Combining photos by using HDR Exposure Merge
You can use Exposure Merge to combine two or more photos by using HDR (high dynamic range) processing.
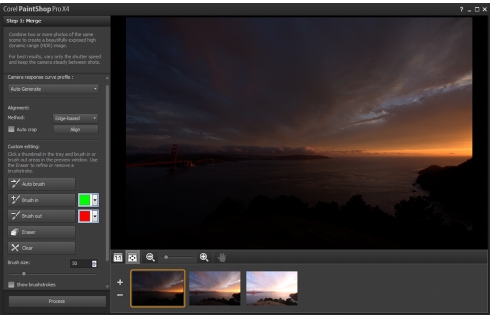
Exposure Merge (Step 1 window)
For more information about taking photos that work well with Exposure Merge, see Taking photos for HDR processing.
Exposure Merge uses a three-step process:
• |
Merge — Choose your merge settings, and if required, apply
custom editing.
|
• |
HDR Adjustments — After merging your photos, you can adjust
them and save the results to an editable HDR file before finalizing
the merge and fine-tuning.
|
• |
Fine-Tune — Refine your image, with noise-reduction and
sharpening options, along with some other familiar tools from the
Adjust workspace. When you’re done, you can save to a standard
file format and close Exposure Merge.
|
Watch a video: HDR Exposure Merge
Please see the topics below for more detailed information about each step.
Step 1: Merge
Merge settings include:
• |
Camera response curve profile — applies a curve adjustment to
the image, based on the known characteristics of the sensor in
your camera
|
• |
Alignment — Choose between Feature-based (detects features in
the photos) or Edge-based (detects edges within the photos).
|
• |
Custom editing — Choose which areas you want to keep (Brush
in) or remove (Brush out) from each photo. Often, custom editing
is applied to remove “ghosting” — the semitransparent effect
caused by merging photos that captured moving objects.
|
Step 2: HDR Adjustments
After you merge your photos, you can adjust the resulting HDR image by applying a preset, customizing a preset, or by creating the look you want from scratch. The key is to experiment. You can save your custom settings as a new preset. You can manage your presets by saving, loading, deleting or resetting them.
All the adjustment options in the HDR Adjustments window let you work on an HDR, 32-bit file. You can save the HDR file with all settings, so you can reopen and modify it again in the future. When you are finished with Step 2 and move to Step 3, the final step, the application prepares the image for output by saving it to a 16-bit image.
Step 3: Fine-Tune
The final step is fine-tuning the merged image before you exit Exposure Merge. The controls in the Fine-Tune window are based on the controls in the Adjust workspace. For more information, see Using the Adjust workspace.
Some fine-tuning tips:
• |
Digital Noise Removal is a great tool for cleaning up noise that can
result from merging photos.
|
• |
High Pass Sharpen can help reduce blurred areas that may result
from movement between photos.
|
• |
Smart Photo Fix and Color Balance let you tweak the colors.
|
• |
To brighten the entire image, try adjusting Brightness/Contrast. To
brighten only the dark areas, try Fill Light/Clarity.
|
• |
Local Tone Mapping and Fill Light/Clarity can be used to further
enhance details in the image.
|
| To choose merge options for Exposure Merge (Step 1) |
1 |
In the Manage workspace, select the thumbnails for the photos
that you want to merge.
|
An orange outline appears around the thumbnails of selected photos. |
2 |
Click File |
3 |
In the Step 1: Merge pane, choose a profile from the Camera
response curve profile drop-list.
|
If you are not sure what to choose, select Auto Generate. |
If the EV interval slider displays, set the exposure value that you used between photos. |
4 |
In the Alignment area, choose an alignment type from the
Method drop-list.
|
If you want to crop any edges that don’t overlap, mark the Auto crop check box. |
5 |
Click Align.
|
You will not see the alignment in the preview area immediately. |
To check the alignment of photos taken without a tripod, click the Process button, review the alignment, and click Back to return to the Step 1 pane. To try a different alignment option, in the Alignment area, click the Reset button, and choose an alignment method. |
6 |
If you want to keep or remove specific areas from individual
photos, use the controls in the Custom editing area. See To brush
in or brush out artifacts in Exposure Merge.
|
7 |
Click Process.
|
The merge settings are applied and the Step 2: HDR Adjustments window appears. |
Review the results in the preview area for alignment issues and ghosting issues. If you want to tweak your merge settings, click Back to return to the Step 1 window. |
HDR Exposure Merge and Photo Blend are part of the same
merge utility and therefore cannot be opened simultaneously.
|
If your photos were not taken with a tripod or steady rest, there
is likely some misalignment between shots. If the misalignment
is significant, you may not be able to use the photos for HDR.
|
You can also add photos to or remove photos from the merge
tray by clicking the Add Photo button |
| To brush in or brush out artifacts in Exposure Merge |
1 |
In the tray that appears below the Step 1: Merge preview area,
click a thumbnail.
|
2 |
In the Custom editing area, do any of the following:
|
• |
Click Brush in, and in the preview area, drag over the area that
you want to preserve. You don't need to be exact.
|
• |
Click Brush out, and in the preview area, and drag over the area
that you want to remove.
|
• |
Click Auto brush if you want the application to auto-detect and
remove ghosting. Auto brush works well for removing ghosting
along feature edges in photos taken without a tripod. It is not
recommended for larger ghost objects, such as cars and people.
|
3 |
Repeat the process for each of the photos that you want to edit.
|
| To adjust HDR images in Exposure Merge (Step 2) |
1 |
In the Step 2: HDR Adjustments window, do any of the following
to achieve the look you want.
|
• |
In the Presets area, click a preset thumbnail.
|
• |
Mark the White Balance check box, and click Auto or click the
Dropper tool |
• |
Drag Contrast, Highlights, Midtones, and Shadows sliders to
adjust the overall tone and contrast.
|
• |
Drag the Vibrancy slider to saturate or desaturate the colors.
|
• |
From the Detail drop-list, choose Natural detail or Creative
detail, and drag the respective sliders to adjust the amount of
local detail.
|
2 |
To save your HDR image for further editing, click Create HDR file,
navigate to the folder you want, type a file name, and click Save.
|
3 |
Click Process.
|
The settings are applied to the image and it is saved as a 16-bit file in preparation for the final output. The Step 3: Fine-Tune window appears. |
| To manage presets in Exposure Merge |
• |
In the Presets area of the Step 2: HDR Adjustments window,
perform a task from the following table.
|
| To fine-tune and save an HDR-processed image (Step 3) |
1 |
In the Step 3: Fine-Tune window, apply any of the tools or
adjustment options to adjust the final image.
|
2 |
Click Save and close.
|
3 |
In the Save As dialog box, navigate to the folder that you want,
type a file name, and choose a file type from the Save as type
drop-list.
|
The file is saved to a standard, 16-bit file and the Exposure Merge window closes. |
When the size of a zoomed-in image exceeds that of the
preview area, you can click the Pan tool |