Working with Overlays
Another feature under the Edit Step is the application of overlay effects. This allows you to add overlay clips to combine with your videos in the Video Track. You can also use an overlay clip to create a picture-within-a-picture effect. You can also use an overlay clip to create a picture-within-a-picture effect, or to add a lower third, which can make your movie production look more professional. Overlay tracks are also used to insert video while keeping the audio from the main track.
To make overlay clips with transparent backgrounds, you can create a 32-bit alpha channel AVI video file or an image file with an alpha channel. You can use programs such as Corel PaintShop Pro and CorelDRAW to create these video and image files.
Another alternative is to use the Mask & Chroma Key function in Corel VideoStudio Pro to make a specific color on an image transparent.
Adding clips to the Overlay Track
Drag media files to the Overlay Track on the Timeline to add them as overlay clips for your project.
| To add a clip to the Overlay Track |
1 |
In the Library, select the media folder that contains the Overlay clip
that you want to add to your project.
|
2 |
Drag the media file from the Library to the Overlay Track on the
Timeline.
|

You can also use color clips as Overlay clips. To add more tracks, see Adding Multiple Tracks. |
3 |
To customize the Overlay clip, click the Attribute tab. The Overlay clip
is then resized to a preset size and positioned at the center. Use the
options in the Attribute tab to apply direction/style to the Overlay
clip, add filters, resize and reposition the clip, and more.
|
Adding Multiple Tracks
You can insert media files on more than one Overlay Track for added impact in your movie. You can either show or hide Overlay Tracks in your project.
| To add multiple tracks |
1 |
Click Track Manager on the Toolbar.
|
2 |
Specify the number of tracks you want to display from the drop-
down list for each track.
|
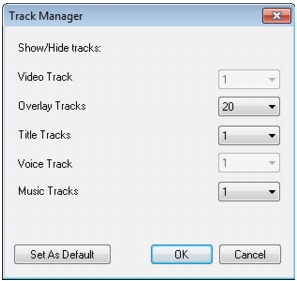
Click Set as Default to save current settings as defaults for all new
projects.
|
You can add up to one Video track, 20 Overlay tracks, two Title
tracks, one Voice track and three Music tracks.
|
In an HTML5 project, you can add up to three Background tracks,
18 Overlay tracks, two Title tracks, one Voice track and three
Music tracks.
|
Working with Overlay clips
Adding multiple Overlay Tracks gives you more creative possibilities for your movie. You can superimpose clips over a background video with portions of the overlay being transparent or add objects and frames to your video. Achieving different effects for your projects is easy when you know how to use Overlay clips and tracks.
Trimming Overlay clips
You trim a clip in the Overlay Track the same way you trim a clip in the Video Track.
| To split a clip in the Video and Overlay Tracks |
1 |
Click Project as the Play mode and drag the slider to the part you
want to cut.
|
2 |
Click the Split Clip button |
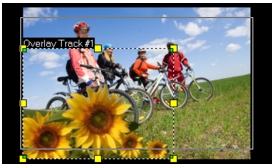
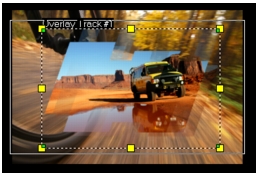
Repositioning the current Overlay clip
| To reposition an Overlay clip |
• |
Do one of the following:
|
• |
Drag the Overlay clip to the desired area on the Preview Window. It
is recommended that you keep the Overlay clip within the title safe
area.
|
• |
In Timeline View, click on the Overlay clip and click Options. In the
Attribute tab, click Alignment Options and choose from a menu of
position options.
|
Resizing an Overlay clip
| To resize an Overlay clip |
• |
In the Preview Window, drag the handles on the Overlay clip to
resize it.
|
If you drag the yellow corner handle, it will keep the aspect ratio when you resize the clip. |
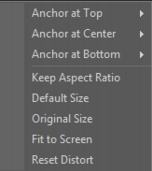
| To specify the alignment and size of the Overlay clip |
• |
Click Alignment Options in the Attribute tab and click your desired
option to achieve your desired effect.
|
This resizes and adjusts the position of the Overlay clip. |
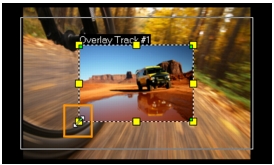
Distorting an Overlay clip
| To distort the Overlay clip |
• |
Drag the green nodes at the corners of the outline box that surround
the Overlay clip.
|
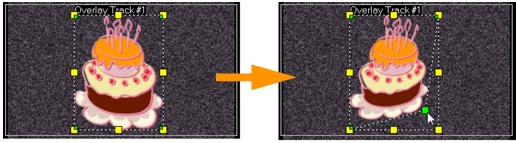
Dragging the green node distorts an overlay clip.
When you select the green node, the cursor becomes a smaller arrow with a small black box at its tail.
Hold [Shift] while dragging the green nodes to keep the distortion
within the outline box of the current clip.
|
Applying motion to an Overlay clip
| To apply motion to an Overlay clip |
1 |
In the Attribute tab, select the direction and style by which the
Overlay clip will move to or from the screen under Direction/Style
option.
|
2 |
Click a specific arrow to set where you want your clip to enter and
exit in your movie.
|
You can rotate the clip or fade it in and out. |
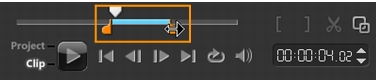
Pause duration determines how long your pause will be in the
designated area before the clip exits the screen. If you applied
motion to the Overlay clip, drag the Trim markers to set the Pause
duration.
|
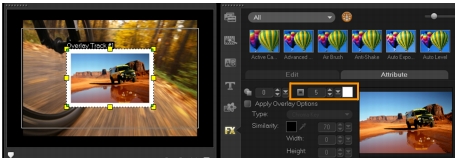
Enhancing Overlay clips
Applying transparency, border, chroma key, and filters can enhance your Overlay clips.
| To apply transparency to an Overlay clip |
1 |
In the Attribute tab, click Mask & Chroma Key.
|
2 |
Drag the Transparency slider to set the opacity of the Overlay clip.
|
| To add a border to an Overlay clip |
1 |
In the Attribute tab, click Mask & Chroma Key.
|
2 |
Click the Border arrow keys to set the thickness of the border for the
Overlay clip.
|
3 |
Click the Border color box located beside the arrow keys to set the
color of the border.
|
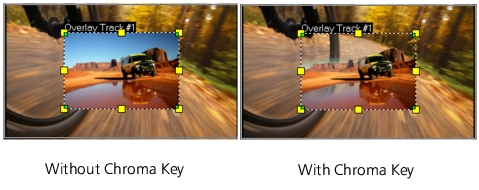
Chroma keying an Overlay clip
Chroma keying makes a particular color in a clip transparent and shows the clip in the Video Track as background.
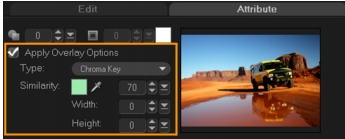
| To specify Chroma Key settings to the current Overlay clip |
1 |
Click Mask & Chroma Key in the Attribute tab.
|
2 |
Click Apply Overlay Options, then choose Chroma Key from the Type
drop-down list.
|
3 |
In the Similarity option, use the eye dropper tool |
4 |
Move the color similarity slider to adjust the range color to be
rendered transparent.
|
You can also crop the overlay clip by setting Width and Height. |
Adding a mask frame
Adding a mask or a matte to an overlay clip applies a shape around it that you can render opaque or transparent.

| To add a mask frame |
1 |
Click Mask & Chroma Key in the Attribute tab.
|
2 |
Click Apply Overlay Options then choose Mask Frame from the Type
drop-down list.
|
3 |
Select a mask frame.
|
4 |
Watch the Preview Window to see how the new settings affect the
image.
|
5 |
To import a mask frame, first create a mask for your project. Click |
You can use any image file for a mask. If your mask is not in the required 8-bit bitmap format, Corel VideoStudio Pro automatically converts the mask. You can use programs such as Corel PaintShop Pro and CorelDRAW to create an image mask. |
|
|
Was this page helpful? Send feedback. (Internet connection required.)
|
Copyright 2012 Corel Corporation. All rights reserved.