Quick links to procedures on this page:
• |
• |
• |
• |
• |
A fountain fill is a smooth progression of two or more colors that adds depth to an object. Fountain fills are also known as gradient fills.
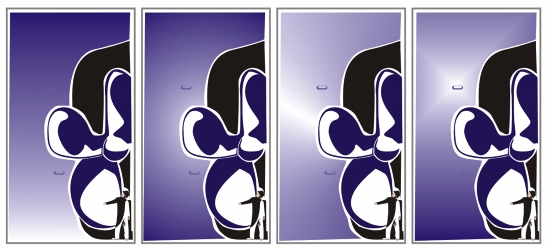
There are four types of fountain fills: linear, radial, conical, and square. A linear fountain fill flows in a straight line across the object, a conical fountain fill creates the illusion of light hitting a cone, a radial fountain fill radiates from the center of the object, and a square fountain fill is dispersed in concentric squares from the center of the object.
There four types of fountain fills (left to right): linear, radial, conical, and square.
You can apply preset fountain fills, two-color fountain fills, and custom fountain fills to objects. Custom fountain fills can contain two or more colors, which you can position anywhere in the fill’s progression. After you create a custom fountain fill, you can save it as a preset.
When you apply a fountain fill, you can specify attributes for the fill type you choose; for example, the direction of a fill’s color blend, the fill’s angle, center point, midpoint, and edge pad. You can also adjust the print and display quality of the fountain fill by specifying the number of fountain steps. By default, the fountain step setting is locked so that the print quality of the fountain fill is determined by the value specified in the print settings and the display quality is determined by the default value you set. However, you can unlock the fountain steps setting when you apply a fountain fill and specify a value that applies to both the print and view quality of the fill. For information about setting fountain fill steps for printing, see Fine-tuning print jobs.
| To apply a preset fountain fill |
1 |
Select an object.
|
2 |
In the toolbox, click the Fountain fill button |
3 |
Choose a fill from the Presets list box.
|
4 |
Specify the settings you want.
|
| To apply a two-color fountain fill |
1 |
Select an object.
|
2 |
In the toolbox, click the Interactive fill tool |
3 |
Choose a fountain fill from the Fill type list box on the property bar.
|
4 |
Open the First fill color picker on the property bar, and click a color.
|
5 |
Open the Last fill color picker on the property bar, and click a color.
|
6 |
Specify the settings you want.
|
You can mix colors in a two-color fountain fill by selecting one of the
interactive vector handles, pressing Ctrl, and clicking a color on the color
palette.
|
You can add a color to a fountain fill by dragging a color from the color palette
to an object’s interactive vector handle.
|
| To apply a custom fountain fill |
1 |
Select an object.
|
2 |
In the toolbox, click the Fountain fill button |
3 |
Choose a fountain fill from the Type list box.
|
4 |
Enable the Custom option.
|
5 |
Click the box at one end of the area just above the color band, and click a color on
the color palette.
|
6 |
Click the box at the opposite end of the area just above the color band, and click a
color.
|
7 |
Specify the attributes you want.
|
You can also apply a custom fountain fill by clicking the Interactive fill tool
|
| To change the fountain fill print and display quality |
1 |
Select an object.
|
2 |
In the toolbox, click the Interactive fill tool |
3 |
Choose a fountain fill from the Fill type list box on the property bar.
|
4 |
Click the Lock fountain steps |
When the Fountain steps box is locked, the number of steps in the printed
fountain fill is determined by the value specified in the Print dialog box. For
information about setting fountain fill steps for printing, see Fine-tuning print
jobs.
|
| To set the display quality for fountain fills |
1 |
Click Tools |
2 |
In the list of categories, double-click Workspace, and click Display.
|
3 |
Type a value in the Preview fountain steps box.
|
|
|
Copyright 2010 Corel Corporation. All rights reserved.