Quick links to procedures on this page:
• |
• |
• |
• |
• |
• |
• |
You can fill objects with two-color, full-color, or bitmap pattern fills.
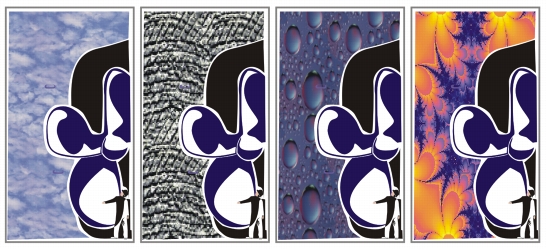
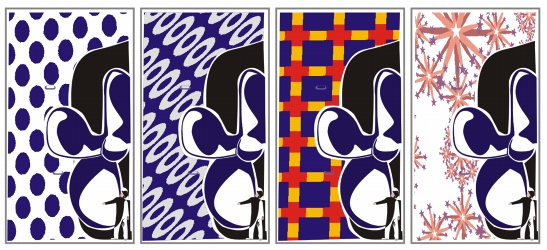
Examples of bitmap pattern fills
A two-color pattern fill is composed of only the two colors that you choose. A full-color pattern fill is a more complex vector graphic that can be composed of lines and fills. A bitmap pattern fill is a bitmap image whose complexity is determined by its size, image resolution, and bit depth.
CorelDRAW provides preset pattern fills that you can apply to objects; however, you can also create your own pattern fills. For example, you can create pattern fills from objects that you draw or images that you import.
You can change the tile size of pattern fills. You can also specify exactly where these fills begin by setting the tile origin. CorelDRAW also lets you offset tiles in a fill. Adjusting the horizontal or vertical position of the first pattern, relative to the top of the object, affects the rest of the fill.
You can choose how the pattern fill appears by specifying whether to mirror the fill so that alternating tiles are the reflections of one another. If you want a pattern fill to change according to actions you perform on the filled object, you can specify that you want it to transform with the object. For example, if you enlarge an object filled with a pattern that transforms, the pattern becomes larger while the number of tiles is not increased.
You can apply a pattern of two colors or many colors to an object.
| To apply a two-color pattern fill |
1 |
Select an object.
|
2 |
In the toolbox, click the Interactive fill tool |
3 |
Choose Two color pattern from the Fill type list box on the property bar.
|
4 |
Open the First fill color picker, and click a pattern.
|
5 |
Open the Front color picker, and click a color.
|
6 |
Open the Back color picker, and click a color.
|
You can also mix colors in a two-color pattern fill by pressing Ctrl and clicking
a color on the color palette.
|
You can mix a color with only one of the colors in the fill by pressing Ctrl and
dragging a color to the interactive handle.
|
| To apply a full-color or bitmap pattern fill |
1 |
Select an object.
|
2 |
In the toolbox, click the Interactive fill tool |
3 |
Choose one of the following from the Fill type list box on the property bar:
|
• |
Full color pattern
|
• |
Bitmap pattern
|
4 |
Open the First fill color picker, and click a pattern.
|
| To create a two-color pattern fill |
1 |
Select an object.
|
2 |
In the toolbox, click the Pattern fill |
3 |
Enable the 2-color option.
|
4 |
Open the following color pickers, and click a color:
|
• |
Front — to choose a foreground color
|
• |
Back — to choose a background color
|
5 |
Click Create.
|
6 |
In the Two-color pattern editor dialog box, enable one of the following options in
the Bitmap size area:
|
• |
16 X 16 — changes the resolution of the Edit grid to 16 x 16 squares
|
• |
32 X 32 — changes the resolution of the Edit grid to 32 x 32 squares
|
• |
64 X 64 — changes the resolution of the Edit grid to 64 x 64 squares
|
7 |
In the Pen size area, enable one of the following options:
|
• |
1 X 1 — changes the pen size to a 1-grid square
|
• |
2 X 2 — changes the pen size to a 2 x 2 square
|
• |
4 X 4 — changes the pen size to a 4 x 4 square
|
• |
8 X 8 — changes the pen size to an 8 x 8 square
|
8 |
Click in the grid to enable a square. If you want to disable a square, right-click the
square.
|
Squares that are enabled form the foreground, and squares that are disabled form the background. |
You can also create a foreground pattern by dragging in the grid.
|
| To create a two-color pattern fill from an image |
1 |
Click Tools |
2 |
Enable the Two-color option.
|
3 |
In the Resolution area, enable one of the following options:
|
• |
Low — creates a low-resolution, two-color pattern
|
• |
Medium — creates a medium-resolution, two-color pattern
|
• |
High — creates a high-resolution, two-color pattern
|
4 |
Click OK.
|
5 |
Select the image or area of the image that you want to use in the pattern.
|
| To create a full-color pattern from an image |
1 |
Click Tools |
2 |
Enable the Full color option.
|
3 |
Click OK.
|
4 |
Select the image or area of the image that you want to use in the pattern.
|
5 |
In the Create pattern dialog box, click OK.
|
6 |
Type a filename for the pattern in the File name box.
|
| To create a pattern fill from an imported image |
1 |
Select an object.
|
2 |
In the toolbox, click the Pattern fill |
3 |
Enable one of the following options:
|
• |
2-color
|
• |
Full-color
|
• |
Bitmap
|
4 |
Click Load.
|
5 |
In the Import dialog box, locate the image you want to use, and double-click the
filename.
|
| To change the size of pattern tiles |
1 |
Select an object.
|
2 |
In the toolbox, click the Pattern fill button |
3 |
Enable one of the following options:
|
• |
2-color
|
• |
Full-color
|
• |
Bitmap
|
4 |
Type a value in any of the following boxes:
|
• |
Width — lets you change the width of a pattern tile
|
• |
Height — lets you change the height of a pattern tile
|
You can also change the size of pattern tiles by clicking the Interactive fill tool
|
You can skew or rotate tiles by clicking the Interactive fill tool |
|
|
Copyright 2010 Corel Corporation. All rights reserved.