
Quick links to procedures on this page:
• |
• |
• |
• |
• |
All CorelDRAW drawings consist of stacked objects. The vertical order of these objects — the stacking order — contributes to the appearance of the drawing. An effective way to organize these objects is by using invisible planes called layers.
Drawings can be assembled by placing objects on various levels or layers.
Layering gives you added flexibility when you organize and edit the objects in complex drawings. You can divide a drawing into multiple layers, each containing a portion of the drawing’s contents. For example, you can use layers to organize an architectural plan for a building. You can organize the building’s various components (for example, plumbing, electrical, structural) by placing them on separate layers.
By default, all content is placed on a layer. Content that applies to a specific page is placed on a local layer. Content that applies to all pages in a document can be placed on a global layer called a master layer. Master layers are stored on a virtual page called the Master Page.
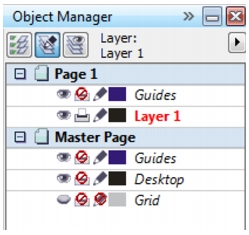
The Object manager docker displays the default layer structure.
Each new file is created with a default page (Page 1) and a Master Page. The default page contains a Guides layer and Layer 1. The Guides layer stores page-specific (local) guidelines. Layer 1 is the default local layer. When you draw objects on the page, the objects are added to this layer unless you choose a different layer.
The Master Page is a virtual page that contains the information that applies to all pages in a document. You can add one or more layers to a master page to hold content such as headers, footers, or a static background. By default, a master page contains the following layers:
• |
Guides — contains the guidelines that are used for all pages of the document
|
• |
Desktop — contains objects that are outside the borders of the drawing page. This
layer lets you store objects that you may want to include in the drawing at a later
time.
|
• |
Grid — contains the grid that is used for all pages of the document. The grid is
always the bottom layer.
|
The default layers on the master page cannot be deleted or copied. Layers that you add to the master page appear at the top of the stacking order unless the stacking order is changed in the Layer manager view in the Object manager docker.
To add content to a layer, you must first select the layer so that it becomes the active layer.
You can choose from different views that let you display pages, layers, or all the objects in your document. The view you choose depends on the complexity of your document and the task you are performing. For example, in a long multipage document, you can choose a pages-only view so that you can navigate more easily and view only one page at a time. The Layer manager view lets you view and reorder all the layers that affect the current page, including the master layers.
For information about how facing page views affect layers, see To view facing pages.
For information about how layers are affected when you save a file to an earlier version of CorelDRAW, see To save a drawing.
| To create a layer |
1 |
Click Tools |
2 |
Perform a task from the following table.
|
To use a layer in the drawing, you must first make the layer active by clicking
the layer name in the Object manager docker. The layer name appears in a
red bold font to indicate that it is the active layer. When you start a drawing,
the default layer (Layer 1) is the active layer.
|
Master layers are always added to the master page. Content added to these
layers is visible on all pages of the document.
|
You can also add a layer by clicking the New layer button |
You can make any layer a master layer by right-clicking the layer name, and
clicking Master.
|
| To make a layer active |
1 |
Click Tools |
2 |
In the Object manager docker, click the layer name.
|
The layer name appears in a red bold font to indicate that it is the active layer. |
By default, the active layer is Layer 1.
|
The name of the active layer, as well as the currently selected object, appears
in the status bar at the bottom of the application window.
|
| To display pages, layers, and objects in the Object Manager docker |
1 |
Click Tools |
2 |
Perform a task from the following table.
|
The name of the active layer, as well as the currently selected object, appears
in the status bar at the bottom of the application window.
|
If you want to view a document that has facing pages, see To view facing pages.
|
| To delete a layer |
1 |
Click Tools |
2 |
Click the name of a layer.
|
3 |
Click the flyout button |
When you delete a layer, you also delete all the objects on it. To preserve an
object, move it to a different layer before you delete the current layer.
|
You can delete any unlocked layer except the following default layers: Grid,
Desktop, and Guides. For more information about locking and unlocking
layers, see To set the editing properties of a layer.
|
You can also delete a layer by right-clicking the layer name in the Object
manager docker and choosing Delete.
|
| To specify settings for a layer on the master page |
1 |
Click Tools |
2 |
Right-click the layer, and click Properties.
|
|
|
Copyright 2010 Corel Corporation. All rights reserved.