Edit symmetry
You can edit symmetry groups in any of the following ways: by editing the objects in the symmetry group; by adding, repositioning, and rotating symmetry lines; and by editing the symmetry group as a single entity.
When editing a symmetry group, you can preview only the outline of object copies for faster rendering. This view makes it easy to identify the primary objects. You can also preview the object copies as full objects with the same fills, outlines, and effects that are applied to the primary objects. You can toggle quickly between the two preview modes. To evaluate the results more easily, you can also hide the symmetry lines.
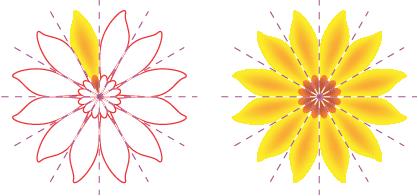
Previewing object copies as outlines (left) and full objects (right)
You can use the Pick tool ![]() and Shape tool
and Shape tool ![]() to modify the objects in a symmetry group. When you reshape the primary objects with the Shape tool, the vector previews appear in the default main color, and the object copy outlines appear in the default secondary color. For information about these preview colors and how to change them, see Options for nodes, handles, and previews.
to modify the objects in a symmetry group. When you reshape the primary objects with the Shape tool, the vector previews appear in the default main color, and the object copy outlines appear in the default secondary color. For information about these preview colors and how to change them, see Options for nodes, handles, and previews.

The vector previews of the primary objects appear in the default main color when you are reshaping objects with the Shape tool.
You can apply fills, effects, and transparencies to the primary objects. Any changes you make to the primary objects are reflected in the object copies. You can add objects to the symmetry group, and you can delete objects you no longer need. In addition, you can drag objects into a symmetry group even if the group is not in Edit symmetry mode.

Modifying the symmetry lines affects how the elements in the symmetry group are positioned and oriented. You can add more symmetry lines for more object copies. In addition, you can move the symmetry lines to increase or decrease the distance between the primary objects and object copies; and you can rotate the symmetry lines. For more information, see To set up the planes of symmetry.

Move the symmetry line to change the distance between primary objects and object copies.

As with any group of objects, you can move, rotate, and scale the symmetry as a single entity, preserving the spacial relationship between its elements. You can also apply fills and transparencies to the entire symmetry group, and you can modify the outline properties.
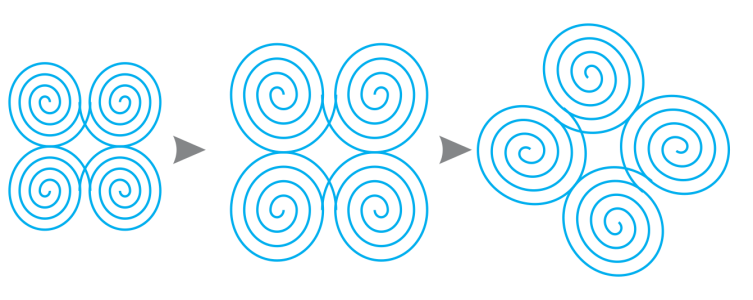
The symmetry group on the left is scaled (middle) and then rotated (right) with the Pick tool.
When you are editing a symmetry group, it is easy to snap objects to the symmetry line because the View ![]() Snap to
Snap to ![]() Symmetry Lines command is enabled by default. This feature helps you fuse open curves and create closed shapes in your symmetrical design. If you don’t want the objects you edit to snap to the symmetry line, you can disable snapping to symmetry lines.
Symmetry Lines command is enabled by default. This feature helps you fuse open curves and create closed shapes in your symmetrical design. If you don’t want the objects you edit to snap to the symmetry line, you can disable snapping to symmetry lines.
To edit the objects of a symmetry group
You can start editing a symmetry group by double-clicking it or by clicking Object ![]() Symmetry
Symmetry ![]() Edit Symmetry.
Edit Symmetry.
You can also enter the Edit Symmetry mode by clicking a selected symmetry group while holding down Command.
You can also finish editing a symmetry group by clicking Object ![]() Symmetry
Symmetry ![]() Finish Editing Symmetry.
Finish Editing Symmetry.
To drag an object into a symmetry group that contains objects
To drag an object into an empty symmetry group
To edit a symmetry group as a single entity
|
Double-click the Outline icon
|


To preserve the symmetry, skewing and stretching a symmetry group are not allowed.
You can move, scale, and rotate a symmetry group with precision by using the controls on the property bar.
To disable snapping to symmetry lines
Disabling snapping to symmetry lines makes it difficult to fuse curves in symmetry groups.
For more information about snapping options, see Snap objects.