Contour objects
You can contour an object to create a series of concentric lines that progress to the inside or outside of the object. CorelDRAW also lets you set the number of the contour lines and the distance between them.
In addition to creating interesting 3D effects as well as shading in complex illustrations, you can use contours to create cuttable outlines for output to devices such as plotters, engraving machines, and vinyl cutters.
After contouring an object, you can copy or clone its contour settings to another object. You can also change the colors of the fill between the contour lines and the contour outlines themselves. You can set a color progression in the contour effect, where one color blends into another. The color progression can follow a straight, clockwise, or counterclockwise path through the color range of your choice.
You can also choose how contour corners appear. For example, you can use pointed or rounded corners, or you can bevel (square off) sharp contour corners.
You can separate an object from its contour lines.

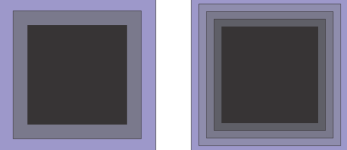
A center contour has been applied to the above object. The number of contour lines, as well as the distance between lines, can be changed.

An outside contour has been applied to the above object. Note that an outside contour projects from the outside edge of the object.
When an object with a contour effect is brought into Focus mode, the object and the effect are brought into focus together. Once in Focus mode, you can select and edit the object and the effect separately. For more information about Focus mode, see Edit objects in Focus mode.
To contour an object
|
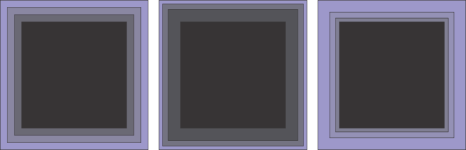
Left to right: Inside contour without acceleration, with lower acceleration, with higher acceleration |
|
You can create contours by clicking Effects ![]() Contour (the second Contour command in the Effects menu) and specifying the settings you want in the Contour docker.
Contour (the second Contour command in the Effects menu) and specifying the settings you want in the Contour docker.
To copy or clone a contour
You can also use the Attributes eyedropper tool ![]() to copy a contour. For more information, see To copy effects from one object to another.
to copy a contour. For more information, see To copy effects from one object to another.
To set the fill color for a contour object
You can accelerate the fill color progression by clicking the Object and color acceleration button ![]() on the property bar and moving a slider.
on the property bar and moving a slider.
You can change the contour center’s color by dragging a color from the color palette to the end fill handle.
To specify an outline color for the contour object
To set the fill progression

Fill progression from left to right: Linear, clockwise, counterclockwise