Edit perspective groups
You can edit perspective groups by moving and editing the objects in the group, and by adding objects.
You can move, rotate, and scale objects within a perspective group. Also, you can move an object in a perspective group from one plane to another to change its view. For example, you can place the object on the orthographic plane to remove the perspective, or you can move an object from the top plane to a side plane, and vice versa. You can also move objects from the orthographic plane to any available perspective plane.
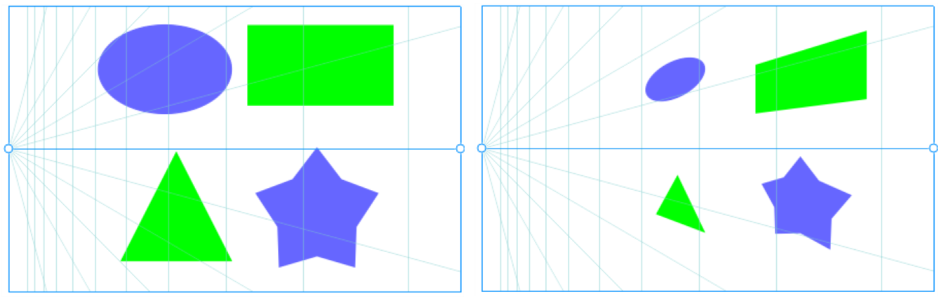
The objects are moved from the orthogonal plane (left) to the left plane (right).
While you are in Edit mode, you can add existing objects, such as vector shapes, text and bitmaps, to the perspective group by moving them to a plane. Text added to perspective groups isn’t converted to curves, so you can edit and reformat it.
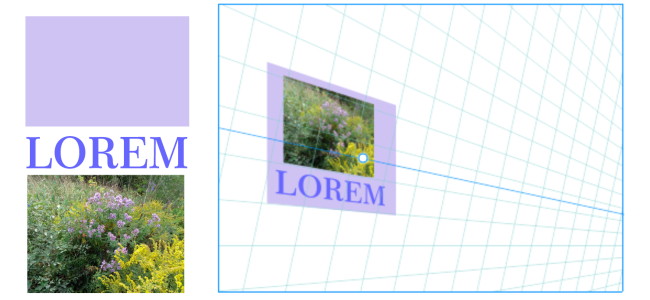
A rectangle, a text object, and a bitmap (left) were moved to the right plane (right) and are now included in the perspective group.
You can also shape and edit the objects in a perspective group by using the Shape tool. When you draw and edit objects in a perspective group, snapping to perspective lines (View ![]() Snap To
Snap To ![]() Perspective Lines) is enabled by default. If you want to snap objects only to guidelines, you can disable snapping to perspective lines. For more information about using guidelines to help with object placement, see Set up guidelines.
Perspective Lines) is enabled by default. If you want to snap objects only to guidelines, you can disable snapping to perspective lines. For more information about using guidelines to help with object placement, see Set up guidelines.
You can move and scale proportionally perspective groups as you would any other groups. However, perspective groups can’t be resized nonproportionally, rotated, or skewed.
In addition, you can modify the appearance of the perspective field in each perspective group. For example, you can hide and show horizon and perspective lines, and you can customize the color of the lines and adjust their opacity. Adjusting the line color and opacity can help you focus on the objects you draw; conversely, it can make the lines and handles stand out so that you can adjust the perspective field more easily.
Depending on the drawing precision you want, you can adjust the density of the perspective field by adding or removing perspective lines.
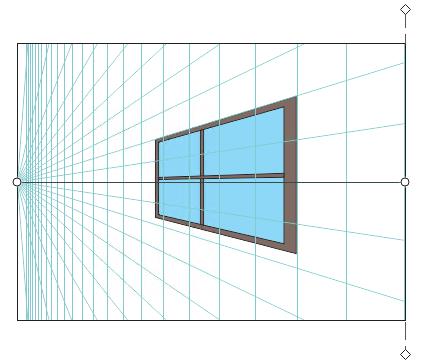
The perspective field is customized by changing the color of the horizon line and viewport, and increasing the number and opacity of the perspective lines.
To edit a perspective group
Perspective groups cannot be edited when Focus mode is activated. For more information about Focus mode, see Edit objects in Focus mode.
You can start editing a selected perspective group by clicking Object ![]() Perspective
Perspective ![]() Edit Perspective Group.
Edit Perspective Group.
You can also right-click a perspective group, and click Edit Perspective Group.
To reshape an object placed on a perspective plane
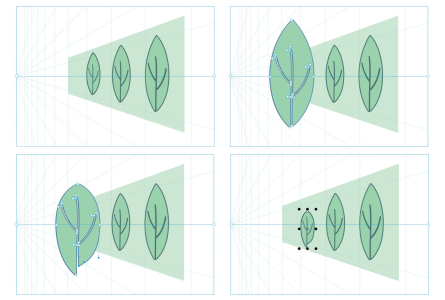
Some objects are drawn on a perspective plane (upper-left). When clicked with the Shape tool, the first object is temporarily placed on the orthographic plane (upper-right). The Shape tool is used to edit the shape (lower-left). When the Pick tool is selected, the edited object is automatically placed back on the perspective plane (lower-right).
To edit text placed on a perspective plane
To move or scale a perspective group
Perspective groups can’t be resized nonproportionally, rotated, or skewed. To apply any of these transformations to a perspective group, you must break it apart first. For more information, see Break perspective groups apart.