Prepare a data source file
The first step in the print merge process is to prepare the data source file. Information in a data source file is organized into columns, fields, and records. A field refers to a single unit of data within a record, while a column refers to a set of related fields that share the same data type and format. A record can have one or more columns.
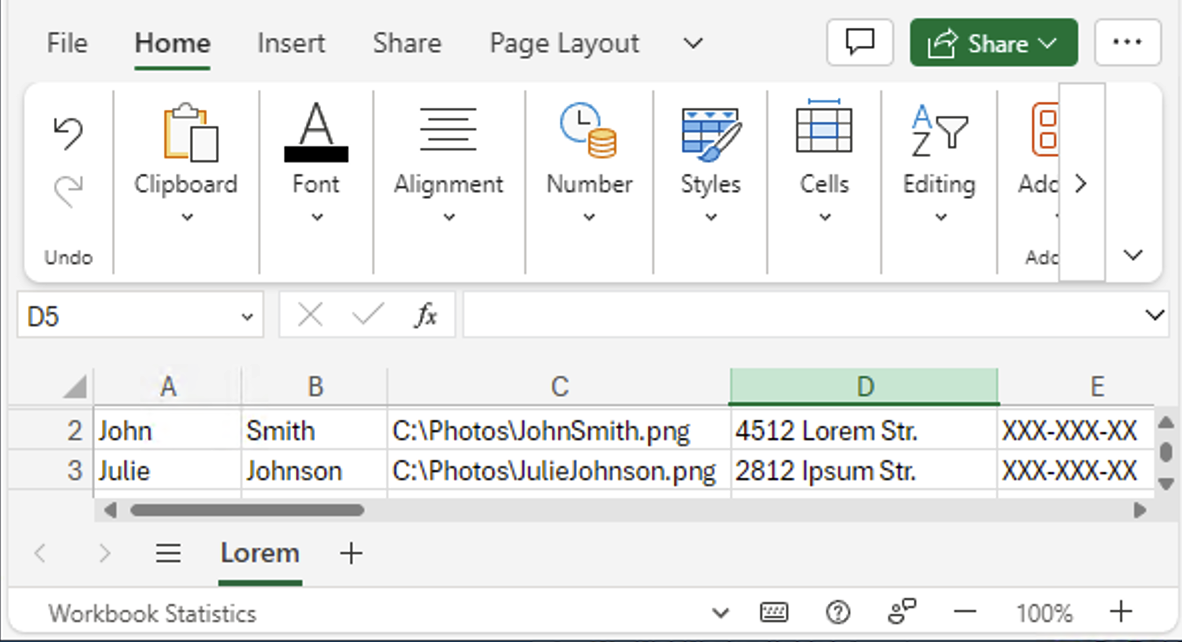
In this example of an Excel Workbook (XLSX) data source file, every record includes a first name, last name, photograph, address, and phone number. Each item within a column, such as ‘4512 Lorem Str.’ and ‘2812 Ipsum Str.’, is recognized as a field.
You can create a data source or import an existing one. CorelDRAW supports the following data source files: Text (TXT) files, comma-separated values (CSV) files, Rich Text Format (RTF) files, Excel Workbook (XLSX) files, and files that can be opened by means of an ODBC data source.
Create data source files in CorelDRAW
Columns can contain several types of data, including text, numeric values, or file paths.
Text data consists of both alphabetic or numeric characters, such as names, addresses, phone numbers, or email addresses.
Numeric data includes any type of numerical values, such as integers or decimal numbers. You can choose formatting options for numeric fields and set them to increment automatically when values are added.
In path columns, you can specify file paths for image assets, such as logos, icons, or photographs. You can enter a path manually or browse for a file. If you enter paths manually, make sure you follow the file system location conventions and rules of your operating system. The application supports only valid file paths on local and network drives, and not URLs.

When you access the Configure Data Source dialog box or sync with the data source, the application validates the paths. An "X" before a filename indicates that a file path is invalid, or the file cannot be found in the specified location.
CorelDRAW lets you add, delete, and rename columns. When you add a column manually, there are no records by default. If you want to automatically populate a column with data, you can import the column from a data source file. For more information about importing columns, see To import a column from a data source file.
You can add and delete records, and edit fields in records. All records are selected by default; however, if you want to use only the data from specific records, you can quickly deselect all records, and then select only the ones you need. In addition, you can add a record to the list of selected records when browsing records in single-record view (View Single Record).
Depending on your preferences and requirements, you can view one record or multiple records at a time. If you need to scan through the entire dataset or compare information across different records, you can use the viewing mode that displays all records (View All Records). When you need to focus on a specific record in detail, the single record viewing mode (View Single Record) provides a clean and uncluttered interface, minimizing distractions from other records.
CorelDRAW offers several methods for navigating and locating records. To quickly find the information you need, you can scroll through records, browse through a list, or directly go to a specific record.
You can quickly remove all merge data if needed. This can be helpful when you want to reset the document to its original state and start from scratch. It offers convenience and efficiency by providing a quick and easy way to clear the merge data without manually deleting each individual record and column.
Create data source files in a text editor
You can create a data source in a text editor. If you plan to export to Rich Text Format (RTF), ensure that the text editor supports saving files in RTF format. Open a new file and indicate the number of columns you want to include on the first line. For example:
On the second line, specify the names of the columns by separating them with a backslash. Each column must begin and end with a backslash. To indicate that a column contains file paths, pre-pend the "at" (@) symbol before the column name. For example:
\Name\\Date\\Instructor\\@Photo\
On the next lines, enter the data that you want to appear in the merged document. Each line constitutes a record. For example:
\Pixie Parsons\\6 September 2023\\Mr. Randy Harris\\"C:\Users\admin\Documents\UserProfilePictures\RandyHarrisPicture.jpg"\
Once you add the information you need, save the file as an ANSI text file (.TXT extension) or as an RTF file. Below is an example of a TXT or RTF data source:
\Name\\Date\\Instructor\\@Photo\
\Pixie Parsons\\6 September 2023\\Mr. Randy Harris\\"C:\Users\admin\Documents\UserProfilePictures\RandyHarrisPicture.jpg"\
\Shirley Wilkinson\\13 January 2023\\Ms. Corinne Pitts\\"C:\Users\admin\Documents\UserProfilePictures\CorinnePittsPicture.jpg"\
In comma-delimited (CSV) files, fields are separated by commas or tabs, records are separated by paragraph breaks. For example:
Pixie Parsons,6 September 2023,Mr. Randy Harris,"C:\Users\admin\Documents\UserProfilePictures \RandyHarrisPicture.jpg"
Shirley Wilkinson,13 January 2023,Ms. Corinne Pitts,"C:\Users\admin\Documents\UserProfilePictures\CorinnePittsPicture.jpg"
You can also create a data source in a spreadsheet application, such as Microsoft Excel. To indicate that a column contains file paths, pre-pend the "at" (@) symbol before the column name preceded by the single quote (or apostrophe) symbol "’" as an escape character. For example:
Import and sync with data source files
If you prefer to create and modify the data source in a text editor or spreadsheet application, you can import it into CorelDRAW and synchronize it as needed. The application maintains a link to the data source file and lets you update the data in your project with the latest changes from the source. If a data source file is missing, you have the option to link to a new location or use the embedded data instead. When you synchronize, any manual modifications to the data, including adding, deleting, or editing columns, are not retained. To keep the changes, you can either save the data to a new file or overwrite the linked data source file.
Apart from importing a data source file, you can selectively bring in data from specific columns. This allows you to choose and merge data from diverse sources, expanding your possibilities. When deciding between importing a data source or single columns, consider your specific needs. Importing the entire data source is an ideal choice when all the required information is contained within a single source. The ability to sync the data in your document with any subsequent changes made to the source is particularly beneficial if you anticipate future modifications to the data source, as it enables you to maintain up-to-date information in your project. By choosing to import individual columns, on the other hand, you attain the benefits of focused selection and increased versatility in merging data from various sources. It is important to note that while the syncing functionality is not available in this scenario, the ability to combine data elements according to your preferences and requirements adds valuable flexibility to your workflow. Moreover, you have the option to export the data to a new file and conveniently link to it if needed.
When you create a data source in CorelDRAW, you can save it to a new file which can be helpful for accessing and managing the data in a text editor or spreadsheet application. If you want to overwrite an existing file, make sure the file is not read-only. You can save all records or only selected records.
Whether you create a data file in CorelDRAW or import an existing data file into CorelDRAW, by default, the data is saved in your document and is retained until you perform the data merge. You can choose not to store the data with documents.
To create a data source file by using CorelDRAW
To export a data source
To create a data source by using a text editor
To import a data source file
To ensure the correct rendering of characters in print merge data when importing TXT or CSV files, it is recommended to include a BOM (Byte Order Mark).
Empty columns are ignored on import.
When you import a data source file that contains paths, the application validates the paths. If a file cannot be found in a specified location, an "X" appears before the filename.
To import a column from a data source file
Columns must have unique names.
After importing the columns you need, you can save the data to a new file and link to it if needed. For information about saving data source files, see To export a data source.
To import an ODBC data source file
To sync linked data with the latest version of the data source
The Sync with data source button appears grayed out when there is no data source linked to a drawing. After you import a data source, the tooltip of the Sync with data source button ![]() shows the location of the data source.
shows the location of the data source.
When changes are made to the data source, such as updating its contents or renaming or moving the file to a new location, the Sync with data source button ![]() indicates the availability of a more recent version or denotes that the application is unable to access the data source.
indicates the availability of a more recent version or denotes that the application is unable to access the data source.
To save merge data in or remove merge data from a document
If you choose not to save print data in a drawing, any data fields that you may have added in the form document are retained.