Snap objects
When you move or draw an object, you can snap it to another object in a drawing. You can snap an object to various snap points on the target object. When you move the pointer close to a snap point, the snap point becomes highlighted, which identifies it as the pointer’s snapping target.
You can snap objects to other objects, to page elements (such as the center of the page), to the document grid, pixel grid, baseline grid, and guidelines. When you edit or draw in perspective, you can snap objects to perspective lines. When editing symmetry groups, you can also snap objects to symmetry lines. All these snapping options can be turned on or off from the View menu and from the Snap to button on the standard toolbar.
When you need to turn off the selected snapping options temporarily, you can disable all snapping from the Snap off button on the standard toolbar or the View menu. To restore the selected snapping options, you can enable snapping by using the same controls.
To snap an object to another object with greater precision, you can first snap the pointer to a snap point in the object, and then snap the object to a snap point in the target object. For example, you can snap the pointer to the center of a rectangle, drag the rectangle by the center, and then snap the rectangle to the center of another rectangle.
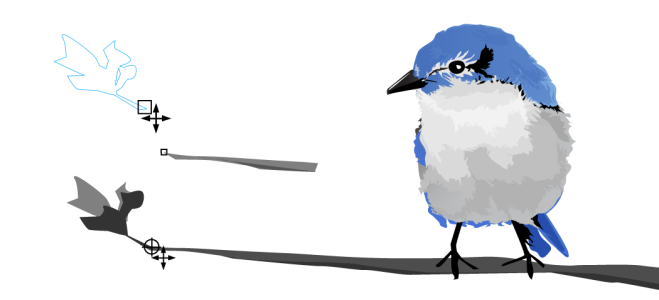
The pointer was snapped to an end node of the leaf (top), and then the leaf was dragged to snap to the end node of the branch (bottom).
Snapping modes determine which snap points you can use in an object. The table below includes descriptions of all available snapping modes.
You can adjust a number of snapping settings. For example, you can disable some or all snapping modes to make the application run faster. You can also set a snapping threshold, which specifies the distance from the pointer at which a snap point becomes active.
When you move or transform an object, the pointer may snap to a snap point in the object itself. You can disable snapping of objects to their own snap points, which is useful for moving and transforming complex objects.
To turn snapping on or off
|
This option is available only when pixel view is enabled. For more information, see Viewing modes.
|
|
|
For more information, see Document grid and pixel grid.
|
|
|
For more information, see Baseline grid.
|
|
|
For more information, see Set up guidelines.
|
|
|
This option is available only when you draw or edit perspective groups. For more information, see Edit perspective groups.
|
|
|
This option is available only in symmetry mode. For more information, see Edit symmetry.
|
A check mark next to the snap command indicates that snapping is turned on.
You can also press Alt + Z to toggle snapping to objects on and off, or press Alt + Y to toggle snapping to the document grid on and off.
You can also turn snapping modes on or off from the Snap To button on the standard toolbar.
To disable and enable snapping
You can also disable and enable all selected snapping options by pressing Alt + Q or by clicking the Snap Off button ![]() on the standard toolbar.
on the standard toolbar.
To temporarily disable snapping as you are moving an object, hold down Q.
To snap objects
To snap an object as you draw it, drag in the drawing window until the snap point in the target object becomes highlighted.