Use projected drawing modes
You can specify a projected drawing mode by choosing drawing profiles and drawing planes from the Drawing Plane toolbar. However, you can have only one drawing profile and one drawing plane active at a time.
You can draw an object in a projected drawing mode, or you can project an object onto a drawing plane by using the Shift key or the controls in the Transform docker. You can also unproject an object from a drawing plane; this reconstructs the object as it would appear in an orthographic view.
To hide or show the Drawing Plane toolbar

•
Click
View  Toolbars Drawing Plane
.
A check mark beside the
Drawing Plane command indicates that the
Drawing Plane toolbar is displayed.
The
Drawing Plane toolbar is displayed by default and appears as part of the standard toolbar.

You can also hide or show the Drawing Plane toolbar by right-clicking any control on the standard toolbar and clicking Drawing Plane.
To choose a preset drawing profile
•
From the
Drawing profiles list box on the
Drawing plane toolbar, choose one of the following preset
drawing profiles:
•
Cabinet oblique (0, 90, 60)•
Cavalier oblique (0,90,45)To choose a drawing plane
•
On the
Drawing Plane toolbar, choose one of the following
drawing planes:
•
Orthographic 
•
Top 
•
Front 
•
Right 
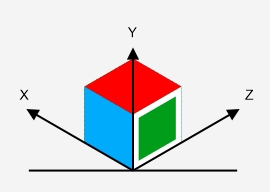
You can also choose the active drawing plane by clicking the cube in the Projected Axes docker (Window Projected Axes).
To draw an object in a projected drawing mode
1
From the
Drawing profiles list box on the
Drawing Plane toolbar, choose a
drawing profile.
2
On the
Drawing Plane toolbar, choose the
Top,
Front, or
Right drawing plane.
If you need to define a custom drawing plane, see Define a projected drawing plane interactively.
To project an object onto a drawing plane by using Shift
2
Holding down
Shift, click one of the following buttons on the standard toolbar:
•
Top — projects the object onto the top plane
•
Front — projects the object onto the front plane
•
Right —projects the object onto the right plane
You can also project a selected object from the Projected Axes docker (Window Projected Axes) by holding down Shift and clicking a plane on the interactive cube.
To unproject an object by using Shift
2
Holding down
Shift, click the
Orthographic button
on the standard toolbar.
You can also unproject an object from the Projected Axes docker (Window Projected Axes) by holding down Shift and clicking outside the interactive cube.
To project an object onto a drawing plane using the Transform docker
2
Click
Object Transform Project.
3
In the
Transform docker, click one of the following buttons in the
Plane area:
•
Top — projects the object onto the top plane
•
Front — projects the object onto the front plane
•
Right — projects the object onto the right plane
4
To specify an origin point on the drawing around which to project the selected object, do one of the following:
•
Type values in the
X and
Y boxes to specify coordinates along the horizontal and vertical axes.
•
Click the
Specify point button

next to the
X and
Y boxes, and click a point on the drawing.
•
Enable the
Relative Position check box, and click the point on the origin locator

that corresponds to the point on the object from which you want to project the object.
If you want to leave the original object unchanged and apply the transformation to a copy, type
1 in the
Copies box. The number of copies cannot exceed one.

Applying a contour to a projected object may not produce the desired results. It is recommended that you apply a contour to the object in its unprojected state and then project the object. Contour groups can be unlinked by clicking Arrange Break Contour Apart.
To unproject an object from a drawing plane using the Transform docker
2
Click
Object Transform Project.
3
In the
Transform docker, click one of the following buttons in the
Plane area:
•
Top — unprojects the object from the top plane
•
Front — unprojects the object from the front plane
•
Right — unprojects the object from the right plane
4
To specify an origin point in the drawing around which to unproject the selected object, do one of the following:
•
Type values in the
X and
Y boxes to specify coordinates along the horizontal and vertical axes.
•
Click the
Specify point button
next to the
X and
Y boxes, and click a point on the drawing.
•
Enable the
Relative Position check box, and click the point on the origin locator
that corresponds to the point on the object from which you want to unproject the object.
If you want to leave the original object unchanged and apply the transformation to a copy, type
1 in the
Copies box. The number of copies cannot exceed one.