Transform objects


You can change the appearance of objects by using the following transformations.


Transformation
Description
Sizing
Lets you change the width and height of an object
Scaling
Lets you size an object to a percentage of its original size
Rotating
Lets you turn an object around its center of rotation
Flipping (mirroring)
Lets you create a horizontal or vertical mirror image of an object
Skewing
Lets you slant an object to one side
Distorting
Lets you stretch an object disproportionately
Applying perspective
Lets you give an object the appearance of depth

You can apply freeform transformations in the image window or manually adjust settings for more precise results.

You can apply transformations to a single object or multiple objects simultaneously.

 
Transformation
Applied to objects in an image

Sizing and scaling

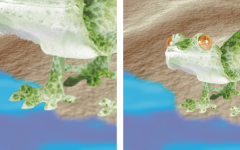
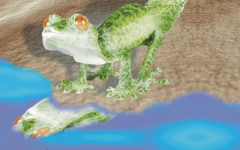
The photo object is scaled down to fit onto the background image.

Flipping

The object is flipped to create a reflection.

Rotating

The reflection is rotated.

Skewing

The reflection is skewed to create a realistic angle.

Distorting

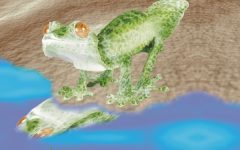
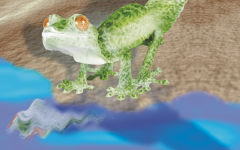
The shadow is distorted to indicate the direction of a light source.

Perspective

A second shadow is added and modified.

To size an object

Back to Top
1 Select an object.
2 Click the Position and size button on the property bar.
3 Drag any of the handles on the bounding box.
If you want to cancel the transformation, double-click outside the object.
4 Click Apply on the property bar.

*

You can resize the object from the center by holding down Shift as you drag any of the handles.

You can also change the size of a selected object by typing values in the Size boxes, and clicking Apply on the property bar.

To scale an object

Back to Top
1 Select an object.
2 Click the Scale button on the property bar.
3 Drag a corner handle on the bounding box.
If you want to cancel the transformation, double-click outside the object.
4 Click Apply on the property bar.


You can also
Scale an object with precision
On the property bar, type percentage values in the Scale boxes and click Apply.
Scale an object while preserving the ratio of width and height
Click the Maintain ratio button on the property bar.
Scale an object from the center
Hold down Shift as you drag a corner handle.

*

When you scale, skew, or rotate an object, its edges can appear jagged. For this reason, these transformation modes enable anti-aliasing by default.

To rotate an object

Back to Top
1 Select an object.
2 Click the Rotate button on the property bar.
3 Drag a rotation handle on the bounding box.
If you want to cancel the transformation, double-click outside the object.
4 Click Apply on the property bar.


You can also
Rotate an object by a specific angle
Type a value in the Angle of rotation box on the property bar, and then click Apply.
Constrain the rotation to 15-degree increments
Hold down as you drag a corner handle.
Change the pivot point
Drag the object’s center of rotation to a new location or type a value in the Center of rotation box on the property bar.

*

When you scale, skew, or rotate an object, its edges can appear jagged. For this reason, these transformation modes enable anti-aliasing by default.

*

You can also switch to rotate mode by clicking an object twice. As you cycle through the transformation modes, the handles surrounding an object will change to indicate the active mode.

To flip an object

Back to Top
1 Select an object.
2 Hold down Ctrl, and drag a middle handle on the highlighting box across the object, past the middle handle on the opposite side.
If you want to cancel the transformation, double-click outside the object.
3 Click Apply on the property bar.

*

You can flip a selected object disproportionately by not holding down Ctrl while dragging a middle handle of the highlighting box across the middle handle on the opposite side.

You can also flip a selected object by clicking Object Mirror Horizontally or Object Mirror Vertically.

To skew an object

Back to Top
1 Select an object.
2 Click the Skew button on the property bar.
3 Drag a skewing handle on the bounding box.
If you want to cancel the transformation, double-click outside the object.
4 Click Apply on the property bar.

*

When you scale, skew, or rotate an object, its edges can appear jagged. For this reason, these transformation modes enable anti-aliasing by default.

*

You can also skew an object by typing values in the Skew angle boxes on the property bar and clicking Apply.

To distort an object

Back to Top
1 Select an object.
2 Click the Distort button on the property bar.
3 Drag a distortion handle on the bounding box.
If you want to cancel the transformation, double-click outside the object.

*

You can also switch to distort mode by clicking an object two times. As you cycle through the transformation modes, the handles surrounding an object will change to indicate the active mode.

To apply perspective to an object

Back to Top
1 Select an object.
2 Click the Perspective button on the property bar.
3 Drag a perspective handle on the bounding box.
If you want to cancel the transformation, double-click outside the object.

*

You can also switch to perspective mode by clicking an object three times. As you cycle through the transformation modes, the handles surrounding an object will change to indicate the active mode.

Was this page helpful? Send feedback.


The features documented in the Help are available in the full version of CorelDRAW Graphics Suite 2021. Some features may not be available in this version of the product.