Quick links to procedures on this page:
• |
• |
• |
• |
• |
When you start a new image, an empty color palette, named the Image palette, appears in the image window. Every time you use a color in your image, it’s automatically added to the Image palette. However, if you prefer to control which colors are added to the Image palette, you can disable the automatic updates and add colors manually.
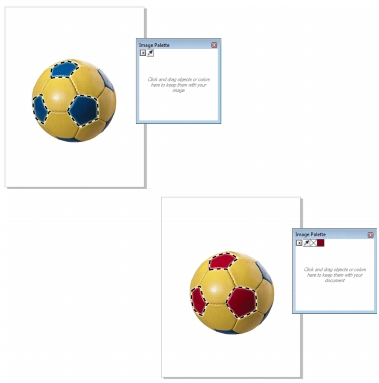
An example of the Image palette before (above) and after (below) colors are added to an image.
You can add colors from a color palette, an external image, a color picker, or a color-related dialog box, such as the Uniform fill color dialog boxes. In addition, you can add colors from an imported image or object.
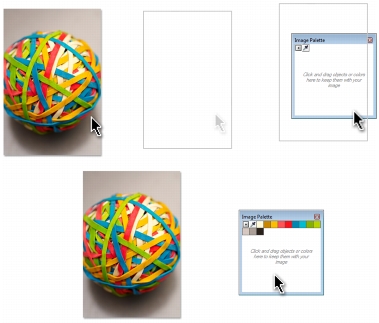
Drag an image or object to the Image palette to add colors.
You can clear the Image palette of any unwanted or unused colors by removing colors individually or resetting the palette to remove all unused colors at once.
When you open an image that was created in a previous version of Corel PHOTO-PAINT, the Image palette does not contain any colors. However, you can easily build the Image palette by adding colors from the entire image, an editable area, or a selected object.
You can also hide the Image palette.
| To disable the automatic adding of color to the Image palette |
• |
In the top left corner of the Image palette, click the flyout |
You can also disable the automatic adding of color by clicking Tools |
| To add a color to the Image palette |
|
To
|
Do the following
|
|---|---|
|
Add all colors from an image
|
In the top left corner of the Image palette, click the flyout button, and click Add colors from image.
|
|
Add a color from an image
|
In the Image palette, click the Eyedropper tool, and click the image.
|
|
Add multiple colors from an image
|
In the Image palette, click the Eyedropper tool, hold down Ctrl, and click the image until you add the colors that you want.
|
|
Add the dominant colors from an object or image by dragging
|
With the object or image open in the image window, drag the object or image to the Image palette.
|
|
Add colors from an editable area
|
Define an editable area. In the top left corner of the Image palette, click the flyout button, and click Add colors from visible.
|
|
Add colors from one or multiple objects
|
Select one or more objects. In the top left corner of the Image palette, click the flyout button, and click Add colors from objects.
|
|
Add a color from a color-related dialog box
|
In the dialog box, click a color swatch, then click Add to palette
|
When dragging an image to the Image palette, only the five most dominant
colors are added. Colors from PostScript fills are not supported.
|
You can deselect the Eyedropper tool by pressing Esc.
|
You can move a color swatch by dragging a color swatch to a new position.
|
| To remove a color from the Image palette |
1 |
Click a color swatch on the Image palette.
|
2 |
In the top left corner of the Image palette, click the flyout |
| To reset the Image palette |
• |
In the top left corner of the Image palette, click the flyout |
| To show or hide the Image palette |
• |
Click Windows |
|
|
Copyright 2010 Corel Corporation. All rights reserved.