|
Retouching with Heal and Clone |
  
|
|
Retouching with Heal and Clone |
|
The Heal and Clone tools let you remove small, distracting elements from your photos. They use layers and Region tools in a similar way to selective editing.
| • | Healing is best used for small blemishes in smooth, low detail areas, such as a small blemish on skin, or a small bird in the sky. It is limited only to circular regions created with the Circle tool, and unlike cloning, it does not require that you to set a source. |
| • | Cloning is the process of copying a part of an image in order to cover up a distracting or unwanted feature in the picture. Cloning takes image content from a source region and places it in the selected area. |
Each version can have only one Heal/Clone layer. Copying and pasting a Heal/Clone layer replaces any existing Heal/Clone layer.
Switch between Heal and Clone
You can use the Circle tool in Heal or Clone mode. To switch between these modes, simply choose Heal or Clone the Mode drop-down list in the Layers palette. The control is visible only when you create a Circle region.
To remove a spot with Heal
| 1. | Click the Open Layer Manager button |
| 2. | In the Layers palette, click the +Heal/Clone button. |
| 3. | Click the Circle Region tool, and in the Preview panel, click the spot that you want to remove. |
| 4. | In the lower-left corner of the Layers palette, choose Heal from the Mode drop-down menu. |
If you want to adjust the size of the circle or how the edges of the circle blend, drag the Size or Feather sliders at the bottom of the Layers palette.
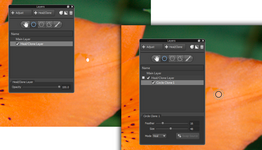
The Heal mode was used to remove a small white spot from a flower
To cover or copy image areas by cloning
| 1. | In the Layers palette, choose an existing Heal/Clone layer or click the +Heal/Clone button to create a Heal/Clone layer. |
| 2. | Click a Region tool. |
| 3. | Select the portion of your image that you want to clone out. This is the destination area for the cloning. If you used the Circle tool, make sure the Mode is set to Clone. For information about using regions tools, see To create a region. |
| 4. | After you finish creating your destination region, a source region is automatically created (outlined in red). Click and drag the source region to position it over the image content that you want to copy. |
Tip: When cloning, you can click the Swap Source button at the bottom of the Layers palette to swap the source region with the destination region. This is useful when you want to duplicate content in an image instead of using cloning to remove image content.
© 2013 Corel Corporation