|
Selective editing |
  
|
|
Selective editing |
|
Selective Editing lets you isolate adjustments or edits to a specified area of a photo. For example, you can select and lighten an area that you want to highlight in a photo, or select an area that you want to edit by using Heal or Clone. For more information about Heal and Clone, see Retouching with Heal and Clone.
Selective Editing has three main steps:
| 1. | Create a layer — See To create an adjustment layer. |
| 2. | Select one or more areas to edit by creating regions — See To create a region. |
| 3. | Apply adjustments — See To adjust a layer. |
Review the information below to learn about layers, regions, and adjustments that can be used with selective editing.
Layers
Layers are collections of regions and adjustments. A layer can contain a single region and adjustment, or it can contain many regions and adjustments. All regions in a single layer will have the same adjustments applied. For example, if you want to brighten several faces in a photo, you can create circle regions over each face, and then adjust the Fill Light setting for the layer, thereby brightening the shadows for all the selected faces at one time. You can apply other adjustments to the layer as well, but at the point where you don't want the adjustments to apply to all the selected regions, or you want to adjust a new region, you must create a new layer and select one or more regions that you want to adjust.
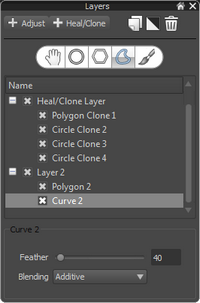
The upper area of the Layers palette contains the main commands for creating and managing layers, including the Region tools. You can add, delete, duplicate, invert, and rename layers. You can also copy and paste layers — the selected areas and layer settings are copied.
The Name list on the Layers palette shows all the layers associated with the current version of the photo. You can choose a layer to view the selected regions in the Preview panel. You can also choose which layers and regions to show or hide.
The lower area of the Layers palette is context-sensitive. It displays settings that you can use to control and fine-tune the active tool.
Regions are selected areas of a photo that you create by using one of the Region tools:
| • | Circle Region tool |
| • | Polygon Region tool |
| • | Curve Region tool |
| • | Brush Region tool |
Regions have two areas: the main area and the feather area. The main area is the portion within the solid lines of a region, and this is where the full effect of editing applies. Along the edge of the main area is the feather area. This is the transition area where the selected area blends with the background — from 100% at the inside edge, to 0% at the outer edge of the dashed line.
To have a smooth, gentle fade between a region and the rest of the image, use a large feather size. To make sharp, crisp regions that affect only the selected area inside a region, use a very small feather size.
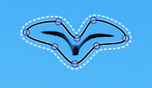
The main part of the region is enclosed by a solid black line. The feather area is enclosed by a dashed white line.
Regions can also be inverted, so that the edits applied to the layer containing a region will apply to the portion of the image that is outside the selected area.
After you have created a layer with one or more regions that you want to edit, you can use controls in the Tools panel to apply adjustments.
Some adjustments and editing tools are designed to work on the entire image and cannot be applied to a layer. The following adjustments and tools affect the entire image:
| • | Image Rotation |
| • | Straightening |
| • | Lens Distortion Correction |
| • | Color Management |
| • | AutoLevels |
| • | All Metadata settings (keywords, ratings, labels, IPTC data, etc) |
| 1. | In the upper-right corner of the application window, click the Open Layer Manager button |
| 2. | In the Layers palette, click Add Layer button |
A new layer appears in the Name list, below Main Layer.
To set layer opacity
| • | In the Layers palette, click a layer name, and adjust the Opacity slider at the bottom of the palette. |
To rename a layer
| • | In the Layers palette, double-click a layer name in the Name list, and type a name. |
Tip: You can name your layer according to the type of adjustment you want to make. Later, if you want to make the same adjustment to another region, it will be easy to choose the existing layer and add a region.
To duplicate a layer
| • | In the Layers palette, click the layer that you want to duplicate and click the Duplicate button |
To hide or show a layer or region
| • | In the Layers palette, click the box to the left of a layer or region name in Name list. |
A check mark appears in the box when the layer or region is visible. The box is empty when the layer or region is hidden.
To delete a layer or region
| 1. | In the Layers palette, click the name of the layer or region that you want to delete. |
| 2. | Click the Delete button |
| 1. | In the Layers palette, create or select a layer to which you want to add a region. |
| 2. | Click one of the following Region tools and follow the instructions in the table. |
Tool |
Instructions |
|---|---|
Circle Region |
In the Preview panel, click the image to set the position of the circle. At the bottom of the Layers palette, adjust the Size and Feather settings. |
Polygon Region |
In the Preview panel, click the image to set each point of your shape (the points are connected by straight lines). Double-click to complete the polygon. At the bottom of the Layers palette, adjust the Feather settings. |
Curve Region |
In the Preview panel, click the image to set each point of your shape (the points are connected by curved lines). Double-click to complete the shape. At the bottom of the Layers palette, adjust the Feather settings. |
Brush Region |
In the Layers palette, enable the Show Strokes check box. Adjust the Size and Intensity settings for your brush, and drag in the Preview panel to apply your brushstrokes. When you are finished, you can disable the Show Strokes check box. To fine-tune your brushstrokes, toggle between the Erase Brush |
To invert a layer
| • | In the Layers palette, click a layer name in the Name list and click the Invert button |
The outline for the main area of a region changes from black to white when you invert.
| • | In the Layers palette, click a layer name in the Name list, and in the Tools panel, adjust the settings you want. |
For information about which adjustments can be applied, see Adjusting regions.
Editing regions is just as easy as creating regions. You can edit a region by adding, deleting, or moving points on polygon and curved shapes. You can also move a region, adjust the size, or adjust the feathering.
To add a point to a polygon or curved region
| 1. | In the Layers palette, click a region name in the Name list. |
| 2. | Hold down the Shift key down and in the Preview panel, position your pointer over the region outline where you want to add a point. |
| 3. | When a red circle appears at the correct position, click to add a point. |
To delete a point from a polygon or curved region
| 1. | In the Layers palette, click a region name in the Name list. |
| 2. | Hold down the Alt key down (or Alt+Shift on some Linux systems) and in the Preview panel, position your pointer over the point that you want to remove. |
| 3. | When a red circle appears on the point, click to delete the point. |
To move a point on a polygon or curved region
| 1. | In the Layers palette, click a region name in the Name list. |
| 2. | In the Preview panel, position your pointer over the point that you want to move. |
| 3. | When a red circle appears on the point, drag the point to a new location. |
To move a region
| 1. | In the Layers palette, click a region name in the Name list. |
| 2. | In the Preview panel, position your pointer over the region. |
| 3. | Drag the region to a new location. |
To resize a region
| • | In the Preview panel, position your pointer over a region and roll your mouse wheel to make it larger or smaller. |
Blending allows you to "cut out" sections of a region by creating new regions below the initial region and setting Blending to Subtractive. This will subtract the lower regions from any areas where they overlap with higher regions. A Subtractive region that does not overlap with Additive regions above it will have no effect. You can check layer order by looking at the Name list in the Layers palette.
To use a Subtractive layer when blending layers
| 1. | In the Layers palette, click the name of the layer that you want to change to Subtractive or create a new layer. |
| 2. | Choose a Region tool, and from the Blending drop-down list, choose Subtractive. |
| 3. | Create a region that protects lower regions from the Additive layers above it. |
© 2013 Corel Corporation