|
Managing your Library |
  
|
|
Managing your Library |
|
Your Library consists of catalogs and the files and versions that each catalog contains. You can move, copy, rename, and delete one or more files or versions at a time to get organized. You can also manage your Library by creating more than one catalog, and control which catalogs are accessible by opening or closing catalogs.
For more information about versions, see Versions.
You can move or copy versions to a new location.
Note: When you move or copy a version, the master file and all related versions are copied or moved.
To move or copy versions
| • | Do one of the following: |
| • | To move a version, drag the thumbnail from the Thumbnail panel to the folder of your choice in the Browse panel. |
| • | To copy a version, hold Ctrl or Command while dragging the thumbnail from the Thumbnail panel to the folder of your choice in the Browse panel. |
You can choose to rename your versions by using renaming formats if you want to rename several versions at one time with a consistent format.
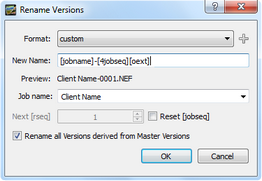
The Rename Versions dialog box has the following controls and features:
| • | Format — choose from a list of existing formats. |
| • | New Name — lets you enter a renaming format. For example, if you use [jobname] or [jobseq] in the New Name box, you can enter a job name in the Job Name. The sequence [jobseq] format remembers the last number used in any previous renaming for this job name, and will continue numbering where it left off. |
| • | Next [rseq] — if you include [rseq] in the New Name box, that text will be replaced with a unique, incrementing sequence number that will start over the next time you rename versions. This control allows you to set the number. |
| • | Reset [jobseq] — restart the numbering for the job name sequence selected. |
| • | Rename all Versions derived from Master Versions — enable this check box to number the master versions sequentially and any related versions with the same name (adds "_v1", "_v2" etc to each version). If you do not check this option, each version is given a unique name. |
For more information about how to use renaming formats, see Renaming formats.
To rename one or more versions
| 1. | Select the thumbnails for the versions that you want to rename. |
| 2. | Press F2 or right-click and select Version > Rename Version. |
| 3. | Edit the New Name field, using text or renaming formats like [date]. Or, select an existing renaming format from the Format drop-down list. |
The Preview updates as you edit the New Name field to show you the results of the renaming format.
You can delete a master version (which represents the original photo, or master file) at any time, but different things happen when you delete a master version versus other types of versions.
Deleting a master version
When you delete a master version, all associated versions are also deleted. The original master files are moved to your computer's Recycle Bin. Review any messages that appear to confirm the action.
Deleting non-master versions
When you delete versions which are not master versions, there is no impact to the original master file — the version thumbnail and associated data is removed from the sidecar XMP file.
Note: When Multi-Image View is enabled, only the single active version is removed, not the entire selection.
To delete a master file or version
| • | Select the thumbnails of the master versions that you want to delete and do one of the following: |
| • | Press Delete. |
| • | Right-click a thumbnail and choose Version > Remove Version. |
If you have selected a master version, a message appears to warn you that the original file for the master version will be moved to the Recycle Bin.
You can create one or more catalogs in your Library. Although you may choose to use one catalog for simplicity, using multiple catalogs lets you create logical groups so you can search, browse, edit, store, and backup specific groups of images at a time without needing to access or open the rest of your Library.
You can create a new catalog at any time. You can open or close catalogs. When you close a catalog, it does not display in the Library. To access the Library, click the Library tab on the Browse panel.
| 1. | Right-click inside the Catalogs section of the Library, and select Catalog > New Catalog, or click File > New Catalog from the menu. |
| 2. | In the Create and Choose New Catalog Folder dialog box, choose an empty folder or create a folder. |
| 3. | Click Select Folder. |
The new catalog appears in the Catalogs section.
| • | Right-click inside the Catalogs section of the Library, and select Catalog > Open Catalog, or choose File > Open Catalog from the menu. |
To close a catalog
| • | In the Catalogs section of the Library, right-click the catalog that you want to close, and choose Catalog > Close Catalog. |
© 2013 Corel Corporation