Previewing object copies as outlines (left) and full objects (right)
You can use the Pick tool ![]() and Shape tool
and Shape tool ![]() to modify the objects in a symmetry group. When you reshape the primary objects with the Shape tool, the vector previews appear in the default main color, and the object copy outlines appear in the default secondary color. For information about these preview colors and how to change them, see Setting options for nodes, handles, and previews.
to modify the objects in a symmetry group. When you reshape the primary objects with the Shape tool, the vector previews appear in the default main color, and the object copy outlines appear in the default secondary color. For information about these preview colors and how to change them, see Setting options for nodes, handles, and previews.


Modifying the symmetry lines affects how the elements in the symmetry group are positioned and oriented. You can add more symmetry lines for more object copies. In addition, you can move the symmetry lines to increase or decrease the distance between the primary objects and object copies; and you can rotate the symmetry lines. For more information, see To set up the planes of symmetry.

Move the symmetry line to change the distance between primary objects and object copies.

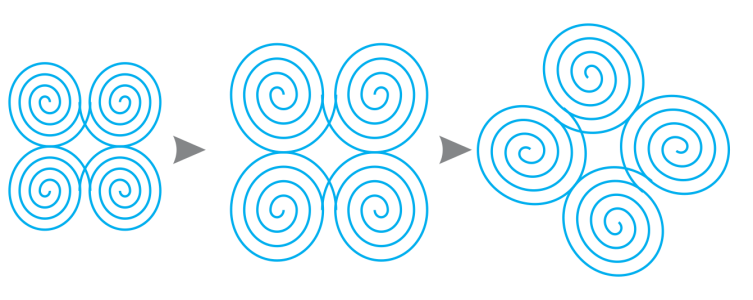
The symmetry group on the left is scaled (middle) and then rotated (right) with the Pick tool.
When you are editing a symmetry group, it is easy to snap objects to the symmetry line because the View ![]() Snap to
Snap to ![]() Symmetry Lines command is enabled by default. This feature helps you fuse open curves and create closed shapes in your symmetrical design. If you don’t want the objects you edit to snap to the symmetry line, you can disable snapping to symmetry lines.
Symmetry Lines command is enabled by default. This feature helps you fuse open curves and create closed shapes in your symmetrical design. If you don’t want the objects you edit to snap to the symmetry line, you can disable snapping to symmetry lines.
| To edit the objects of a symmetry group |
|
| 1 . | Select a symmetry group. |
| The floating symmetry toolbar appears below the symmetry group. |
| 2 . | Click the Edit Symmetry button |
| 3 . | Edit the primary objects in the group by using the Shape tool |
| 4 . | Add and delete objects as needed. |
| 5 . | Click the Finish Editing Symmetry button |
|
Click the Show full preview button
|
|
|
Click the Show symmetry lines button
|
You can start editing a symmetry group by double-clicking it or by clicking Object ![]() Symmetry
Symmetry ![]() Edit Symmetry.
Edit Symmetry.
You can also enter the Edit Symmetry mode by clicking a selected symmetry group while holding down Ctrl.
You can also finish editing a symmetry group by clicking Object ![]() Symmetry
Symmetry ![]() Finish Editing Symmetry.
Finish Editing Symmetry.
| To drag an object into a symmetry group that contains objects |
|
| • | Drag the object over the symmetry group, hold down W, and release the mouse button. |
| To drag an object into an empty symmetry group |
|
| • | Drag the object over the symmetry group, and release the mouse button. |
| To edit a symmetry group as a single entity |
|
| 1 . | Using the Pick tool |
| 2 . | Perform a task from the following table. |
|
Click the Interactive fill tool
|
|
|
Click the Transparency tool
|
|
|
Double-click the Outline icon
|
To preserve the symmetry, skewing and stretching a symmetry group are not allowed.
| To disable snapping to symmetry lines |
|
| • | In Edit symmetry mode, click View |
Disabling snapping to symmetry lines makes it difficult to fuse curves in symmetry groups.
For more information about snapping options, see Snapping objects.
![]()
Not all suite components documented in this Help are available in our Trial, Academic, and OEM versions. Unavailable components may include Corel applications, product features, third-party utilities, and extra content files.
Copyright 2018 Corel Corporation. All rights reserved.