Quick links to procedures on this page:
• |
• |
• |
• |
• |
• |
• |
• |
• |
• |
• |
A line is a path between two points. Lines can consist of multiple segments, and the line segments can be curved or straight. The line segments are connected by nodes, which are depicted as small squares. CorelDRAW provides various drawing tools that let you draw curved and straight lines, and lines containing both curved and straight segments.
The Freehand
![]() and Polyline
and Polyline
![]() tools let you draw freehand lines as if you were sketching on a sketchpad. If you make a mistake while drawing freehand curves, you can erase the unwanted part immediately and continue drawing. When drawing straight lines or segments, you can constrain them to straight vertical or horizontal lines.
tools let you draw freehand lines as if you were sketching on a sketchpad. If you make a mistake while drawing freehand curves, you can erase the unwanted part immediately and continue drawing. When drawing straight lines or segments, you can constrain them to straight vertical or horizontal lines.
The Freehand tool lets you control the smoothness of the curved line you are drawing as well as add segments to an existing line. However, the Polyline tool is easier to use for quickly drawing a complex line that consists of alternating curved and straight segments.
You can choose settings to control how the Freehand and Polyline tools behave. For example, you can change the default smoothness of a curved line that you’ve created with these tools.
You can draw straight lines by using the 2-point line tool. This tool also allows you to create straight lines that are perpendicular or tangent to objects.
The Bézier
![]() and Pen
and Pen
![]() tools let you draw lines one segment at a time by placing each node with precision and controlling the shape of each curved segment. When using the Pen tool, you can preview the line segments you are drawing.
tools let you draw lines one segment at a time by placing each node with precision and controlling the shape of each curved segment. When using the Pen tool, you can preview the line segments you are drawing.

You can draw lines with multiple segments by using the Bézier tool and clicking each time you want the line to change direction.
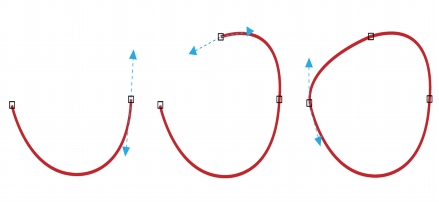
You can draw curves by using the Bézier tool and dragging the control handles at the ends of the Bézier curve.
By using control points, you can easily shape a curved line and draw B-splines, which are typically smooth, continuous curved lines. B-splines touch the first and last control points and are pulled by the points in between. However, unlike the nodes on Bézier curves, control points don’t let you specify the points through which a curve passes when you want to align a curve with other drawing elements.
The control points that touch the line are referred to as “clamped.” Clamped control points function as anchors. The control points that pull the line but do not touch it are referred to as “floating.” The first and last control points are always clamped on open-ended B-splines. The points in between float by default, but you can clamp points if you want to create cusps or straight lines within the B-spline. You can edit completed B-splines by using the control points.
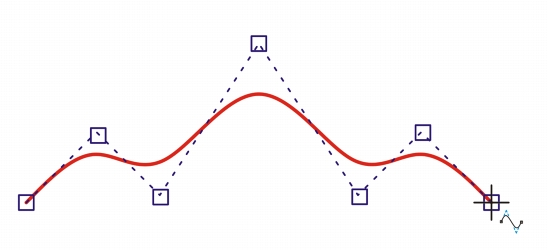
The path of a B-spline curve is determined by the control points you set.
The 3-point curve
![]() tool lets you draw simple curved lines by specifying their width and height. Use this tool to create arc shapes quickly without manipulating nodes.
tool lets you draw simple curved lines by specifying their width and height. Use this tool to create arc shapes quickly without manipulating nodes.
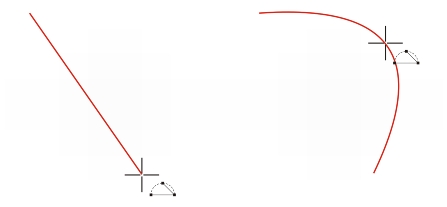
You can draw a curved line by specifying its width (left), and then specifying its height and clicking the page (right).
The Smart drawing tool
![]() lets you use shape recognition to draw straight and curved lines. For more information, see Drawing by using shape recognition.
lets you use shape recognition to draw straight and curved lines. For more information, see Drawing by using shape recognition.
Some lines have nodes and control handles that you can manipulate to shape lines as you draw. For information about node types, see Using curve objects.
When drawing lines by using the curve tools, you can hide the bounding box that is displayed around the lines once they are drawn. The curve tools include the Freehand tool, the 2-point line tool, the Bezier tool, the Artistic media tool, the Pen tool, the B-Spline tool, the Polyline tool, and the 3-point curve tool.
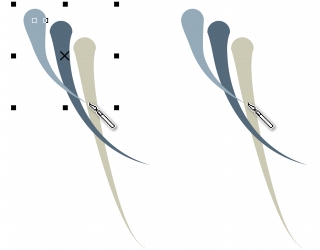
You can hide the bounding box to make drawing artistic media strokes in quick succession more fluid.
| To draw a line by using the Freehand tool |
1. |
In the toolbox, click the Freehand tool
|
2. |
Perform a task from the following table.
|
You can constrain a line created with the Freehand tool to a predefined angle,
called a constrain angle, by holding down Ctrl while you drag. This feature is
useful for drawing straight vertical and horizontal lines. For information about
changing the constrain angle, see To change the constrain angle.
|
You can erase a portion of a curved freehand line by holding down Shift and
dragging backward over the line before releasing the mouse button.
|
| To draw a line by using the Polyline tool |
1. |
In the toolbox, click the Polyline tool
|
2. |
Do one of the following:
|
• |
To draw a straight segment, click where you want to start the line segment, and
then click where you want to end it.
|
• |
To draw a curved segment, click where you want to start the segment, and drag
across the drawing page.
|
You can add as many segments as you want and alternate between curved and straight segments. |
3. |
Double-click to end the line.
|
You can close an open object by clicking the Close curve button
|
| To draw a straight line by using the 2-point line tool |
1. |
In the toolbox, click the 2-point line tool
|
2. |
Point to where you want to start the line, and drag to draw the line.
|
As you drag, the length and angle of the segment appears in the status bar. If you’re adding to a line, the total length for all segments also appears. |
| To draw a perpendicular line |
1. |
In the toolbox, click the 2-point line tool
|
2. |
On the property bar, click the Perpendicular 2-point line
|
3. |
Click the edge of an object, and drag to where you want the line to end.
|
If you want to draw a line that is perpendicular to two objects, drag to the edge of the second object, and release the mouse button when the perpendicular snap point appears. |
To extend the line beyond the second object, hold down Ctrl when the perpendicular snap point appears, and drag to where you want the line to end. |
This procedure cannot be used for drawing a line that is perpendicular to the
baseline of a text object.
|
You can also drag from an existing curve to draw a perpendicular line.
|
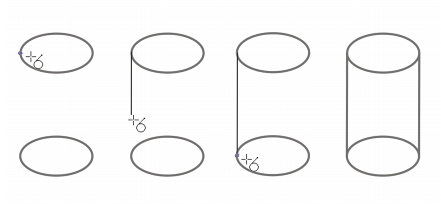
Drawing perpendicular lines
| To draw a tangent line |
1. |
In the toolbox, click the 2-point line tool
|
2. |
On the property bar, click the Tangential 2-point line button
|
3. |
Click the edge of a curved segment in an object, and drag to where you want the
tangent line to end.
|
If you want to draw a line that is tangent to two objects, drag to the edge of the second object, and release the mouse button when the tangent snap point appears. When the quadrant snap point coincides with tangent snap point, the quadrant snap point appears. |
To extend the line beyond the second object, hold down Ctrl when the tangent snap point appears, and drag to where you want the line to end. |
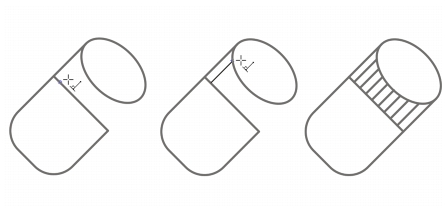
The Tangential 2-point line mode can be used for drawing the sides of the
cylinder.
|
Drawing tangent lines
| To draw a line by using the Bézier tool |
1. |
In the toolbox, click the Bézier tool
|
2. |
Do one of the following:
|
• |
To draw a curved segment, click where you want to place the first node, and drag
the control handle to where you want to place the next node. Release the mouse
button, and drag the control handle to create the curve.
|
• |
To draw a straight segment, click where you want to start the line segment, and
click where you want to end it.
|
You can add as many segments as you want. |
3. |
Press the Spacebar to finish the line.
|
| To draw a line by using the Pen tool |
1. |
In the toolbox, click the Pen tool
|
2. |
Do one of the following:
|
• |
To draw a curved segment, click where you want to place the first node, and drag
the control handle to where you want to place the next node. Release the mouse
button, and drag the control handle to create the curve you want.
|
• |
To draw a straight segment, click where you want to start the line segment, and
click where you want to end it.
|
You can add as many segments as you want and alternate between curved and straight segments. For more information about alternating curved and straight segments, see To draw a line by using the Bézier tool. |
3. |
Double-click to finish the line.
|
| To draw a B-spline |
1. |
In the toolbox, click the B-Spline tool
|
2. |
Click where you want to start the line.
|
3. |
Click to set as many control points as you need to shape your line.
|
Control points float by default, but you can clamp control points to the line by pressing V while clicking. |
4. |
Double-click to finish the line.
|
Pressing Esc cancels the line instead of finishing it. |
If you add to a B-spline by selecting the first or last control point, the clamped
control point automatically changes to a floating control point as you draw the
new portion of the line.
|
You can also add control points while you draw a B-spline by pressing
Spacebar instead of clicking.
|
| To draw a curve by using the 3-point curve tool |
1. |
In the toolbox, click the 3-point curve tool
|
2. |
Click where you want to start the curve, and drag to where you want the curve to
end.
|
3. |
Release the mouse button, and click where you want the center of the curve to be.
|
|
You can also
|
|
|---|---|
|
Draw a circular curve
|
Hold down Ctrl while dragging.
|
|
Draw a symmetrical curve
|
Hold down Shift while dragging.
|
| To set options for the Freehand and Bézier tools |
1. |
Click Tools |
2. |
In the Workspace list of categories, click Toolbox, and then click Freehand/
Bézier tool.
|
3. |
Move the Freehand smoothing slider to set the default smoothness for curved
lines.
|
Higher values produce smoother curves. |
Double-click the Freehand or Bézier tool to display the Freehand/Bézier
page in the Options dialog box.
|
| To hide the bounding box when using curve tools |
1. |
In the toolbox, click one of the following curve tools:
|
• |
Freehand
|
• |
2-point line
|
• |
Bézier
|
• |
Artistic Media
|
• |
Pen
|
• |
B-Spline
|
• |
Polyline
|
• |
3-point curve
|
2. |
Click the Bounding box button
|
When you hide the bounding box while working with one curve tool, the
bounding box remains hidden for all curve tools. For example, if you hide the
bounding box when using the Freehand tool, it remains hidden when you
switch to the Bézier tool.
|
You can also hide the bounding box by clicking Tools |
|
|
Copyright 2012 Corel Corporation. All rights reserved.