Quick links to procedures on this page:
• |
• |
• |
When you move or draw an object, you can snap it to another object in a drawing. You can snap an object to various snap points on the target object. When you move the pointer close to a snap point, the snap point becomes highlighted, which identifies it as the pointer’s snapping target.
You can snap objects to other objects, to page elements (such as the center of the page), to the document grid, pixel grid, baseline grid, or the guidelines.
To snap an object to another object with greater precision, you can first snap the pointer to a snap point in the object, and then snap the object to a snap point in the target object. For example, you can snap the pointer to the center of a rectangle, drag the rectangle by the center, and then snap the rectangle to the center of another rectangle.
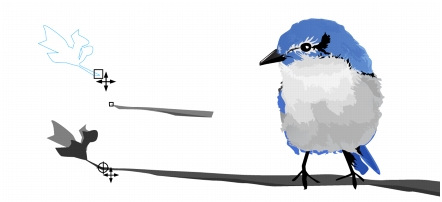
The pointer was snapped to an end node of the leaf (top), and then the leaf was dragged to snap to the end node of the branch (bottom).
Snapping modes determine which snap points you can use in an object. The table below includes descriptions of all available snapping modes.
You can choose a number of snapping options. For example, you can disable some or all snapping modes to make the application run faster. You can also set a snapping threshold, which specifies the distance from the pointer at which a snap point becomes active. You can also turn snapping on and off.
| To turn snapping on or off |
• |
Perform one or more tasks from the following table:
|
|
To
|
Do the following
|
|---|---|
|
Enable snapping for all objects
|
Click View
|
|
Enable snapping objects to page elements (edges, edge midpoints, and page center)
|
Click View
|
|
Enable snapping objects to the pixel grid
|
Click View
This option is available only when pixel view is enabled. For more information, see Choosing viewing modes.
|
|
Enable snapping objects to the document grid
|
Click View
For more information, see Setting up the document grid.
|
|
Enable snapping objects to the baseline grid
|
Click View
For more information, see Setting up the baseline grid.
|
|
Enable snapping objects to guidelines
|
Click View
For more information, see Setting up guidelines.
|
A check mark next to the snap command, such as Snap to objects, indicates
that snapping is turned on.
|
You can also press Alt + Z to toggle snapping to objects on and off, or press
Ctrl + Y to toggle snapping to the document grid on and off.
|
| To snap objects |
1. |
Select the object that you want to snap to the target object.
|
2. |
Move the pointer over the object until the snap point becomes highlighted.
|
3. |
Drag the object close to the target object until the snap point on the target object
becomes highlighted.
|
To snap an object as you draw it, drag in the drawing window until the snap
point in the target object becomes highlighted.
|
| To set snapping options |
1. |
Click View |
2. |
On the Snap to objects page of the Options dialog box, enable one or more of the
check boxes in the Modes area.
|
To enable all snapping modes, click Select all. |
To disable all snapping modes without turning off snapping, click Deselect all. |
3. |
Type a value in the Snapping radius box to set the radius, in pixels, of the
snapping field around the pointer.
|
|
You can also
|
|
|---|---|
|
Display or hide snapping mode indicators
|
Enable or disable the Show snap location marks check box.
|
|
Display or hide screen tips
|
Enable or disable the Screen tip check box.
|
|
|
Copyright 2012 Corel Corporation. All rights reserved.