Quick links to procedures on this page:
• |
• |
• |
• |
• |
• |
You can change the appearance of both lines and outlines. For example, you can specify their color, width, style, corner shape, and cap style. You can also remove a line or outline, and you can create your own line or outline style.
The program also lets you copy the color of an outline to other objects and convert outlines to objects so that you can fill them. For more information about filling objects, see Filling objects.
Setting the miter limit for outlines lets you specify at what angle a sharp corner is either mitered (pointed) or beveled (squared off).
You can choose from a variety of line styles. Line styles are organized into two categories: standard and enhanced.
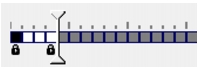
Standard line styles consist exclusively of dashes and spaces. The dashes and spaces vary to create different patterns. You can use a preset pattern or create a custom pattern. Each line style pattern is defined by units. There are fifty units — each of which can be “on” (filled in) or “off” (blank) to define a pattern that contains a maximum of ten dashes or spaces. You can also set the pattern length. When you increase or decrease the pattern length, the dashes and spaces appear longer or shorter because you are changing the size of the units to fit the specified pattern length. The line width is not affected if you change the pattern length.
In the Edit line style dialog box, each box represents a unit that can be filled in to create a dash, or left blank to create a space. You can move the white slider to the right to increase the number of units in your pattern.
Enhanced line styles consist of shapes, zigzags, or multiple lines to create diverse patterns. You can edit an enhanced line style by changing the width of the lines or the width of the overall pattern.
When you apply an enhanced line style to a filled object, the fill is contained within the path of the object, not the outline. For example, if you have an object with a zigzag line style, the fill does not extend into the points of the zigzag.
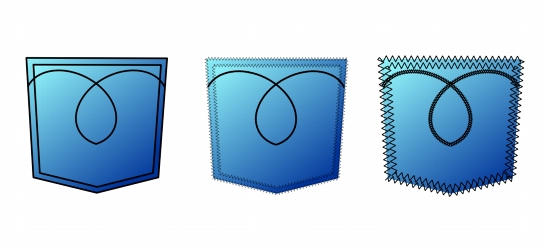
These pocket drawings use a standard line style (left), an enhanced line style with low pattern-width settings (center), and an enhanced line style with higher pattern-width settings (right). The fill is always contained within the object’s path, not the object’s outline.
The outline created by a standard or enhanced line style can appear in front of or behind a fill. For example, you may want an outline to appear behind a fill to line up the outline with the outer edge of the fill.
In the drawing on the left, the outline is in front of the fill. Because the outline width is centered on the object’s path, the outline covers part of the object’s fill. In the drawing on the right, the outline width is the same, but the outline has been moved behind the fill and therefore lines up with the outer edge of the object.
| To specify line and outline settings |
1. |
Select an object.
|
2. |
On the property bar, click the Outline pen button
|
3. |
In the Pattern style area of the Outline pen dialog box, enable the Standard or
Enhanced option.
|
4. |
Choose a line style from the Pattern list box.
|
5. |
Specify the settings you want.
|
If the pattern Width value is too low, the pattern might not appear as
expected. To view the pattern on your object, try increasing the pattern Width
value and decreasing the outline Width value.
|
You can also specify line settings from the property bar or the Outline area of
the Property manager docker.
|
You can also change the color of a line or outline by right-clicking a color
swatch on the color palette.
|
| To edit a standard line style |
1. |
Select an object.
|
2. |
On the property bar, click the Outline pen button
|
3. |
In the Pattern style area, enable the Standard option.
|
4. |
Choose a line style from the Pattern list box.
|
5. |
Click Edit style.
|
6. |
Follow the instructions in the Edit line style dialog box to edit the pattern.
|
7. |
Click Replace.
|
| To create a standard line style |
1. |
Select an object.
|
2. |
On the property bar, click the Outline pen button
|
3. |
In the Pattern style area, enable the Standard option.
|
4. |
Click Edit style.
|
5. |
Follow the instructions in the Edit line style dialog box to create a new pattern.
|
6. |
Click Add to save your new pattern in the Pattern list box.
|
| To copy an outline to another object |
1. |
Using the Pick tool
|
2. |
Right-click the object, and drag to the second object.
|
A blue outline of the first object follows the pointer to the second object. |
3. |
Release the mouse button over the second object, and choose Copy outline here.
|
For more information about copying object properties, see Copying object
properties, transformations, and effects.
|
| To convert an outline to an object |
1. |
Select an object.
|
2. |
Click Arrange |

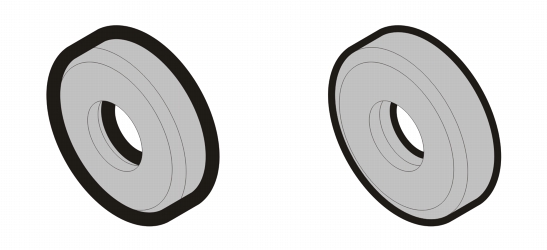
The gear drawing on the left has a gray fill and a blue outline. By converting the outline to an object, you can separate the new object (center) from the old filled shape (right).
| To remove an outline from an object |
1. |
Select an object.
|
2. |
On the property bar, choose None from the Outline width list box.
|
You can also remove an object’s outline by selecting the object and
right-clicking the No color swatch on the color palette.
|
|
|
Copyright 2013 Corel Corporation. All rights reserved.