Erase image areas
You can edit images and objects by erasing areas. For example, you can erase part of an object to change its shape or reveal more of the layer below. You can also erase background areas of the image, or erase part of the last action applied to the image.
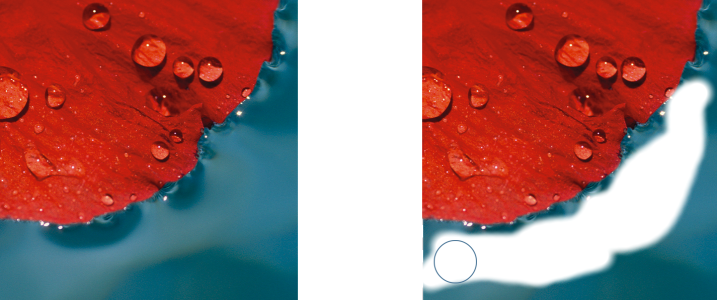
The Eraser tool was used to erase background areas and reveal the secondary color.
The background was first converted to an object, and then the Eraser tool was used to erase background areas, making them fully transparent.
The tools used to erase have many of the same settings as brushes, which means you can control the size, shape and transparency to create unique effects. For example, you can apply a bitmap fill to the entire image, increase the transparency value of the eraser tool, and create a superimposed effect by partially erasing the fill (the last action performed). You can also erase image areas based on color. The secondary color replaces the main color you erase.
To erase image areas
Erasing parts of an object reveals the object below or the background.
Erasing the background reveals the secondary color. To make the erased areas fully transparent, first create an object from the background by clicking Object ![]() Create
Create ![]() From Background.
From Background.
To maintain the shape of an object, enable the Lock transparency button ![]() on the Objects docker. If the Objects docker is not open, click Window
on the Objects docker. If the Objects docker is not open, click Window ![]() Dockers
Dockers ![]() Objects.
Objects.
To adjust the transparency interactively, hold down Alt, and click in the image window without releasing the mouse button to display a transparency slider.
To adjust the feathering interactively, hold down Ctrl + Alt, and click in the image window without releasing the mouse button to display a feathering slider.
To erase with symmetrical patterns, Click Window ![]() Toolbars
Toolbars ![]() Symmetry bar, and choose the settings you want on the Symmetry bar before dragging in the image window. For more information on the Symmetry bar, see To paint symmetrical patterns.
Symmetry bar, and choose the settings you want on the Symmetry bar before dragging in the image window. For more information on the Symmetry bar, see To paint symmetrical patterns.
To erase the last action applied to an image
If you want to erase the last action completely, click the Undo button ![]() on the standard toolbar. For more information about undoing, see Undo and redo.
on the standard toolbar. For more information about undoing, see Undo and redo.
You can also erase the last action applied to an object, but you must use the Eraser tool ![]() to erase the object itself.
to erase the object itself.
To adjust the transparency interactively, hold down Alt, and click in the image window without releasing the mouse button to display a transparency slider.
To adjust the feathering interactively, hold down Ctrl + Alt, and click in the image window without releasing the mouse button to display a feathering slider.
To replace the main color with the secondary color
You can select a main color from the image by clicking the Eyedropper tool ![]() , and clicking a color in the image window. The color you select displays in the Main color swatch.
, and clicking a color in the image window. The color you select displays in the Main color swatch.
You can quickly choose a square or round brush shape by clicking the Round nib button ![]() or the Square nib button
or the Square nib button ![]() on the property bar.
on the property bar.
To adjust the transparency interactively, hold down Alt, and click in the image window without releasing the mouse button to display a transparency slider.
To adjust the feathering interactively, hold down Ctrl + Alt, and click in the image window without releasing the mouse button to display a feathering slider.