Editing channels
You can edit a channel by modifying the size, shape, or opacity of its protected area, which ultimately becomes the protected area of the selection. The changes that you make to the channel do not directly affect the image until you load it as a selection. For more information, see To load a selection from an alpha channel.
Because the alpha channel is a grayscale image, you edit the channel by applying only white (to remove protected areas), black (to add protected areas), and shades of gray (to create semi-protected areas); no colors are available.
You can apply changes by selecting a brush and painting the changes in the channel.
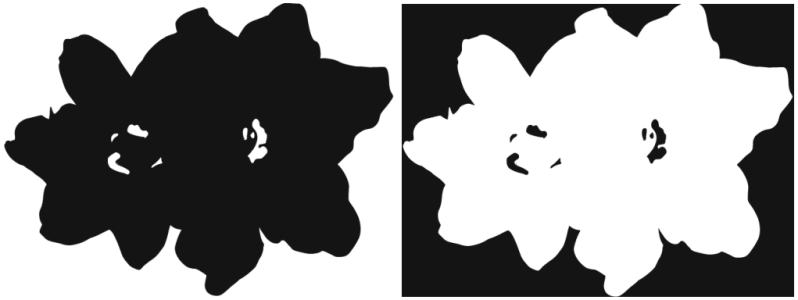
In this example, the channel has a few stray areas that are unprotected (left). The stray areas were transformed into protected areas by applying black brushstroke (right).
In addition, you can apply effects, such as feathering to soften the transitions between light and dark areas. This introduces a bit of opacity to the channel.
A channel before and after feathering
You can also invert a channel to convert a protected area into an unprotected area.
A channel before and after inversion
In addition, you can introduce interesting effects by filling a channel with a pattern, gradient, or weave. For more information, see Working with color fills.
To paint in a channel

1
In the
Channels panel, display and select the channel you want to work with.
If you want to paint only on a specific area of the channel, make a selection.
2
Choose the
Brush tool

from the toolbox.
3
Click the Brush Selector on the Brush Selector bar.
4
Click a brush category, and brush variant.
The
Pen and
Airbrush brush categories make good choices.
5
In the
Color panel, choose one of the following:
•
Black — adds to the protected area
•
White — removes from the protected area
•
Grey — applies a semi-protected area
When you paint in the channel, hue is irrelevant. The channel carries 8 bits of information and you need only set a level in that range. The value scale is between black and white.
6
Paint in the document window.
7
In the
Channels panel, click the eye icon

next to the RGB channel’s thumbnail to display the channel in grayscale.
|
|
|
Control the brush opacity |
Adjust the Opacity slider on the property bar. |
|
|
Type a value in the Size box, or adjust the slider. |
To apply an effect to a channel
1
In the
Channels panel, display and select the channel you want to work with.
If you want to apply the effect to a specific area of the channel, make a selection.
2
Choose an effect from the
Effects menu.
To feather a channel
1
In the
Channels panel, display and select the channel you want to work with.
2
Click the Channel options button

, and choose
Feather.
3
In the
Feather dialog box, type a number of pixels.
To invert a channel
1
In the
Channels panel, choose a channel from the list.
2
Click the
Invert Channel button

.
To fill a channel with a pattern
1
In the
Channels panel, display and select the channel you want to work with.
If you want to fill only a specific area of the channel, make a selection.
2
Click
Window  Media Panels Patterns
.
3
In the
Patterns panel, click a pattern swatch.
4
Choose
Edit Fill.
5
In the
Fill dialog box, choose
Original Luminance from the
Fill with list box.
If you want to change the opacity, adjust the
Opacity slider.
To fill a channel
1
In the
Channels panel, display and select the channel you want to work with.
2
Choose the
Paint Bucket tool

from the toolbox.
3
On the property bar, click the
Fill Image button

.
4
From the
Fill list box on the property bar, choose one of the following:
•
Source Image — fills using the current clone source image. If you haven’t defined a clone source, Corel Painter fills with the current pattern. For information, see
Filling an area with a sampled image.
5
Open the
Fill selector on the property bar, and click a swatch from the media library panel.
6
Click the area of the channel you want to fill.
If the result is not what you want, undo the fill, change the settings, and try again.
|
|
|
Specify the range of grey to be filled |
On the property bar, type a value in the Tolerance box, or adjust the slider. |
Specify the fill opacity for pixels outside the tolerance range |
On the property bar, type a value in the Feather box, or adjust the slider. |
Soften the edge of the fill |
Enable the Anti-Alias button  on the property bar. Anti-aliasing is desirable when Feather is zero or extremely low. |

The Paint Bucket tool applies a fill only to a visible channel. Make sure the channel’s eye icon is open before using the Paint Bucket tool.

You can return to the default Paint Bucket tool settings by clicking the Reset Paint Bucket Tool button  on the property bar.