Size controls
The Size brush controls determine how Corel Painter varies the width of the brushstroke.
Size lets you control the width of the brush and the brushstroke. As size changes, you may need to adjust the spacing controls for brushes that use nonrendered or stamp-based dab types to prevent gaps from appearing in the stroke.

Size controls the width of the brush.
You can adjust brush size dynamically onscreen, use the Size slider and flyout on the property bar, or choose a preset from the Size library. There's a collection of dab sizes available in the application. You can also create custom presets. Corel Painter provides options to manage presets in the Size Library panel. For example, you can hide, delete, and rename presets, as well as assign custom icons to presets. For information about modifying the appearance of the Size library and restoring its default settings, see Modifying the display of media panels and Restoring default libraries.
You can choose an Expression setting to create a brush that responds to subtle hand movements. For more information, see Expression settings. You can also adjust the Min setting to specify the range of variability that you want the expression to apply. The Min Size setting represents a percentage of the Size setting and it must be linked to an expression to have an effect. For example, if you choose the Pressure expression on the Size panel, set the Size slider to 40 and set the Min Size slider to 50%, the stroke sizes will vary from 20% to 40% every time you apply pressure. The Min Size control allows you to create a brushstroke that is amazingly realistic. As stylus pressure eases, brushstrokes taper. As pressure increases, brushstrokes widen, just as they would with a real brush.

The minimum and maximum sizes of a stroke can be linked to Expression settings, such as pressure or velocity. The small black circle shows the minimum stroke size, and the gray circle shows the maximum stroke size.
The Size Jitter control lets you introduce more variation to the size of the brushstroke, which enhances the responsiveness and natural appearance of the brushstrokes. You can also use the Smoothness slider to smooth the size variation for a more organic look.
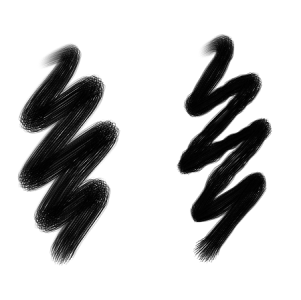
Brushstrokes without Size Jitter (left) and with Size Jitter (right)
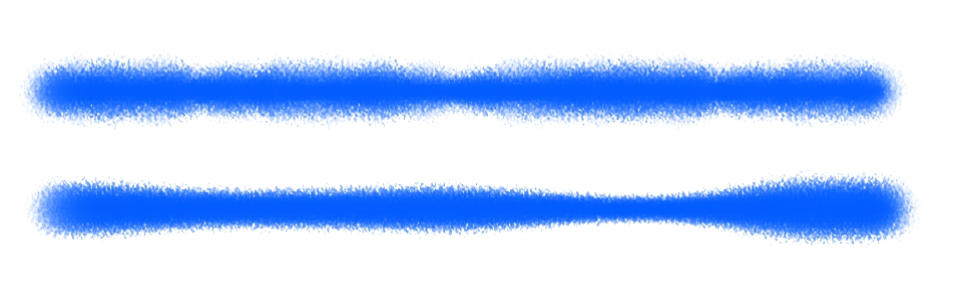
Size Jitter applied to a brushstroke without jitter smoothing (top) and with jitter smoothing (bottom)
Audio Expression lets you link brush size to audio input from your microphone, or internal audio such as streaming music. The brushstroke becomes wider or narrower as the strength of the audio signal changes.
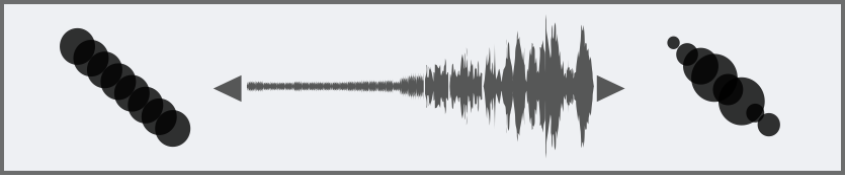
The brushstroke changes its width in synch with the audio input (right).
Size Step controls the transition between narrow and wide sections of a stroke.
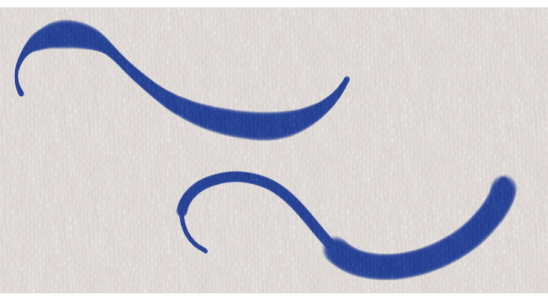
Brushstrokes with Size Step set to 1% (top) and 100% (bottom)
To display the Size panel
You can also access the Size panel by clicking the Size flyout button ![]() on the property bar, and clicking the Size Panel button
on the property bar, and clicking the Size Panel button ![]() .
.
To display the Size library
You can also access the Size Library panel by clicking the Size flyout button ![]() on the property bar, and clicking the Size Library button
on the property bar, and clicking the Size Library button ![]() .
.
To adjust size controls
|
To choose an audio input and adjust audio settings, choose Window
|
|
You can also set the brush size dynamically onscreen. For more information, see To set brush attributes onscreen.
When adjusting Size Jitter, make sure the Min Size slider is not set to 100%. Setting the Min Size to 100% stops Size Jitter from occurring.
You can also change the brush size from the property bar by adjusting the Size slider ![]() or typing a value in the Size box.
or typing a value in the Size box.