Cloning brushes and controls
Painting with a cloner brush is a great way to obtain an artistic rendering from photographic source material. Choose the Cloner tool to automatically enable the brush variants in the General cloners brush category. Many cloner variants let you reproduce a source image with media effects, such as paper grain and specialized dabs.
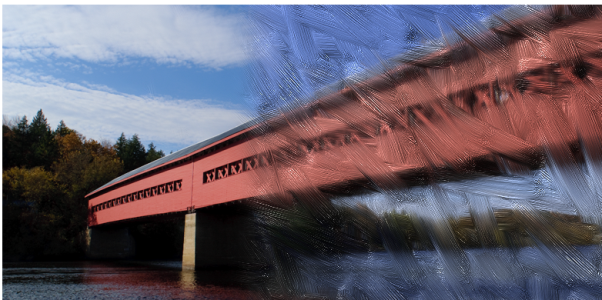
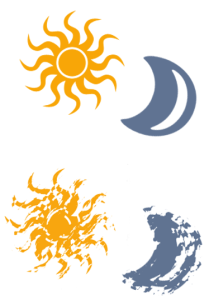
An example of a cloner brush variant
For a list of the cloner brush variants available in the Painter 2021 Brushes library, see Cloners.
You can customize existing cloner brush variants or create new variants by using the brush controls. For more information, see Adjusting brushes with brush controls.
You can also expand Corel Painter’s cloning capabilities by turning almost any brush variant into a cloner. Brush variants that use the Cloning method reproduce the source image while effectively "filtering" it, which allows you to create an artistic rendering of an image.
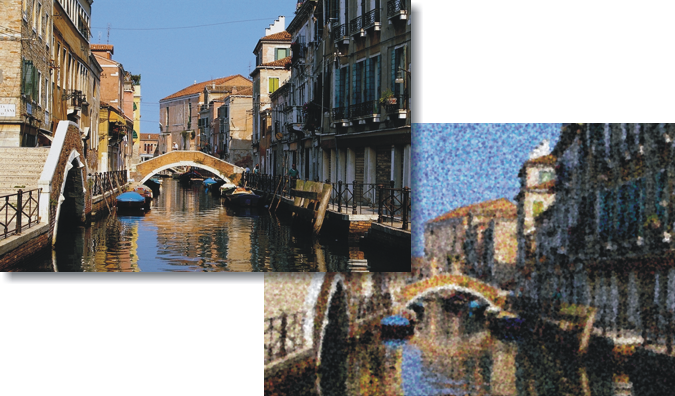
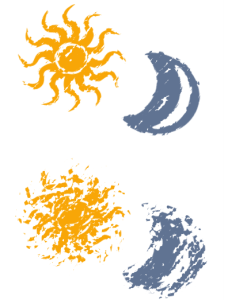
An example of a brush variant using a cloning method
Because the Cloning method uses a full set of pixels from the original document for each brush dab, you get a truer copy of the original than you might by using the Clone Color button ![]() . Unlike the Clone Color option, the Cloning method preserves the original image texture in the clone. The Cloning method is good to use when you want to precisely recreate portions of a source image.
. Unlike the Clone Color option, the Cloning method preserves the original image texture in the clone. The Cloning method is good to use when you want to precisely recreate portions of a source image.
Brushes that use build-up methods, like pencils and felt pens, build toward black. If you clone with one of these brushes in a dark area of your image, you may not achieve the desired results. Use the Opacity slider on the property bar to control how rapidly these brushes build up to black. You can also choose chalk or one of the other tools that cover underlying colors.
The Cloning controls are specific to brushes that use the Cloning method and the Clone Color option.
The Clone Color control directs a brush to pick up color from a source image. Clone Color takes averaged samples of color from the clone source, resulting in an approximation of the original. The Clone Color option is also available on the Color panel and the temporal color selector. For information about using different clone types, see Cloning color.
Clone tinting lets you add the currently selected color to any clone brush independent of the clone source. When tinting is enabled, you dynamically mix a color with your clone source. Sample a color from your image or simply hover over the color wheel, and choose a color. This versatile technology gives you greater creative control while cloning, and is also useful in many other scenarios, such as painting with textures, patterns, and other image content.
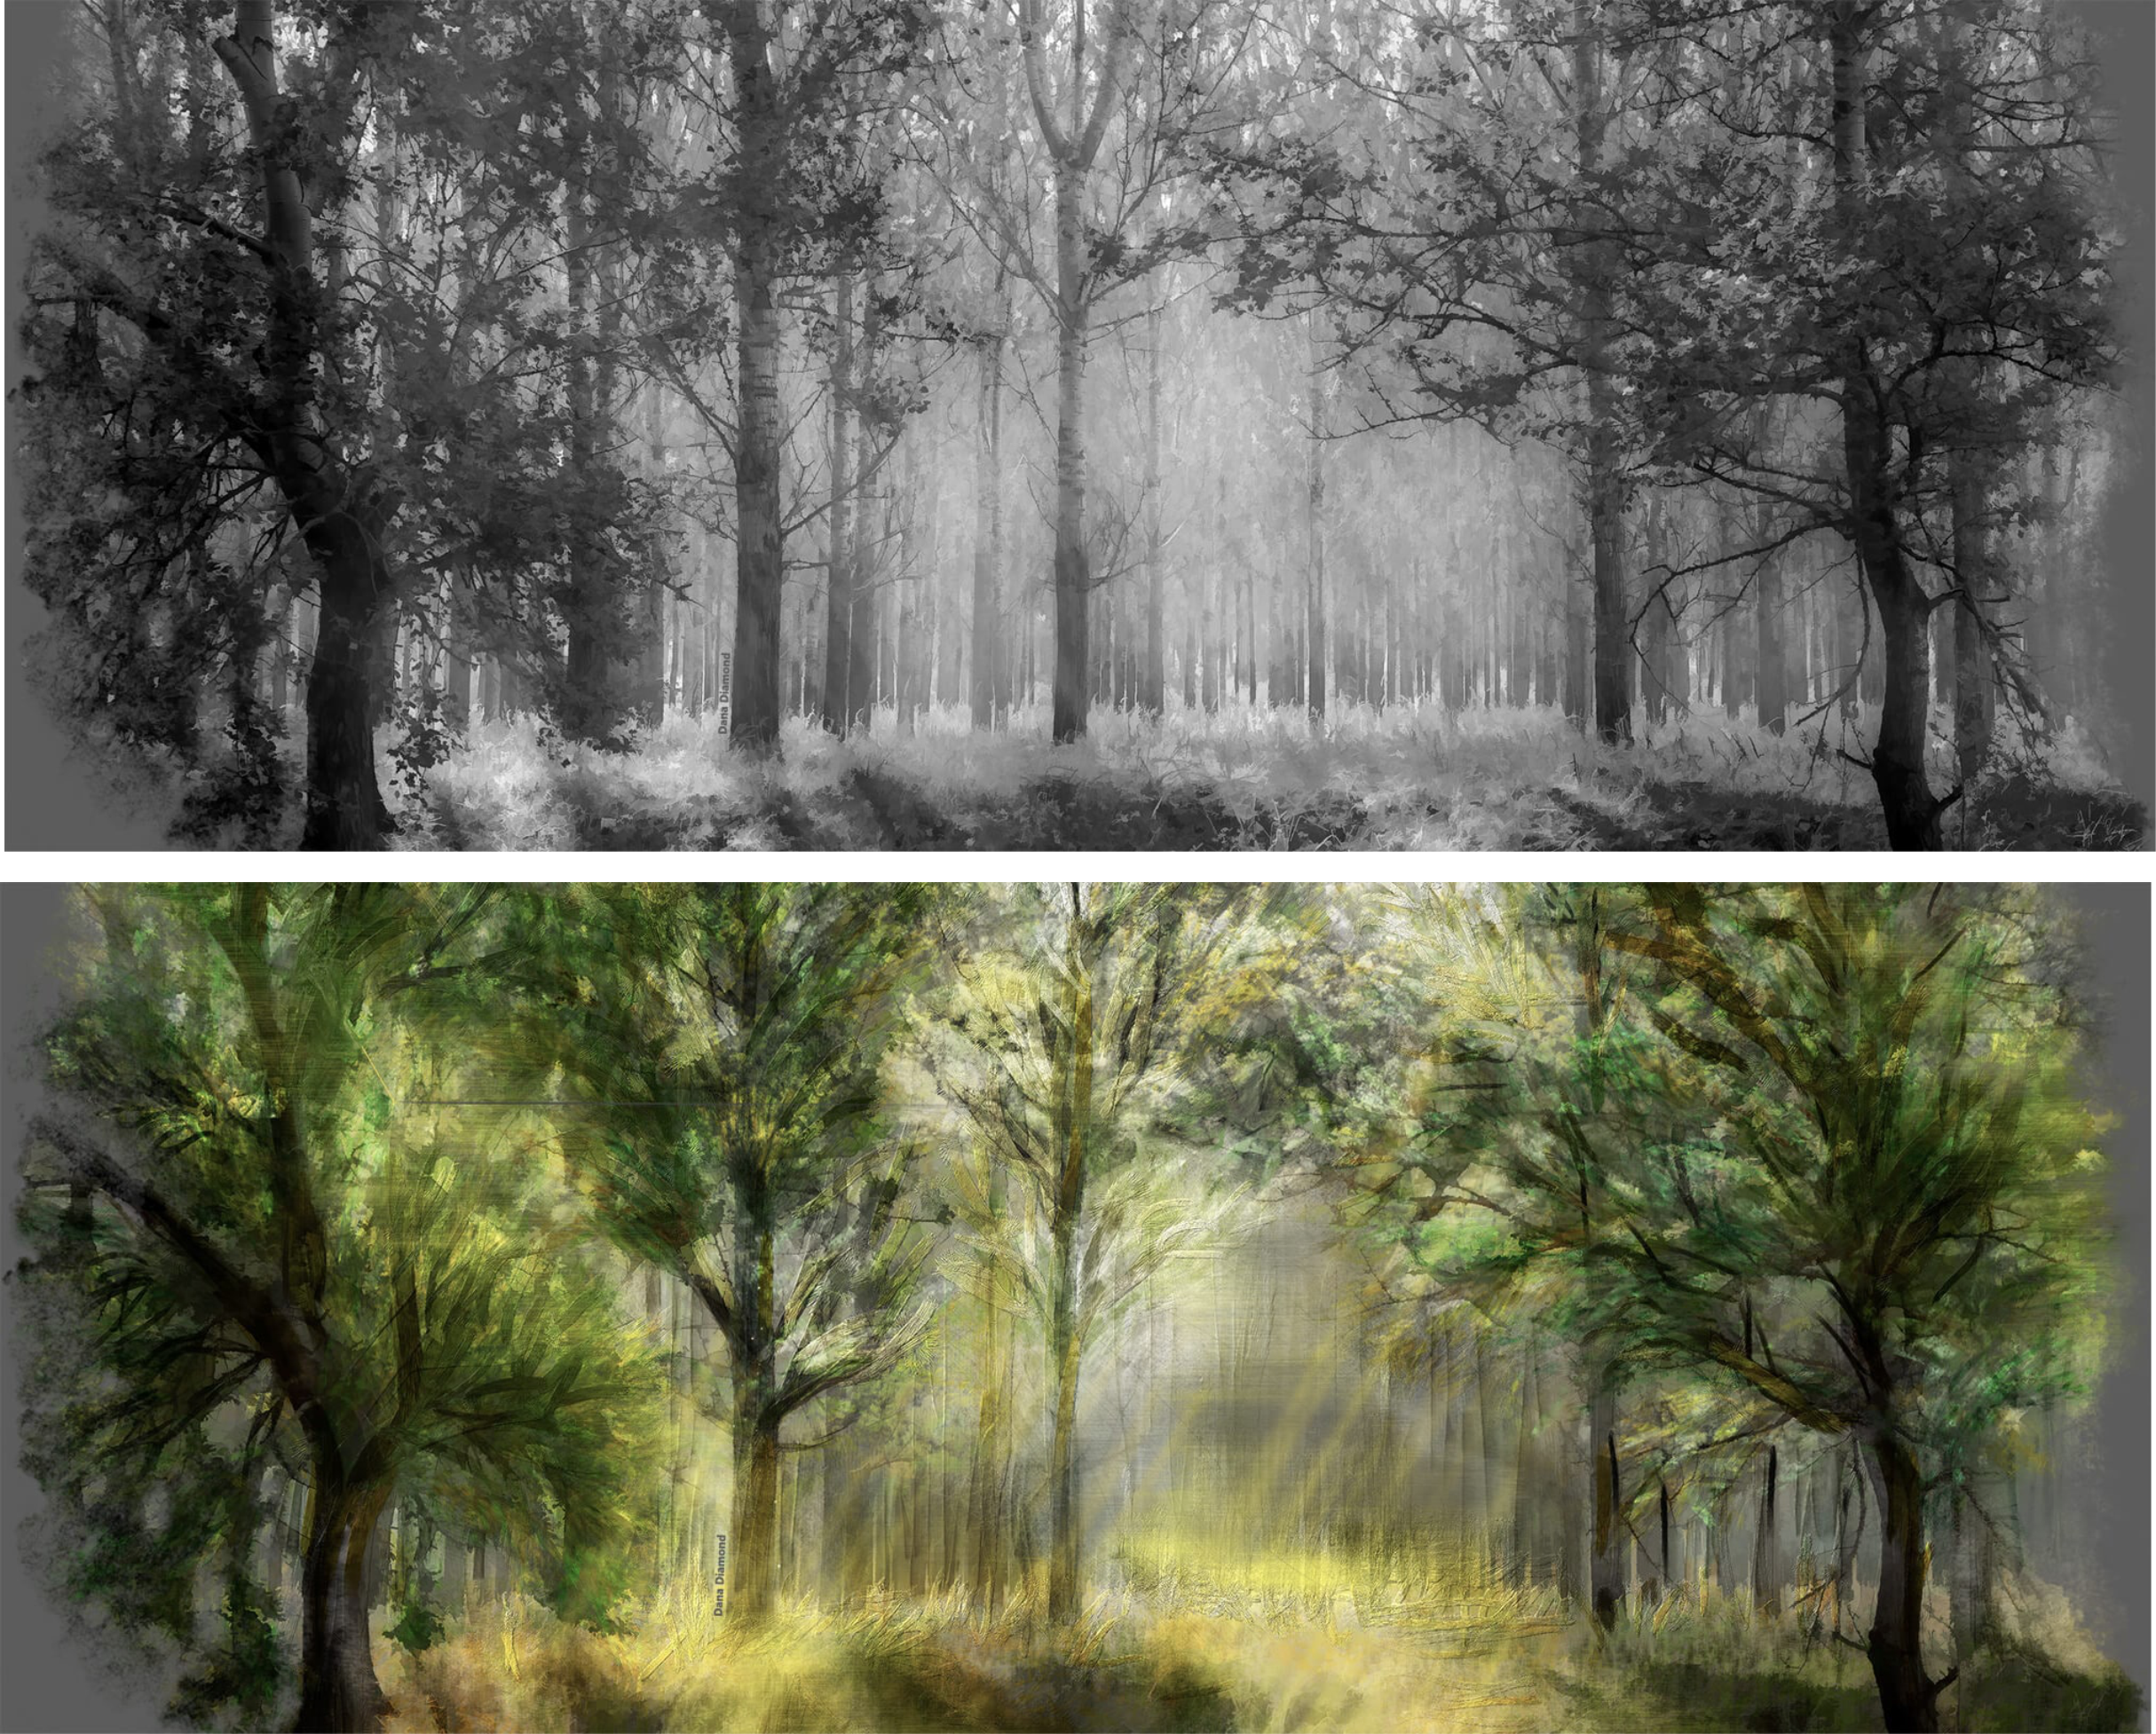
Clone tinting lets you add color to mix with your clone source. Artwork by Dana Diamond.
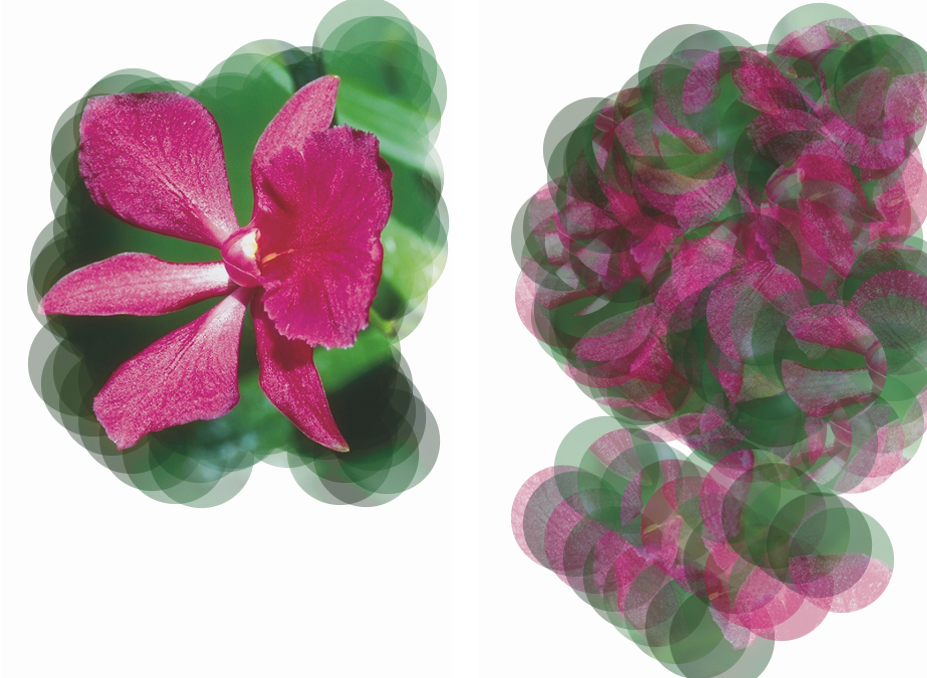
The Precise Sampling control directs a brush to sample color from the center of the dab and is useful when using a large dab to clone images with transparency. It is supported for brushes that use the following dab types: Circular, Computed Circular, Captured, Single-Pixel, Static Bristle, Dynamic Speckle Bristle, and Dynamic Speckle Particle types (Flow, Gravity, and Spring).
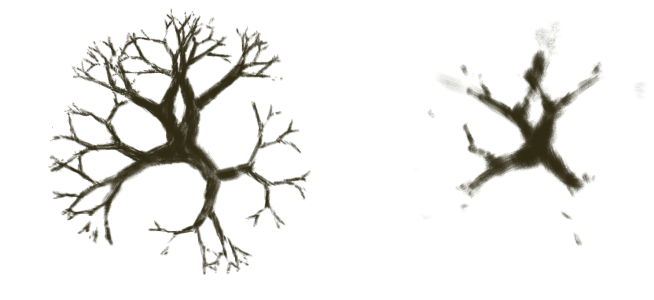
Cloning color with Precise Sampling enabled (left) and disabled (right)
When you work with brushes using the Cloning method, you can modify the Variability to control the offset of the clone based on the location of the source image. When Variability is set at zero, the pixels of the source and destination images correspond precisely. Using a cover brush at full Opacity (and no Grain) simply recreates the source image.
Brushstrokes with Variability set to 0 (top) and 12 (bottom)
Introducing a degree of randomness disturbs the pixel-to-pixel correspondence. The resultant variations distance the clone from its photographic source, which can contribute to a Natural-Media appearance.
The How Often controls allow you to set the period between random offsets.
Brushstrokes with How Often set to 0 (top) and 15 (bottom)
Random Clone Source randomly samples the source document and then places strokes in the clone document. There is no correspondence between the samples taken from the source and where they are placed in the clone. The result is a random pattern of the predominant colors and edges of the source. The brush and stroke determine the nature of the pattern.
You might use Random Clone Source with a faint stipple brush to add "noise" to an image. In this case, the clone source image merely contains the noise colors that you wish to add.
Brushstrokes with Random Clone Source disabled (left) and enabled (right)
The Clone Type control lets you choose among several cloning variations. For detailed information on using the different clone types and multi-point cloning, refer to Multi-point cloning.
The Obey Source Selection option uses any selection in the clone source region to constrain painting in the destination. If a transform Clone Type is used, the selection is appropriately transformed. This option is available only with the Cloning method.
When Copy Source Selection is enabled, the Cloner brush reproduces the source selection information in the destination selection. This option is available only with the Cloning method.
With the 4-Point Tiling check box enabled, your clone source is tiled in a repeating pattern.
For greater color accuracy while cloning, you can use the brush loading option to pick up individual colors in different regions of the brush dab.
Without brush loading, the Clone Color option uses a single, averaged color from the source for each brush dab. This results in an approximation of the original and lets you create an artistic impression of the source.
To choose a cloner brush
For increased color accuracy, you can enable the Brush Loading option. For more information, see Using brush loading.
To transform a brush variant into a cloner brush
You can also transform a brush into a cloner brush by choosing a brush in the Brush Selector and clicking the Clone Color button ![]() in the Color panel (Window
in the Color panel (Window ![]() Color Panels
Color Panels ![]() Color Panel (Full View)). Enabling the Clone Color option disables the Color panel and the color information is pulled from the clone source.
Color Panel (Full View)). Enabling the Clone Color option disables the Color panel and the color information is pulled from the clone source.
If you change brushes while cloning images, you must click the Clone Color button ![]() again.
again.
If you change the brush or variant, the clone color is automatically disabled. To continue working with the clone color, re-enable the clone color.
For more information about methods and subcategories, see General controls: Methods and subcategories.
To set clone color
To apply clone tinting
Enable the Precise Sampling check box to sample color from the center of the dab, which is useful for cloning images with transparency.
To sample color from the center of the dab
To set clone type
To constrain painting in the destination
To reproduce the source selection information in the destination selection
To tile clone source
To set clone location variability
Clone location sliders have no effect when Clone Color is enabled in the Color panel. They have an effect only when a Clone method is used.