
| • | To apply a dab stencil to a brush variant |
| • | To adjust the properties of a dab stencil |
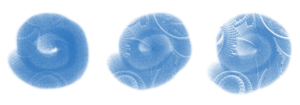
The brushstrokes in this artwork use the Dab Stencil feature. Artwork by Melissa Gallo.

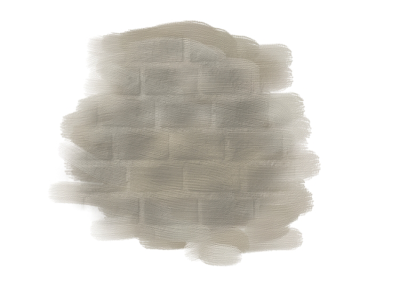
From left to right: Using paper, flow map, and texture as a dab stencil source.
You can adjust the properties of the dab stencil to change the look of the brushstrokes. For example, you can use the Strength and Min Strength controls to adjust the maximum and minimum opacity of the dab stencil. When the dab stencil is at maximum strength (100%), it is the most opaque and makes the dab areas that it covers the most transparent. In addition, you can apply jitter to vary the opacity of the dab stencil, and you can smooth the jitter for more natural-looking brushstrokes. You can link a dab stencil to an expression so that dab stencil opacity changes in response to specific mouse or stylus movement, such as pressure, direction or velocity.


Applying the same paper texture by using Grain (left) and applying a dab stencil (right).

You can use the Dab Stencil feature together with texture brushes to create impactful and controlled brushstrokes. For more information about texture brushes, see Texture painting.
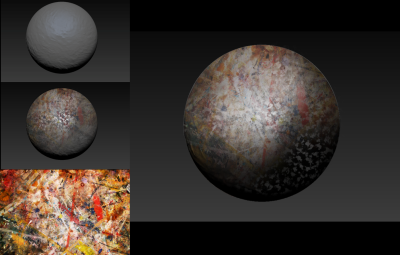
Combining Impasto with Dab Stencil.
| To apply a dab stencil to a brush variant |
|
| 1 | Choose a dab-based brush variant from the Brush Selector. |
| Dab Stencil works well with brushes that use any of the following dab types: Captured, Dynamic Speckles, Circular, Computed Circular, and Static Bristle. |
| 2 | On the extended property bar, open the Dab Options flyout  , and enable the Apply Dab Stencil check box. , and enable the Apply Dab Stencil check box. |
| If the extended property bar isn’t open, choose Window |
| 3 | Adjust any properties you want. For more information, see To adjust the properties of a dab stencil. |
You can also apply a dab stencil from the Dab Stencil panel (Window ![]() Brush Control Panels
Brush Control Panels ![]() Dab Stencil).
Dab Stencil).
| To adjust the properties of a dab stencil |
|
| 1 | Choose a Dab Stencil brush variant or a brush variant that supports Dab Stencil. |
| 2 | Choose Window |
| 3 | Make sure the Apply Dab Stencil check box is enabled. |
| 4 | From the Source list box, choose one of the following options: |
| • | Flow Map— to use a flow map as the stencil source |
| • | Paper— to use a paper texture as the stencil source |
| • | Texture— to use a texture as the stencil source. If you want to display a preview of the texture in the image window, enable the Show Texture check box. |
| 5 | Click the selector button next to the Source list box, and choose the flow map, paper texture, or texture you want to use as a source. |
| To edit the source, click the Toggle [Source Name] Panel button, and adjust any attributes you want on the corresponding panel. For more information about editing the dab stencil source, see To customize a flow map, Working with paper texture and grain or Customizing Texture brushes. |
| 6 | To adjust the Dab Stencil properties, perform a task from the following table. |
|
Move the Strength slider.
|
|
|
Move the Min Strength slider.
|
|
|
Move the Strength Jitter slider.
|
|
|
Click the Smoothness slider.
|
|
|
From the Expression list box, choose an expression.
|
|
|
Click the Audio Expression button
 . .To choose an audio input and adjust audio settings, choose Window
|
|
|
Adjust the angle of the Direction expression
|
Move the Direction slider.
|
|
Reverse the effect of an Expression setting
|
Click the Invert button
 . . |
Copyright 2016 Corel Corporation. All rights reserved.