Quick links to procedures on this page:
• |
• |
Corel Painter allows you to apply a gradient to an image by filling an area, such as the canvas, a selection, layer, or channel. For more information, see Selections and Transformations, Layers, and Alpha Channels.
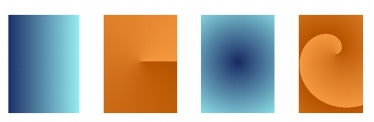
When applying a gradient as a fill, you can apply one of four gradient types: linear, radial, circular, and spiral.
Left to right: Linear, radial, circular, and spiral gradients.
You can also apply a gradient in a fluid way by painting it onto an image with a brush and dab type that support gradient painting. For more information, see General Controls: Dab Types.
| To apply a gradient as a fill |
1 |
Choose Window |
2 |
Click the Gradient selector, and click a gradient from the Painter Gradients library
panel.
|
3 |
Click one of the following gradient types:
|
• |
Linear Gradient |
• |
Radial Gradient |
• |
Circular Gradient |
• |
Spiral Gradient |
4 |
Perform a step from the following table.
|
5 |
Click the Paint Bucket tool |
6 |
In the document window, click the selected area, layer, or channel.
|
You can also apply a Gradient by choosing the Paint Bucket tool |
You can also modify the gradient fill opacity by choosing Edit |
| To paint a gradient |
1 |
Choose Window |
2 |
In the Gradients Control panel, click the Gradient Selector.
|
3 |
Click a gradient in the Gradient Libraries panel.
|
4 |
Choose Window |
5 |
Click the Brush Selector on the Brush Selector bar.
|
6 |
In the Brush Library panel, click a brush category, and a brush variant.
|
If the Source pop-up menu in the General controls panel is not available (appears gray), the selected brush category or variant does not support gradients. For example, the Pattern Pens brush category supports gradients. |
7 |
From the General controls panel, choose a dab type from the Dab Type pop-up
menu.
|
If the Source pop-up menu in the General controls panel is not available (appears gray), the selected dab type does not support gradients. For example, the Line Airbrush, Projected, and Rendered dab types support gradients. |
8 |
From the Source pop-up menu in the General controls panel, choose one of the
following options:
|
• |
Gradient — applies the current gradient across the width of the stroke
|
• |
Gradient Repeat — repeats the current gradient along the length of the stroke
|
9 |
Paint in the document window.
|
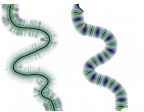
Painting with a gradient by using Gradient (left) and Gradient Repeat (right).
When painting with a gradient, only the Linear gradient type is supported.
|
Direction matters when you paint with a gradient. Corel Painter flips the
gradient when you change direction. To achieve a uniform effect, apply
strokes in the same direction.
|
|
|
Copyright 2012 Corel Corporation. All rights reserved.