
Quick links to procedures on this page:
• |
• |
• |
You can combine shapes in various ways to achieve particular results. You can group shapes so that you can manipulate several at the same time. You can also compound two or more shapes to create a single shape. You can also blend single shapes or groups of shapes, so that they appear to be one shape morphing into another.
Shapes can be grouped, allowing you to manipulate multiple shapes as a single unit. Shapes are created on layers, so you can group them in the same way you group layers.
You cannot scale, rotate, flip, or distort groups that contain a mixture of pixel-based layers and shapes. You must manipulate these two types of entities independently before you group them. For more information about grouping, refer to Viewing Layer Position.
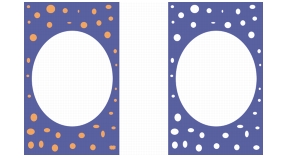
In a compound shape, two shapes are combined into a single shape. The resulting shape takes on the attributes of the shape on the topmost layer. If the shape is filled, any overlapping areas are not filled. Compound shapes can be used to cut a void in one shape using another shape. You can release a compound shape, which reverts it to the original shapes.
The rectangle and the oval are combined to create a compound shape.
| To create a compound shape |
1 |
Choose the Shape Selection tool |
2 |
Choose Shapes menu |
You can combine a shape with a compound shape to create a nested
compound shape.
|
The resulting compound shape can itself be used again to create another compound shape.
| To release a compound shape |
1 |
Select a compound shape.
|
2 |
Choose Shapes menu |
Blending creates intermediate shapes between two or more selected shapes, which is useful for morphing one shape into another. It is also used to simulate shading on irregular shapes. Blending applies to stroke and fill attributes as well as to the shape size.
You can blend a shape group with another group, but you can’t blend a single shape with a group.
Blending groups with other groups offers interesting effects, especially if the groups are blends themselves.

The small circle is blended with the large circle to create a shading effect.
| To blend shapes |
1 |
Position the shapes you want to blend.
|
2 |
In the Layers panel, arrange the shape layers.
|
Blends will progress from lower to higher layers. |
3 |
Choose the Shape Selection tool |
4 |
Hold down Shift, and select the shapes you want to blend.
|
5 |
Choose Shapes menu |
6 |
In the Blend dialog box, type a value in the Number of Steps box to control how
many intermediate shapes are created.
|
7 |
Enable one of the following ramp type options:
|
• |
Equal — Blend shapes are evenly spaced.
|
• |
Decrease toward end — Spacing starts wide and decreases toward the end of
the blend.
|
• |
Increase toward end — Spacing starts small and increases toward the end of the
blend.
|
• |
Increase toward/from middle — Spacing is wide in the middle and decreases
toward both ends.
|
8 |
Choose one of the following Color Space options:
|
• |
RGB — to progress color directly over the course of the blend
|
• |
Hue CW — to progress color clockwise in the color wheel to reach the
destination color
|
• |
Hue CCW — to progress color counterclockwise in the color wheel to reach the
destination color
|
9 |
Type a value between 0.01 and 100 in the Perspective Factor box to control the
spacing of intermediate shapes.
|
With a Perspective Factor of 1.0, the shapes are spaced evenly. With a Perspective Factor of less than 1.0, shapes are closer at the beginning of the blend and farther apart at the end of the blend. With a Perspective Factor greater than 1.0, shapes are farther apart at the beginning of the blend and closer at the end of the blend. |
10 |
Enable any of the following check boxes:
|
• |
Arc Length Matching — to blend shapes containing a different number of
anchor points
|
• |
Align Shape Start Points — to base the orientation of intermediate shapes on
the orientation of the start and end shapes. When disabled, Corel Painter bases
the orientation of intermediate shapes on the starting point (first anchor point)
of the start and end shapes. This can create a “tumbling” appearance in the
intermediate shapes.
|
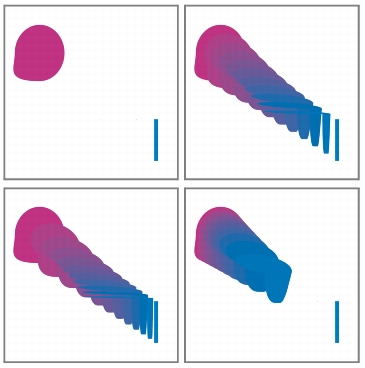
Clockwise from the top left picture: Two shapes with no blending; blending with a perspective factor of 1.0; blending with a perspective factor of 4.0; and blending with a perspective factor of 0.1.
|
|
Copyright 2012 Corel Corporation. All rights reserved.