Quick links to procedures on this page:
• |
• |
• |
• |
• |
• |
• |
• |
• |
• |
• |
• |
• |
• |
• |
• |
To manage layers in a document, you can select, lock, view, or hide them, or change their position in the hierarchy.
Selecting a layer lets you make changes to it. If no layers are selected, any changes you make apply to the canvas. The Auto Select Layer option changes your ability to select and move layers with the Layer Adjuster tool.
By default, the Auto Select Layer option is disabled. This means that the layer selection is “locked in” — the Layer Adjuster tool affects only the selected layer or layers. In other words, you cannot select a layer by clicking it in the document window; you must select a layer by clicking it in the Layers panel. When the Auto Select Layer option is enabled, you can select layers automatically with the Layer Adjuster tool by clicking an area of layer content in the document window.
| To select a layer |
You can also press the F key to activate the Layer Adjuster tool.
|
If you are working with a shape, you can switch to the Shape Selection tool
|
| To deselect layers |
• |
In the Layers panel, click the Canvas.
|
Deselecting one or more layers automatically selects the Canvas layer. |
You can also deselect a layer by clicking the layer you want to deselect in the
Layers panel, then clicking the Layer Options button |
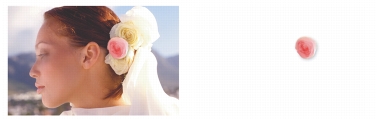
When a layer is selected, you can move its content anywhere in the document to create a new image layout.

The pink rose was added to an individual layer. The rose layer (left) was repositioned on top of the white roses (right).
Think of a layer’s content as being contained by an invisible bounding box. This bounding box is a rectangle that marks the left, right, top, and bottom edges of the layer’s content. When you move or align a layer, you work with the dimensions and position of this bounding box, not with the entire area of the layer. This allows you to easily position the contents of a layer in relation to the canvas.
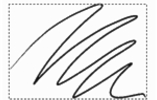
This layer contains a brushstroke. The content area is defined by an invisible bounding box (indicated by a dashed outline in the image).
The layer indicators provide a visual representation of the bounding box. Refer to Showing Layer Indicators for more information.
| To move or nudge a layer |
1 |
In the Layers panel, select the layer or group you want to move.
|
2 |
Perform an action from the following table.
|
|
To
|
Do the following
|
|---|---|
|
Move a layer
|
Click the Layer Adjuster tool
|
|
Move a layer one pixel at a time
|
Press the Arrow keys to move the selected layer one pixel at a time.
|
|
Move a layer to a new document window
|
With two or more documents open in the application window, click the Layer Adjuster tool
|
| To move a layer to a specific location |
1 |
In the Layers panel, select a layer or group.
|
2 |
Click the Layer Options button |
3 |
In the Position area, type values in the following boxes:
|
• |
Top — defines the distance in pixels from the top edge of the canvas to the top
edge of the layer’s content. Increase to move the layer down, or decrease to
move the layer up.
|
• |
Left — defines the distance in pixels from the left edge of the canvas to the left
edge of the layer’s content. Increase to move the layer to the right, or decrease
to move the layer to the left.
|
If you use negative values, or values larger than the canvas dimensions, the
layer is placed partially or wholly outside the canvas.
|
You can also open the Layer Attributes dialog box for pixel-based and
reference layers by double-clicking the item in the Layers panel, or by
selecting an item and pressing Return (Mac OS) or Enter (Windows).
|
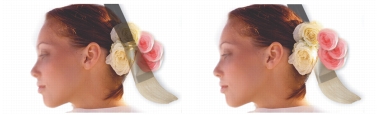
You can align layers horizontally or vertically. When you align layers, Corel Painter calculates the “destination” point for alignment. For example, if you align layers to the left, the destination is the leftmost point of all selected layers. If you align horizontally to the center, the destination is the midpoint between the leftmost edge and the rightmost edge of the selected layers.
Next, Corel Painter aligns the corresponding edge of each selected layer’s bounding box with the destination point.
For example, if you align layers to the left, each layer is moved so that the left edge of its bounding box lines up with the destination point. If you align horizontally to the center, each layer is moved so that the horizontal midpoint of its bounding box lines up with the destination point.
The left edge of the image is the leftmost point of all the layers (left). The layers are aligned horizontally to the left so that all the layers line up with the leftmost point (right).
| To align layers |
1 |
Select the layers or groups that you want to align.
|
2 |
Choose Effects |
3 |
In the Align Shapes dialog box, enable any of the following Horizontal options:
|
• |
Left — aligns the left edges of the layers’ content
|
• |
Center — aligns the midpoints of the layers’ content horizontally
|
• |
Right — aligns the right edges of the layers’ content
|
• |
None — preserves the existing horizontal alignment
|
4 |
Enable any of the following Vertical options:
|
• |
Top — aligns the top edges of the layers’ content
|
• |
Middle — aligns the midpoints of the layers’ content vertically
|
• |
Bottom — aligns the bottom edges of the layers’ content
|
• |
None — preserves the existing vertical alignment
|
You can lock layers to avoid accidentally changing them. When a layer is locked, you cannot select it with the Layer Adjuster tool in the document window. You can, however, move a locked layer or shape by nudging it. For more information, refer to Working with Reference Layers.
| To lock or unlock a layer |
1 |
Select the layer in the Layers panel.
|
2 |
Do one of the following:
|
• |
In the Layers panel, click the Lock Layer button |
• |
Click the Layer Options button |
The Locked Layer icon |
You can control your view of an image in the document window by changing layer visibility settings. This is helpful in both compositing an image and applying effects. You can hide one layer to gain better visibility of the layer below it. Or, you can set up different states of an image to create rollover effects for use on the Web. For more information about creating rollovers, refer to Creating Rollovers.
In the example on the right, the layer containing the background is hidden; in the example on the left, the layer containing the background is visible.
Layer visibility settings stay active when you print or save documents to certain file formats. In other words, the content of hidden layers does not print and is not saved. However, saving a document in RIFF or PSD format preserves hidden layers as part of the document. For more information, see Saving Files That Contain Layers.
| To show or hide a layer or the canvas |
• |
In the Layers panel, click the eye icon next to the layer name or the canvas.
|
When the eye is shut |
The hierarchy of layers determines how the layers in a document interact. When you create a new pixel-based layer, it appears on top of the existing layers (when the canvas is selected) or on top of the selected layer. New Watercolor, Liquid Ink, and dynamic layers are always created on top of existing layers. Depending on its transparency, masking, and compositing characteristics, the layer will obscure or otherwise affect the underlying layers.
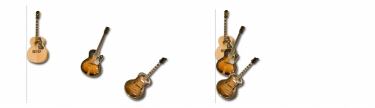
A document’s layer hierarchy is reflected in the Layers panel. The bottom layer is always the canvas.
In this example, the picture of the brush is contained in a layer. The brush layer is displayed in the top position (left) and in the bottom position (right).
| To change a layer’s position in the hierarchy |
1 |
Choose the Layer Adjuster tool |
2 |
In the Layers panel, select the layer you want to reposition in the hierarchy.
|
3 |
Perform an action from the following table.
|
|
To
|
Do one of the following
|
||||||
|---|---|---|---|---|---|---|---|
|
Move a layer to the bottom
|
|
||||||
|
Move a layer to the top
|
|
||||||
|
Move a layer down one
|
|
||||||
|
Move a layer up one
|
|
When you have nonoverlapping layers in a document, the Move Up One
Layer and Move Down One Layer commands may move the selected layer
past multiple layers. This is because nonoverlapping layers are considered to
be at the same level. The Move Up One Layer and Move Down One Layer
commands move the selected layer (or layers) above or below the next level.
To move a layer to a position between nonoverlapping layers, drag it in the
Layers panel.
|
The Navigator panel contains information about the size and position of the selected layer’s content on the canvas. Think of the area of a layer that contains images as being marked by a bounding box. The Navigator panel displays the dimensions and position of the bounding box, not the entire area of the layer. This makes it easy to determine the exact size and location of a layer’s content in the document.
The following list describes information displayed in the Navigator panel:
• |
X is the x-coordinate of the pointer on the canvas, measured in pixels.
|
• |
Y is the y-coordinate of the pointer on the canvas, measured in pixels.
|
• |
W is the width of the layer’s content, measured in pixels.
|
• |
H is the height of the layer’s content, measured in pixels.
|
• |
T is the position of the top edge of the layer’s bounding box, measured in pixels
from the top edge of the canvas.
|
• |
L is the position of the left edge of the layer’s bounding box, measured in pixels
from the left edge of the canvas.
|
• |
B is the position of the bottom edge of the layer’s bounding box, measured in pixels
from the top edge of the canvas.
|
• |
R is the position of the right edge of the layer’s bounding box, measured in pixels
from the left edge of the canvas.
|
In the document window, you can also view indicators that mark the corners of the selected layer’s content. For more information, see Showing Layer Indicators.
You can show the layer indicators to see display handles at the corners of a layer’s content when it is selected. You can also display information about the size of a layer’s content and its position on the canvas. For more information, see Viewing Layer Position.
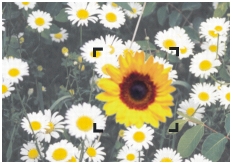
Show the layer indicators to mark the corners of a selected layer.
| To display the layer information |
• |
Choose Window |
If the panel is not expanded, double-click the Navigator panel tab. |
| To show layer indicators |
1 |
In the Layers panel, select a layer.
|
If you selected the canvas, the funtion will not work. You need to select a layer. |
2 |
Click the Layer Options button |
To hide the layer indicators, click the Layer Options button, and choose Hide
Layer Indicators.
|
Grouping layers enables you to control layers as a unit. A group can contain any combination of layers: pixel-based layers, Watercolor layers, Liquid Ink layers, vector-based shapes, and dynamic layers.
You can move, rename, hide, show, lock, and set options for a group just as you do for a single layer. However, you cannot paint across layers in a group or change the composite method for a group; you must collapse the group into a single layer if you want to paint on it.
To work with individual layers in a group, you must open the group. To regain control of the group as a unit, you must close the group. Collapsing a group reduces its contents to a single layer.
If you create a new layer while you have a layer within a group selected in the Layer panel, the new layer is added to the group. If the group is selected, the layer is placed above the group.
| To create a group |
1 |
In the Layers panel, select the layers you want to group.
|
For more information about selecting multiple layers, refer to Selecting Layers. |
2 |
Do one of the following:
|
• |
Click the Layer Commands button |
• |
Click the Layer Options button |
The layers are collected under a group item in the Layers panel. |
If you select nonsequential layers (layers not next to each other in the list),
Corel Painter creates the group at the position of the topmost layer. To select
nonsequential layers, in the Layers panel, hold down Shift and click each layer
you want to select.
|
| To open or close a group |
• |
In the Layers panel, click the arrow to the left of the group.
|
When the arrow points down |
| To add or remove a layer in a group |
1 |
In the Layers panel, open the destination group.
|
2 |
Perform an action from the following table.
|
|
To
|
Do the following
|
|---|---|
|
Add a layer to a group
|
Drag a layer to the group.
|
|
Remove a layer from a group
|
Drag the layer out of the group.
|
You can create a nested group by dragging a closed group to the open
destination group.
|
| To ungroup layers |
1 |
In the Layers panel, select the group.
|
If the group is open, close the group. |
2 |
Do one of the following:
|
• |
Click the Layer Commands button |
• |
Click the Layer Options button |
| To collapse a group |
1 |
In the Layers panel, select the group.
|
2 |
Click the Layer Commands button |
If the group contains shapes, Liquid Ink layers, or dynamic layers, the Commit dialog box is displayed. Click Commit All to convert the items to pixel-based layers before collapsing the entire group. |
If you want to collapse a group containing a Watercolor layer, you must first
convert the Watercolor layer to a default layer and change its composite
method to Default. For more information about composite methods, refer to
Blending Layers by Using Composite Methods.
|
You can also collapse layers by clicking the Layer Options button |
If you have enabled the Commit and Don’t Ask Again check box in the
Commit dialog box, you can reinstate the display of the Commit dialog box
when collapsing layers by choosing Corel Painter 12 menu |
Dropping a layer or group merges its contents with the canvas. After you drop a layer, you can no longer access the layer’s content separately from the canvas. You can drop specific layers or you can drop all layers at once.
When you drop a layer, you can choose to create a selection based on the layer contents. If the layer has a layer mask, the mask is used to make the selection. For more information, see Working with Layer Masks and Selections and Transformations.
| To drop a layer |
|
To
|
Do the following
|
||||||
|---|---|---|---|---|---|---|---|
|
Drop specific layers
|
In the Layers panel, select the layers (or groups) that you want to drop, and do one of the following:
|
||||||
|
Drop all layers
|
In the Layers panel, click the Layer Options button
|
||||||
|
Make a selection by dropping a layer
|
In the Layers panel, click the Layer Options button
|
|
|
Copyright 2012 Corel Corporation. All rights reserved.