Quick links to procedures on this page:
• |
• |
• |
• |
• |
• |
• |
• |
• |
• |
• |
• |
• |
You can create a layer mask to define what areas of a layer are visible in the document window. Masking originated as a technique for creating color separations, where sheets of masking material were hand-cut to define the color regions in an image. In the Corel Painter digital workspace, the layer mask is a powerful tool for controlling image composition and effects.
A layer mask is similar to an alpha channel. Both are grayscale images that you can create and edit. Although the Channels panel provides access to both channels and layer masks, their characteristics and functions are different:
• |
A layer mask is attached to a layer, but an alpha channel is independent.
|
• |
The canvas can have up to 32 alpha channels; each layer can have only one layer
mask.
|
• |
Channels don’t influence the visibility of the canvas image; a layer mask defines
what areas of a layer’s image are visible.
|
• |
An alpha channel, when loaded, protects designated areas of an image; a layer
mask does not provide protection.
|
• |
A channel is enabled by loading it to a selection. A layer mask can be enabled and
disabled at any time, and it can also be loaded to a selection.
|
For more information, see Creating, Generating, and Importing Channels.
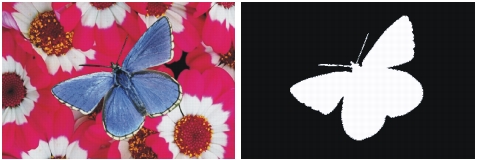
A layer mask is a grayscale image. In the white areas of the mask, the layer content is visible; in the black areas of the mask, the layer is transparent, revealing the images below it. Intermediate levels of gray are partially transparent.
You can create a new, blank layer mask, or you can create a layer mask based on the layer’s transparency. A layer mask based on transparency is white wherever the layer has content, and black in other areas. For more information, see Preserving Layer Transparency.

A layer mask for the butterfly layer is created based on its transparency. Black areas are transparent; white areas reveal the image.
| To create a blank layer mask |
1 |
Select a layer.
|
2 |
Do one of the following:
|
• |
In the Layers panel, click the Create Layer Mask button |
• |
Choose Layers |
The blank layer mask icon displays next to the layer name in the Layers panel. |
The layer mask icon varies in appearance depending on how you’re viewing
the layers. If you are displaying layers as No Thumbnails, the icon is the same
as the Create Layer Mask button. If you’re viewing layers as any size of
thumbnail, a small-scale representation of the mask displays as the icon.
|
| To create a layer mask based on transparency |
1 |
Select a layer.
|
2 |
Choose Layers |
The layer mask icon displays next to the layer name in the Layers panel. |
You can create layer masks based on transparency for pixel-based layers only.
Other layers must first be converted to default layers by clicking the Layer
Options button |
Earlier versions of Corel Painter used layer visibility masks. If you have a file
with a modified visibility mask that was created with an earlier version of
Corel Painter, use this procedure to load the visibility mask to a layer mask.
|
Before you work with a layer mask, you must select it. You can also view a layer mask as a grayscale image. Selecting a layer mask and viewing it are distinct operations — you can select a layer mask without viewing it.
| To select a layer mask |
1 |
In the Layers panel, choose a layer that has a layer mask.
|
The layer mask is displayed in the Channels panel. |
2 |
Do one of the following:
|
• |
In the Channels panel, click the layer mask.
|
• |
In the Layers panel, click the layer mask icon next to the layer name.
|
| To select a transparency mask from the Layers Panel |
• |
In the Layers panel, perform an action from the following table:
|
| To view a layer mask |
1 |
Select a layer with a layer mask.
|
2 |
In the Channels panel, click the layer mask.
|
In this mode, the RGB image is hidden. |
| To hide a layer mask |
• |
In the Channels panel, click the eye icon |
You can copy a layer mask to an alpha channel. If you’ve finished working with a layer mask, you can delete it. You can also clear a layer mask without deleting it, leaving you with a blank mask.
The layer mask is a grayscale image. By inverting it, you can make dark pixels light, and light pixels dark. When you move a layer, Corel Painter also moves the layer mask to maintain the pixel correspondence.
You can disable a layer mask, which lets you view the entire layer. The layer mask can be re-enabled at any time. If you like the result of a layer mask, you can apply it. Applying the layer mask permanently removes the hidden parts of the layer and deletes the layer mask.
Although a layer mask does not protect areas of a layer from being edited, you can load a layer mask to a selection. The selection provides protection to the hidden parts of the layer. For more information about selections, refer to Selections and Transformations.
The name of a layer mask in the Channels panel reflects the name of the layer ([Layer Name] [Layer Mask]). Although you cannot change the name of a layer mask, it automatically updates if you change the layer name. You can also copy a channel to a layer mask.
| To copy a layer mask to a channel |
1 |
Select a layer mask.
|
2 |
In the Channels panel, click the Channel Options button |
3 |
In the Duplicate Channel dialog box, choose New from the Destination list box.
|
You can also copy a layer mask to an existing channel, which replaces that
channel. To do this, choose the channel to be replaced from the Destination
list box.
|
| To copy a channel to a layer mask |
1 |
Select a layer in the Layers panel.
|
2 |
Click the Create Layer Mask button |
A blank layer mask is created. |
3 |
In the Channels panel, select the channel you want to copy.
|
4 |
Click the Channel Options button |
5 |
In the Duplicate Channel dialog box, choose the layer mask from the Destination
list box.
|
Corel Painter copies to the layer mask the portion of the channel that coincides with the layer content. |
| To delete or clear a layer mask |
• |
Select the layer mask you want to delete or clear.
|
| To invert a layer mask |
1 |
Select a layer mask.
|
2 |
In the Channels panel, click the Channel Options button |
| To enable or disable a layer mask |
• |
Select a layer mask.
|
|
To
|
Do the following
|
|---|---|
|
Enable a layer mask
|
Choose Layers
|
|
Disable a layer mask
|
Choose Layers
|
| To apply a layer mask |
1 |
Select a layer mask.
|
2 |
Choose Layers |
| To load a layer mask to a selection |
1 |
In the Layers panel, select a layer that has a layer mask.
|
2 |
Control + click the layer mask icon (Mac OS), or right-click the layer mask icon
(Windows), and choose Load Layer Mask to Selection.
|
When you select a layer mask, you can edit it as you would edit a channel. You can paint in a layer mask; apply effects to it; fill it with a color, pattern, gradient, or weave; and feather it. You do not have to view a layer mask to edit it; you can select the layer mask, make changes to it, and view the resulting image immediately.

A layer mask before (left) and after (right) feathering.
When you edit a layer mask, you are making modifications to the mask, not to the layer’s image. You can use shades of gray only; no colors are available. This is because the layer mask is a grayscale image that is separate from the RGB image.
The paint and effects you apply to a layer mask are reflected as follows:
• |
Applying white removes areas from the mask and reveals more of the layer.
|
• |
Applying black adds to the mask, which conceals more of the layer.
|
• |
Applying an intermediate gray value makes the mask semitransparent.
|
|
|
Copyright 2012 Corel Corporation. All rights reserved.