Quick links to procedures on this page:
• |
• |
• |
• |
• |
• |
• |
Color correction lets you adjust the relative amounts of the color components in an image. Color correction is often used to improve a color-casted or washed-out photo. You can also use it to create surreal color effects. If a layer is selected, color correction is applied only to the layer; if no layer is selected, the entire image is color corrected.
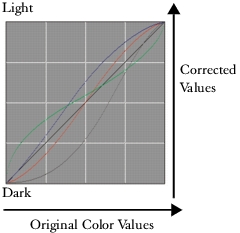
Color correction is based on adjusting gamma response curves. You can adjust the gamma curves for red, green, blue, or all three color components. The black Master curve controls all color components equally. The curves describe how the input color values are adjusted to create the output (corrected) color values.
A gamma curve.
The horizontal axis represents the input (original color) values. The vertical axis represents the output (corrected) values. Before you adjust a curve, it appears perfectly diagonal (45°), which indicates that all input and output values are equal. Corel Painter maps light values at the top of the graph and darker values at the bottom. When you edit RGB curves, the current color is indicated by a colored point on the curve.

Use the Color Correction dialog box to correct colors.
The Color Correction dialog box provides access to four methods of adjusting a gamma curve:
• |
Contrast and Brightness
|
• |
Curve
|
• |
Freehand
|
• |
Advanced
|
You can use a single method or a combination of methods to adjust the image.
You can also adjust an image by matching the colors and brightness of another image.
You can adjust the contrast or brightness of colors while maintaining the tonal transitions in the original image. As you adjust the Contrast or Brightness sliders, the endpoints of the curves remain fixed. Because the effect maintains the levels from the original image, there are always 256 distinct levels, regardless of how much you adjust the sliders.
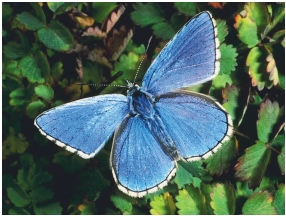
Contrast adjusts the difference between light and dark values. As you increase Contrast, the curve takes on an “S” shape, indicating that light colors are becoming lighter and dark colors darker.
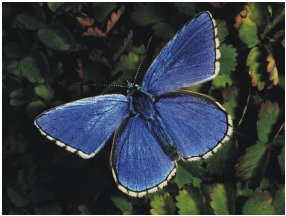
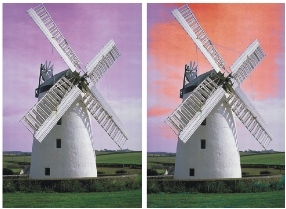
Original image.

Contrast method of color correction.
Brightness moves all values on a curve to a brighter tone or darker tone.

Brightness method of color correction.
| To correct colors by using contrast and brightness |
1 |
Choose Effects |
2 |
In the Color Correction dialog box, choose Contrast and Brightness from the list
box.
|
3 |
For each color you want to adjust, click the color icon and adjust the Contrast and
Brightness sliders.
|
Click the Master button to adjust all color curves at once. |
Color icons in the Color Correction dialog box.
Curve lets you drag the color curves to reshape them. This method lets you to create very specific changes in color values.
Curve method of color correction.
You can control the overall effect of your changes using the Effect slider. The slider controls how much of the curve moves in response to your dragging. When the slider is all the way to the right, the entire curve moves. As the value is reduced, a smaller portion of the curve moves.
| To correct colors by reshaping curves |
1 |
Choose Effects |
2 |
In the Color Correction dialog box, choose Curve from the list box.
|
3 |
Click the color icon for the curve you want to reshape.
|
If you want to reshape all color curves at once, click the Master button. |
4 |
Adjust the position of the Effect slider to set the intensity of your changes.
|
5 |
Move the crosshair cursor over the curve; when the crosshair cursor changes to a
black arrowhead, drag the curve.
|
The Freehand method lets you draw the curve as you want it. This color correction method is particularly useful when you want posterized or solarized effects.

Freehand method of color correction.
| To correct colors by using the Freehand method |
1 |
Choose Effects menu |
2 |
In the Color Correction dialog box, choose Freehand from the list box.
|
3 |
Click the color icon for the color you want to adjust.
|
If you want to redraw all color curves at once, click the Master button. |
4 |
Move the pointer over the graph; when the pointer changes to a pencil, drag to
draw a new curve.
|
The Advanced method lets you set the red, green, and blue curves numerically at five points: Highlight, 1/4 Tone, Midtone, 3/4 Tone, and Shadow. These points coincide with the vertical gridlines.

Advanced method of color correction.
| To correct colors by using the Advanced method |
1 |
Choose Effects |
2 |
In the Color Correction dialog box, choose Advanced from the list box.
|
3 |
Click a color icon, and drag the corresponding curve.
|
If you want to redraw all color curves at once, click the Master button. |
You can also correct colors using the Advanced method by choosing Advanced
from the list box and typing values in the boxes.
|
The Adjust Colors effect lets you control the hue, saturation, and value of an image in much the same way as you would adjust your television.

Use the Adjust Color dialog box to change the hue, saturation, and value of an image.
| To adjust colors |
1 |
Select a layer or area of the canvas.
|
If you want to adjust colors in the entire image, do not make a selection. |
2 |
Choose Effects |
3 |
In the Adjust Color dialog box, choose one of the following methods from the
Using list box:
|
• |
Uniform Color — adjusts all pixels equally
|
• |
Paper — uses the selected paper grain to control the color adjustment
|
• |
Image Luminance — uses the luminance of the image as the model for color
adjustment. Areas of greater luminance are adjusted more.
|
• |
Original Luminance — uses the luminance of the clone source as the model for
color adjustment. If you have not set up a clone source, the current pattern is
used.
|
• |
[Alpha channel] or [Layer mask] — sets the selected alpha channel or layer
mask as the model for controlling color adjustment. For example, a
black-to-white gradation in the channel or mask lets you adjust the color
progressively across the image. In black areas of the channel or mask, colors are
not changed. In white areas of the channel or mask, the adjustment applies
fully. Transitional areas receive proportional color adjustments.
|
4 |
Adjust the sliders to control the overall hue, saturation, and value levels in the
selection.
|
• |
The Hue Shift slider adjusts the colors of the pixels by changing their hue.
Moving the slider to the right increases the hue.
|
• |
The Saturation slider adjusts the amount of pure hue in the color. Moving the
slider all the way to the left creates a grayscale image.
|
• |
The Value slider adjusts color brightness. Moving the slider to the left darkens
colors.
|
You can see changes in the Preview window. To see areas of the image that aren’t visible, drag in the Preview window. |
If you want to reset the sliders to the default settings, click Reset. |
With all methods other than Uniform Color, a greater color adjustment
results for pixels that are assigned higher luminance.
|
The Adjust Selected Colors effect is similar to the Adjust Colors effect, but it works only on a specified range of colors within an image. You choose a color in an image and adjust colors within a range of that color. You could, for example, change yellow peppers to red peppers. You can adjust colors that are exactly the same as the color you select, or you can choose colors within a range, based on proximity (on the color wheel or the color space) to the selected color.
Selective color adjustments change only certain colors in the image.
The Extents sliders determine the extent of the HSV color space around the selected center color:
• |
H Extents controls the number of hues adjusted. Only hues within the specified
percentage of hues on the color wheel are adjusted.
|
• |
S Extents controls the range of saturation adjusted. Only saturations within this
range are adjusted.
|
• |
V Extents controls the range of values adjusted.
|
By combining these three settings, you can set up a very specific range of colors to adjust. For example, you can limit changes to a precise shade of red.
The Feather sliders affect the softness at the edge of the selected colors. These sliders can help you create smoother transitions between the replaced color and the original.
A replaced color with and without feathering.
The choice of methods is the same as for Adjust Colors. For more information, refer to To adjust colors.
| To adjust a selected color |
1 |
Choose Effects |
The Adjust Selected Colors dialog box appears. |
2 |
Move your cursor over the original image in the document window (your cursor
becomes a dropper), and click the color you want to adjust.
|
The Color panel displays the selected color as the main color. |
3 |
Choose a method from the Using list box to determine the source that
Corel Painter will use for the color adjustment.
|
4 |
Adjust the Extents and Feather sliders to select a range of colors to adjust.
|
Move the Extents sliders to the right to increase the amount of color space affected. |
5 |
Adjust the bottom three sliders to control the overall hue, saturation, and value
levels.
|
You can see changes in the Preview window. To see areas of the image that aren’t visible, drag in the Preview window. |
If you want to reset the sliders to the default settings, click Reset. |
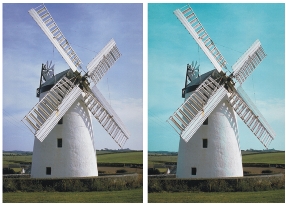
You can adjust the brightness and contrast of the overall image in RGB in the Brightness/Contrast dialog box. You can also adjust brightness and contrast as a function of dye densities by adjusting the dye concentration. Refer to Adjusting the Dye Concentration for more information.
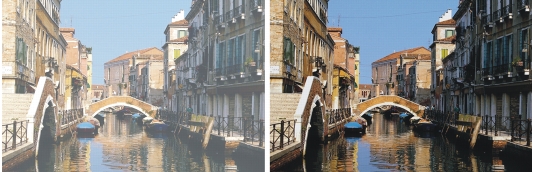
Before (left) and after (right) applying the Brightness/Contrast effect.
| To adjust RGB brightness and contrast |
1 |
Select a layer or area of the canvas.
|
If you want to apply the effect to the entire image, do not make a selection. |
2 |
Choose Effects |
The Brightness/Contrast dialog box appears. |
3 |
Move the upper slider to adjust image contrast. Move the lower slider to adjust
image brightness.
|
The image is adjusted when you stop dragging. |
If you want to reset the sliders to the default settings, click Reset. |
4 |
Click Apply.
|
|
|
Copyright 2012 Corel Corporation. All rights reserved.