
Quick links to procedures on this page:
• |
• |
• |
• |
• |
• |
• |
• |
• |
• |
The Surface Control effects let you manipulate paper, color, and light to produce a variety of interesting visual effects. Many of these effects also let you add texture to an image, producing the illusion of paint on a canvas or paper.
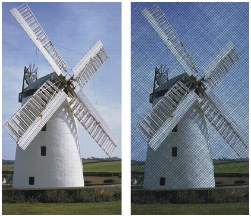
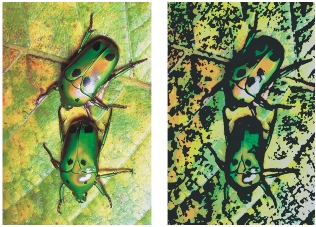
The Apply Screen effect is another way to add texture to an image. It combines luminance, the selected paper texture, and the three colors you pick, to add a three-color screen to an image.
Before (left) and after (right) using Apply Screen with Image Luminance.
| To apply a screen |
1 |
Select a layer or area of the canvas.
|
If you want to apply the effect to the entire image, do not make selection. |
2 |
Choose Effects |
3 |
In the Apply Screen dialog box, choose three colors by clicking each color chip and
choosing a color from the Color dialog box.
|
4 |
Move the Threshold 1 slider to determine how much of the second and third colors
will be in the image.
|
Moving the slider to the left increases the amount of the third color. Moving it to the right increases the amount of the second color. |
5 |
Move the Threshold 2 slider to determine how much of the first color will be in the
image.
|
Moving the slider to the left decreases the amount of the first color. Moving it to the right increases the amount of the first color. |
6 |
Choose one of the following methods from the Using list box:
|
• |
Paper — produces a screen using the paper grain. If the Papers panel is open,
you can choose different textures while the Apply Screen dialog box is open.
|
• |
Image Luminance — creates texture based on the image’s brightness. It is
similar to a three-level posterization.
|
• |
Original Luminance — adds texture based on the clone source document’s
brightness
|
• |
[Alpha channel] or [Layer mask] — adds texture based on the luminance of a
channel or layer mask. The list box lists each alpha channel in the document. If
a layer with a layer mask is selected, the layer mask is also listed.
|
Use the Color Overlay effect to simultaneously add color and texture to an image. The color is taken from the current color in the Color panel. Both color and texture are applied using one of five methods:
• |
The Uniform Color method adds a flat tint to the image.
|
• |
The Paper method overlays a color using the paper texture as a mapping model.
More color is applied to light areas in the paper grain; less color is applied to dark
areas.
|
• |
The Image Luminance method uses the image’s brightness as the model for the
color overlay. More of the effect is applied to light areas in the original image; less
color is applied to dark areas.
|
• |
The Original Luminance method uses the luminance of the clone source as the
model for the color overlay. Light areas in the clone source produce more color in
the image.
|
• |
[Alpha channel] or [Layer mask] sets the values in the channel or layer mask as the
model for the color overlay. More color is applied to the light areas of the channel or
mask; less color is applied to dark areas.
|
You can use this method only if you have a saved alpha channel or a layer mask in your image. |
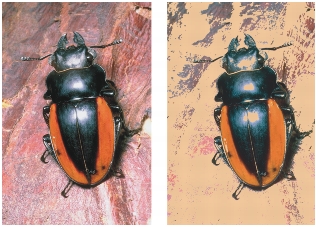
Before (left) and after (right) applying the Color Overlay effect.
| To create a color overlay |
1 |
From the Window menu, open both the Color panel and the Papers panel.
|
2 |
Select a layer or area of the canvas.
|
If you want to apply the effect to the entire image, do not make selection. |
3 |
Choose a color from the Color panel.
|
If you want to base the color on a paper grain, choose a paper texture in the Papers panel. |
4 |
Choose Effects |
5 |
In the Color Overlay dialog box, choose a method from the Using list box.
|
6 |
Move the Opacity slider until the preview reflects the desired opacity.
|
7 |
Enable or disable the following options:
|
• |
Dye Concentration— allows the paper to absorb the color
|
• |
Hiding Power — allows the color to cover what lies beneath it
|
The Dye Concentration effect lets you adjust pigments to adjust color intensity and add surface texture. You can use this effect to lighten an underexposed photo or to darken an overexposed one.
| To adjust the dye concentration |
1 |
Select a layer or area of the canvas.
|
If you want to apply the effect to the entire image, do not make a selection. |
2 |
Choose Effects |
The Adjust Dye Concentration dialog box is displayed. While the dialog box is open, the controls in the Papers panel can be adjusted. |
3 |
Choose a method from the Using list box:
|
• |
Uniform Color — adjusts color based solely on Maximum slider values. Setting
the Maximum slider above 100% increases color density; setting it below 100%
decreases color density. With this method, moving the Minimum slider has no
effect.
|
• |
Paper — adjusts color by using the paper texture as a mapping model
|
• |
Image Luminance — uses the image’s brightness as the model for the color
adjustment
|
• |
Original Luminance — uses the luminance of the clone source as the model for
the adjustment
|
• |
[Alpha channel] or [Layer mask] — sets the values in the alpha channel or layer
mask as the model for the dye concentration adjustment. You can use this
method only if you have a saved channel or a layer mask in your image.
|
4 |
Adjust the Minimum and Maximum sliders as needed.
|
If you think of texture as peaks and valleys, the Maximum slider controls the amount of dye on the peaks, and the Minimum slider controls the amount of dye in the valleys. You can set the Maximum slider as high as 800%. |
The Minimum slider can be set as low as 0%. The lower you set the Minimum slider, the higher the contrast between peaks and valleys. The higher you set the Minimum slider, the flatter the paper appears. |
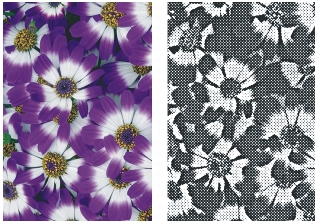
The Express Texture effect generates a high-contrast version of an image in grayscale. With this feature, you can create a visual effect similar to a custom halftone screen, like a mezzotint or line screen. Like the Apply Screen effect, the Express Texture effect has anti-aliasing built in.
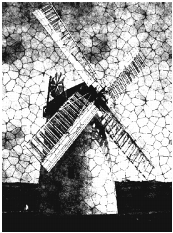
The Express Texture effect.
| To apply Express Texture |
1 |
Select a layer or area of the canvas.
|
If you want to apply the effect to the entire image, do not make a selection. |
2 |
Choose Effects |
3 |
In the Express Texture dialog box, choose a method from the Using list box.
|
You can base the effect on the current paper texture, a channel or layer mask, image luminance, or original luminance (clone source). |
4 |
Use the following guidelines to adjust the sliders:
|
• |
Gray Threshold — determines where the threshold is, between pure black and
pure white
|
• |
Grain — determines how deeply the texture penetrates the surface
|
• |
Contrast — determines the number of levels of black and white. For example,
low contrast generates pure gray, medium contrast produces levels of grayscale,
and high contrast produces a black and white screen.
|
![]()
If you want to restore some of the original color to the image after applying
this effect, choose Edit |
If you want to add a new set of colors, you can apply an express gradient to
the image. In the Gradients panel, choose a gradient, click the Gradient
Options button, and choose Express In Image.
|
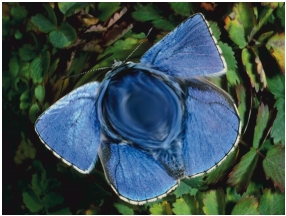
The Image Warp effect lets you distort the surface of an image as if it were a sheet of pliable film. You can make images look as though they’re reflected in a fun house mirror.
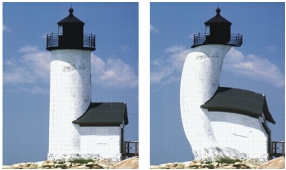
Before (left) and after (right) applying the Image Warp effect.
The Quick Warp effect lets you create some basic distortions, like stretch or bulge. These distortions are useful for preparing images for reflection maps when applying surface texture. For more information about surface texture and reflection maps, refer to Working with Reflection Maps. Quick Warp applies to the entire canvas — not to selections or layers.
Quick Warp lets you create five types of distortions:
• |
Sphere warps the image spherically, like a reflection on a polished silver ball. You
can use the Power and Angle Factor sliders to intensify and twist the effect.
|

An example of a Sphere distortion.
• |
Bump warps the center of the image toward you, making it appear convex. Use the
Angle Factor slider to twist the effect.
|
An example of a Bump distortion.
• |
Valley warps the center of the image away from you, making it appear concave. Use
the Angle Factor slider to twist the effect.
|
• |
Swirl distorts the image in a spiral. The Angle Factor slider controls how many
times the image spirals.
|
• |
Ripple distorts the image in concentric rings, like the rings created when you drop
a stone into a pool of water. Use the Power and Angle Factor sliders to intensify and
twist the effect.
|
| To warp an image |
1 |
Select a layer or area of the canvas.
|
If you want to apply the effect to the entire image, do not make a selection. |
2 |
Choose Effects |
3 |
In the Image Warp dialog box, choose one of the following warp methods:
|
• |
Linear — pulls the selected area as if you were pulling from the top of a cone
|
• |
Cubic — pulls a flat surface outward
|
• |
Sphere — pulls a surface as if it were a lens
|
4 |
Adjust the Size slider.
|
This slider controls the size of the area affected by dragging the cursor. The higher the number, the smaller the affected area. |
5 |
In the preview window, drag to distort the image.
|
A circle displays as you drag, indicating the area affected. |
| To apply Quick Warp effects |
1 |
Choose Effects |
2 |
In the Quick Warp dialog box, enable a warp method.
|
3 |
Adjust the Power and Angle Factor sliders to control the warp effects.
|
The Woodcut effect is useful for creating woodcut or linoleum block prints of photographs. You can save preset Woodcut effects to apply to other photographs or paintings.
Before (left) and after (right) applying the Woodcut effect.
| To apply Woodcut effects |
1 |
Choose Effects |
2 |
In the Woodcut dialog box, enable or disable the following check boxes:
|
• |
Output Black — uses the black part of the effect in the final image. Disable this
check box if you want to use color only in the final image.
|
• |
Output Color — uses the color part of the effect in the final image. Disable this
check box if you want to use black and white only in the final image.
|
3 |
If you enable the Output Black check box, you can adjust the following sliders:
|
• |
Black Edge — determines the detail of the black edge. Larger values produce
thick, black edges around objects. Smaller values produce more intricate edges.
|
• |
Erosion Time — determines the number of erosion iterations performed on the
black edge. The higher the erosion, the simpler the edge.
|
• |
Erosion Edge — controls the amount of smoothing on the black edge. Larger
values produce a rounded appearance of the black edge.
|
• |
Heaviness — determines the amount of black in the final image
|
4 |
Enable one of the following options:
|
• |
Auto Color — automatically computes the color set from the original image’s
colors
|
• |
Use Color Set — uses a predefined color set
|
5 |
Use the following guidelines to adjust the sliders:
|
• |
N Colors — determines the number of colors used in the effect, ranging from 2
to 256. You can adjust the number of colors only if you have enabled the Auto
Color option and the Output Color check box.
|
• |
Color Edge — determines the thickness of a colored edge applied to the image
boundaries. Moving the slider to the right increases edge thickness, which is
measured in pixels. The edge color is selected by choosing a color swatch below
the Preview window. Before you use this feature, you must enable the
Output Color check box.
|
![]()
You can change the colors in a color set by clicking a color and then clicking a
new color in the Color Sets panel.
|
You can save a Woodcut effect as a preset by clicking Save in the Woodcut
dialog box and specifying a preset name in the Save Preset dialog box.
|
The Distress effect can be used on images and text. You can base the effect on the currently selected paper or pattern.
Before (left) and after (right) applying the Distress effect.
| To apply Distress effects |
1 |
Choose Effects |
2 |
In the Distress dialog box, adjust any of the following sliders:
|
• |
Edge Size — determines the size of the edge enhancement
|
• |
Edge Amount — determines the amount of edge enhancement
|
• |
Smoothing — determines the roundness of the edge between black and white
|
• |
Variance — determines the amount of grain added to the edge
|
• |
Threshold — determines how much black is in the image
|
3 |
Choose a method from the Using list box.
|
You can base the effect on the current paper grain or on the original luminance (clone source). |
With the Serigraphy effect, you can use photographs to generate images that appear to be silk-screened or woodblock cuts. Each color reduction is saved as a separate layer, so you can edit the layer individually after the effect has been applied.
Before (left) and after (right) applying the Serigraphy effect.
| To apply Serigraphy effects |
1 |
Choose Effects |
2 |
In the Serigraphy color dialog box, adjust any of the following sliders:
|
• |
Smoothing — determines the smoothness of the black edge
|
• |
Threshold — determines the total amount of color difference from the center
color
|
• |
Dist Weighting — determines the amount of color distance from the center
color
|
• |
Hue Weighting — determines how much hue contributes to the effect
|
• |
Sat Weighting — determines how much saturation contributes to the effect
|
• |
Lum Weighting — determines how much luminance contributes to the effect
|
3 |
Click the Match Color chip, and choose a color from the Color dialog box.
|
This is the center color — the color on which the effect will be based. |
4 |
Click the Fill Color chip, and choose a color from the Color dialog box.
|
This color is used on the new layer. |
5 |
Click Create Serigraphy Layer.
|
6 |
Click Done.
|
You can also specify Match and Fill Colors by clicking a color in the image.
|
You can use the Sketch effect to convert an image to a black and white pencil sketch.
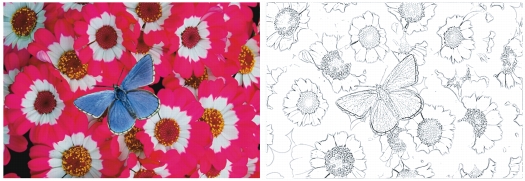
The Sketch effect.
| To apply the Sketch effect |
1 |
Select a layer or area of the canvas.
|
If you want to apply the effect to the entire image, do not make a selection. |
2 |
Choose Effects |
3 |
In the Sketch dialog box, adjust any of the following sliders:
|
• |
Sensitivity — determines sensitivity to detail. Low values detect only the main
edges. High values detect the main edges as well as thin lines, such as the lines
around a person’s eyes.
|
• |
Smoothing — determines how much noise is filtered out. Higher values result
in wider, lighter, and blurrier lines.
|
• |
Grain — determines how much of the paper grain is revealed in the sketch
marks. Move this slider to the right to show more of the paper grain.
|
• |
Threshold — removes noise after edge detection. Threshold High is used to flag
light pixels which may be just noise in the image. Threshold Low is used to test
surrounding pixels.
|
If you want to save your settings as a preset, click Save and specify a preset name in the Save Preset dialog box. |
|
|
Copyright 2012 Corel Corporation. All rights reserved.