Quick links to procedures on this page:
• |
• |
• |
• |
• |
• |
• |
• |
• |
The Apply Surface Texture effect lets you add a three-dimensional (3D) surface texture to your image. You can use this feature to apply a paper texture across the image, to give depth to the brushstrokes of an oil painting, or to create 3D mosaic tiles.
Surface texture is created either by applying a paper texture or by using information from a clone source to determine depth and height. There are five methods for creating texture:
• |
Using a paper texture
|
• |
Using the difference from a clone source
|
• |
Using image luminance
|
• |
Using the luminance from a clone source
|
• |
Using a channel or layer mask
|
The Apply Surface Texture effect also lets you apply a reflection map to your surfaces, which can make the textured parts of the image look metallic or glasslike. Refer to Working with Reflection Maps for more information.
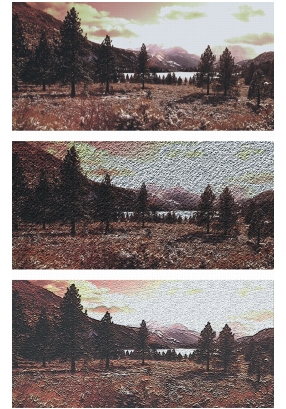
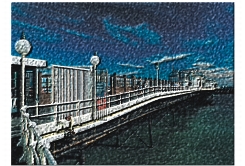
Examples of effects created with Apply Surface Texture.
The surface texture you apply is made up of a material. That material can be subtle and blend with the original image, or it can be highly reflective or shiny, distorting the original image.
The Appearance of Depth sliders on the Apply Surface Texture dialog box let you control material properties.
• |
The Amount slider controls how much surface texture is applied to the image.
Moving the slider all the way to the right applies the maximum amount.
|
• |
The Picture slider controls how much of the color from the original image is
applied to the texture. At 100%, the full color of the picture shines through.
Moving the slider to the left displays more black, leaving only the shine.
|
• |
The Shine slider controls how much highlight appears on the surface of the texture.
Higher Shine values make the texture look metallic.
|
• |
The Reflection slider maps a clone source image or pattern onto the texture at a
variable percentage.
|
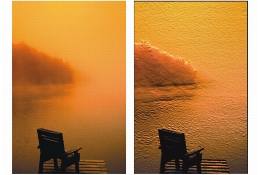
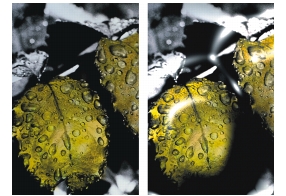
When you create a texture by using the Paper method, the current paper texture is applied to your image. If the Papers panel is open, you can choose different papers and change their scale to try different textures. The Preview window is updated automatically to reflect paper changes.
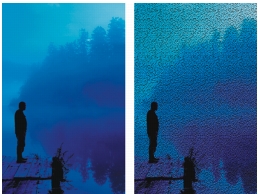
Before (left) and after (right) creating texture by using paper grain.
| To create surface texture by using paper |
1 |
Select a layer or area of the canvas.
|
If you want to apply the effect to the entire image, do not make a selection. |
2 |
Choose Effects |
3 |
In the Apply Surface Texture dialog box, choose Paper from the Using list box.
|
If you want to apply an inverted paper texture, enable the Inverted check box. |
4 |
Adjust the Softness slider to control the amount of distortion created by the
texture.
|
Increasing softness creates more intermediate steps, which produces a smoother distortion. |
5 |
Adjust the Appearance of Depth sliders.
|
Refer to Setting Appearance of Depth Properties for more information. |
6 |
Adjust the Light Controls sliders.
|
For more information, refer to Applying Lighting to a Texture. |
When you create a texture using the 3D Brushstrokes method, the difference in luminance between the clone source and the current document is used to determine the look of the texture.
If you change the colors in the clone or posterize the clone, the texture is based on color differences. If you paint on the clone, however, you can make the brushstrokes appear three-dimensional, giving them the illusion of oil paints. For information about cloning, refer to Image Cloning and Sampling.
An example of the texture created when Posterize (right) is applied to the clone source (left).
An example of the texture created when brushstrokes (right) are applied to a cloned image (left).
| To create surface texture by using 3D Brushstrokes |
1 |
Open the original image.
|
2 |
Choose File |
If you want to alter the clone before using the 3D Brush Strokes method, apply an effect or paint on it. |
3 |
Select a layer or area of the canvas.
|
If you want to apply the effect to the entire image, do not make a selection. |
4 |
Choose Effects |
5 |
In the Apply Surface Texture dialog box, choose 3D Brush Strokes from the Using
list box.
|
If you want to apply an inverted texture, enable the Inverted check box. |
6 |
Adjust the Softness slider to control the amount of distortion created by the
texture.
|
Increasing softness creates more intermediate steps, which produces a smoother distortion. |
7 |
Adjust the Appearance of Depth sliders.
|
For more information, see Setting Appearance of Depth Properties. |
8 |
Adjust the Light Controls sliders.
|
For more information, see Applying Lighting to a Texture. |
Because the 3D Brushstrokes method uses the difference between the clone source and its clone to define a 3D texture, you can create the illusion of dimensional oils by painting on the clone. The look of the strokes on the clone determines how realistic the final 3D strokes appear. So, you may want to set up a more complex brush before painting. For example, you can apply a paper texture to the stroke. Many of the brush variants reveal the paper texture automatically in their strokes.
An example of 3D brushstrokes with paper texture.
You can apply a paper texture when you first create an image, and then paint or draw over it to make a textured canvas for your strokes. However, the texture is erasable, so you might not end up with the same texture across the document surface. As a rule, you add the paper texture as the last step in producing artwork.
You can also use advanced brush settings to make realistic strokes. For example, you can use the Brush Loading option to move underlying colors as you make brushstrokes. You can also apply other settings, like Bleed, or adjust brush size to create complex strokes. For more information, see Adjusting Brushes.
An example of 3D brushstrokes with Brush Loading (left) and Bleed (right) settings applied.
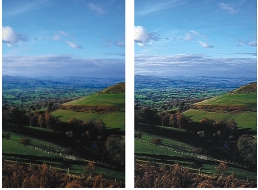
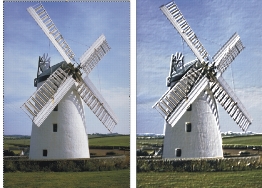
When you create a texture by using the Image Luminance method, the current image’s luminance, or lightness, determines where surface texture is added. Light parts of the image create dents; darker parts create raised areas. The overall effect gives an embossed look to the edges of the image.
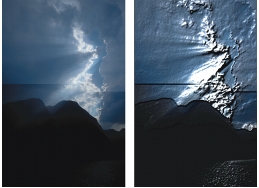
Before (left) and after (right) adding texture based on Image Luminance.
| To create surface texture by using Image Luminance |
1 |
Select a layer or area of the canvas.
|
If you want to apply the effect to the entire image, do not make a selection. |
2 |
Choose Effects |
3 |
In the Apply Surface Texture dialog box, choose Image Luminance from the Using
list box.
|
If you want to apply an inverted texture, enable the Inverted check box. |
4 |
Adjust the Softness slider to control the amount of distortion created by the
texture.
|
Increasing softness creates more intermediate steps, which produces a smoother distortion. |
5 |
Adjust the Appearance of Depth sliders.
|
For more information, see Setting Appearance of Depth Properties. |
6 |
Adjust the Light Controls sliders.
|
For more information, see Applying Lighting to a Texture. |
When you create a texture by using clone source luminance, the dents and bumps in the texture are determined by the light and dark areas in the clone source and are applied to its clone. What is unique about this method is that you can create interesting embossed looks by changing the clone source.

Texture based on clone source luminance.
Any image effects or brushstrokes that you apply to the source result in different textures. For example, you can create raised areas in the clone by darkening the area in the source image.
| To create surface texture based on clone source luminance |
1 |
Open an image.
|
2 |
Choose File |
3 |
Alter the clone by applying an effect, by painting, or by choosing a pattern or
gradient.
|
4 |
Select a layer or area of the canvas.
|
If you want to apply the effect to the entire image, do not make a selection. |
5 |
Choose Effects |
6 |
In the Apply Surface Texture dialog box, choose Original Luminance from the
Using list box.
|
If you want to apply an inverted texture, enable the Inverted check box. |
7 |
Adjust the Softness slider to control the amount of distortion created by the
texture.
|
Increasing softness creates more intermediate steps, which produces a smoother distortion. |
8 |
Adjust the Appearance of Depth sliders.
|
For more information, see Setting Appearance of Depth Properties. |
9 |
Adjust the Light Controls sliders.
|
For more information, see Applying Lighting to a Texture. |
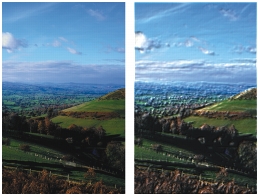
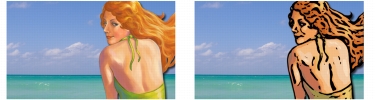
One of the most effective ways of using the Original Luminance method is to create an embossed image. Unlike standard emboss effects, Apply Surface Texture lets you control not only the height of the texture, but also the lighting and material properties of the embossing.
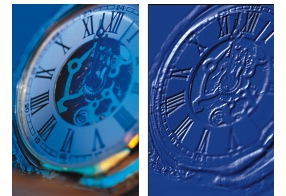
Before (left) and after (right) applying the embossed effect.
| To create an embossed effect |
1 |
Open an image.
|
2 |
Choose File |
3 |
Choose a color other than black from the Colors or Color Sets panel.
|
If you want the embossed image to be white, select all, and then press Delete (Mac OS) or Backspace (Windows). |
4 |
Choose Edit |
5 |
In the Fill dialog box, enable the Current Color option.
|
6 |
Adjust the Opacity slider to set the opacity of the fill.
|
7 |
Click OK to fill the clone file with color.
|
8 |
Choose Effects |
9 |
In the Apply Surface Texture dialog box, choose Original Luminance from the
Using list box.
|
The Preview window shows how the embossed image will look. |
10 |
Adjust any of the Appearance of Depth or Light Controls sliders.
|
11 |
Enable a Light Direction option to change the location of highlights and shadows.
|
If you want to change the light color, click the Light Color chip, and choose a color from the Color dialog box. |
Corel Painter lets you produce surface texture based on an alpha channel or a layer mask. You can use this method only if your image has a saved alpha channel or a layer with a layer mask.
When you choose a channel, the texture is applied around the edges of the channel so that the area it covers appears raised. When you choose a layer mask, the layer mask is used to determine the boundaries of the texture. In this case, texture is applied to the edges of the layer mask. Refer to Working with Layer Masks for more information on layer masks.
Before (left) and after (right) adding texture based on a saved alpha channel.
Before (left) and after (right) adding texture based on a layer mask.
| To create surface texture based on a channel or layer mask |
1 |
Select a layer or the canvas.
|
If you want to use a layer mask, you must select the layer to which the layer mask is attached. Make sure that the layer mask is not blank. |
2 |
Choose Effects |
3 |
In the Apply Surface Texture dialog box, choose the channel or layer mask from the
Using list box.
|
If you want to apply an inverted texture, enable the Inverted check box. |
4 |
Adjust the Softness slider to control the amount of distortion created by the
texture.
|
Increasing softness creates more intermediate steps, which produces a smoother distortion. |
5 |
Adjust the Appearance of Depth sliders.
|
For more information, see Setting Appearance of Depth Properties. |
6 |
Adjust the Light Controls sliders.
|
For more information, see Applying Lighting to a Texture. |
A reflection map is an image mapped onto a texture to produce the illusion that it’s reflecting light from the surrounding environment. You can use the reflection map pattern to quickly apply a realistic reflection. In most cases, a reflection map makes your texture look like chrome or polished metal.
Before (left) and after (right) applying a typical reflection map.
You can use either a pattern or a clone source image as a reflection map. By adjusting the Reflection slider, you control how much of the image appears in the texture. If your image has a clone source, the source image is mapped onto the texture. Otherwise, Corel Painter uses the current pattern as the reflection map.
You can use the Image Warp effect to approximate the reflection from a curved surface. For more information, refer to Warping an Image.
| To create a reflection map from a clone source |
1 |
Open an image or create a new image to use as the reflection.
|
If you want to approximate the reflection from a curved surface, apply the Image Warp effect. |
2 |
Choose File |
3 |
Select the area that you want to be reflective.
|
4 |
Choose Edit |
5 |
Choose Edit |
A new layer is created. |
6 |
In the Layers panel, select the layer, and click the New Layer Mask button |
Using a layer mask simplifies the process because the layer mask exactly matches the shape of the reflection area. Refer to Working with Layer Masks for more information. |
A selected image area, ready to become reflective.
7 |
Choose Effects |
8 |
In the Apply Surface Texture dialog box, choose the layer mask from the Using list
box.
|
9 |
Adjust the Reflection slider to control the amount of reflection you want.
|
10 |
Adjust the Softness slider to control the mapping from the edges of the layer’s
image.
|
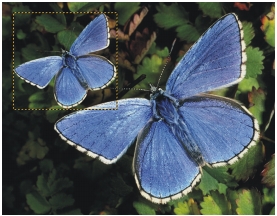
Increasing Softness gives a rounder, more 3D look to the surface. |
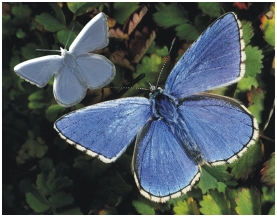
The resulting chrome-plated butterfly.
A large part of the final look of your textures is determined by the lighting you apply. Bad lighting can obscure details in a pattern or surface. Good lighting can add interesting highlights and enhance reflections.
You can add, delete, and position light sources, and you can set light properties. You can also position lights by enabling one of the Light Direction options, which represent eight different preset lighting angles. You can also create a custom lighting setup by working in the sphere.
The lighting sphere shows all possible surface angles and how they are illuminated. The light indicators on the sphere show the current positions of each light source.
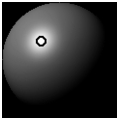
The lighting sphere with a light indicator.
The Display slider beneath the lighting sphere controls the brightness of the sphere so that it’s easier to see light positions. It does not affect the lights themselves.
Sliders for the three Light Controls let you set the properties of a light source. You can also change a light’s color.
• |
The Brightness slider indicates the intensity of the light.
|
• |
The Conc (concentration) slider adjusts the spread of the light’s shine over the
surface.
|
• |
The Exposure slider globally adjusts the overall lighting amount from darkest to
brightest.
|
| To add or delete a light |
The Show Light Icons check box lets you hide or show the light indicators.
|
| To change a light’s position |
• |
In the Apply Surface Texture dialog box, drag a light indicator on the lighting
sphere.
|
You can also change a light’s position by selecting a light indicator on the
sphere and enabling one of the Light Direction options.
|
|
|
Copyright 2012 Corel Corporation. All rights reserved.