Quick links to procedures on this page:
• |
• |
• |
• |
• |
• |
• |
• |
• |
• |
You can create custom nozzles for the Image Hose using ranks and indexing rules. After you save the custom nozzles, you can load them at any time to use in an image.
A 1-Rank indexing system is simply a numbered sequence. You can locate any element in the sequence by specifying its number — for example, “Item 3.”
In Corel Painter, you locate and deliver images by varying input — for example, by pressing harder with the stylus or changing the direction of the stroke. For information on the input factors you can use to control indexing, refer to Ranks and Indexing Rules.
A 2-Rank indexing system uses two perpendicular indexes. The first rank extends horizontally and the second extends vertically. Again, you’ll vary input to locate an item for either rank. You can think of indexing in the two ranks as “selecting a column” and “selecting a row.” The Image Hose delivers the image that is located where the selected column and row intersect. For this to work properly, you must use different indexing rules (input factors) for selecting in each rank.
A 3-Rank indexing system extends the 2-Rank model. The third rank is created by repeating the 2-Rank “set.” Within the selected set, the 1-Rank and 2-Rank indexing (described above) is used. You must use different indexing rules for selecting in each rank.
A 3-Rank indexing system can be used with calendar dates. Any day — past, present, or future — can be located by specifying the month, day, and year. For example, “February 25, 1962 (2/25/1962).”
A nozzle file contains a series of images arranged in a regular grid. Usually, the images are progressive in terms of size, shape, angle, or color. Progression is not necessary, but it increases the sophistication of the Image Hose. For example, a nozzle file with images progressing in size can be set up so that greater stylus pressure paints incrementally larger images.
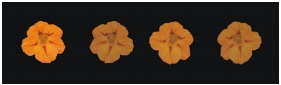
A 1-Rank nozzle progresses in one dimension. In this example, changing angle is the first rank.
What if you want a two-dimensional progression, such as having image elements increasing in size and changing angle? To do this, you’ll need to set up your images as a 2-Rank nozzle file. Painting with a 2-Rank nozzle, you can control where your image comes from in terms of both progressions. In this case, you use a different input factor to control the location of the image elements in each rank.
In the following image, Rank 1 is a progression in angle, and Rank 2 is a progression in size. It would make sense to use direction to control Rank 1 and pressure to control Rank 2.
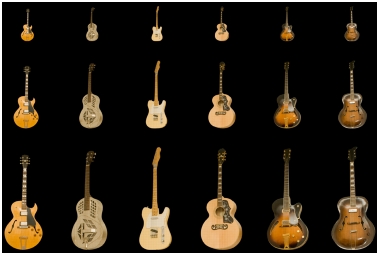
A 2-Rank nozzle progresses in two dimensions. In this example, changing angle is the first rank, and changing size is the second rank.
You can extend the nozzle to a third progression, creating a 3-Rank nozzle. Again, you use a separate indexing rule (input factor) to control the location in each rank. If you use one indexing rule to control two ranks, some image elements become unavailable. In the following image, Rank 3 is a progression in color. You might control this final rank with randomness, velocity, or source — depending on your plans for the image.
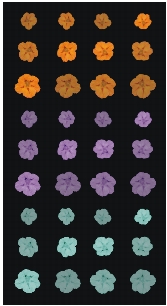
Color is the third rank in this 3-Rank nozzle.
It is recommended that you consider how you will control each rank before you build a nozzle. The way you lay out the images can limit the ways you can control the indexing. Before you begin building a nozzle, you must decide which rank level you need as well as how many elements you want in each progression. For information on setting the indexing rule for each rank, refer to To change the indexing rule.
Regardless of the rank level of the nozzle you are making or the method you use to build it, the following tips will help you develop the individual images.
Each element in an Image Hose nozzle must be selected. The selection allows you to paint with images of irregular shape. Only what is inside the selection will flow from the Image Hose.
You might want to work by creating a silhouette of the image shape as a selection, and then fill in the color information later. With soft edges to the selection, you can create images that are anti-aliased automatically. This improves the continuity across an area of hosed images.
You can create Image Hose nozzles from layers. As you create image elements, turn them into layers. If the layer looks good when dropped on different backgrounds, the image will look good as a nozzle element. Building a nozzle from layers offers advantages in convenience as well.
Another technique is to float the image on a black background and add a drop shadow. This will enhance the appearance of three dimensions, as image elements build up in layers. When all elements have the shadow in the same position, the light source appears the same across the painted area.
For more information on working with layers, refer to Layers.
To create a 1-Rank nozzle, you start by creating each image to be included in the nozzle as a separate layer. Then, you select and group the layers and create a new file by using the Make Nozzle from Group command. As a last step, you save the new nozzle file in RIFF format. To use the new 1-Rank nozzle, you first need to load it. For information about loading nozzle files, see Loading Nozzle Files.
In a 1-Rank nozzle, the images do not need to be in one line. Corel Painter wraps images onto several lines to create a document of reasonable shape. Corel Painter follows a mathematical rule in reconstructing the rank of images. This rule is contained in the Nozzle Definition. You’ll learn more about this in To build a 2-Rank nozzle.
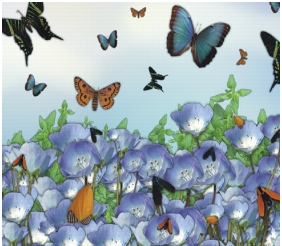
Nozzles are most useful when they deliver similar images with some irregularity — for example, butterflies on flowers.
| To create a 1-Rank nozzle from layers |
1 |
Create image elements as layers for the nozzle.
|
The alignment of layers in the document doesn’t affect the nozzle-building process. |
2 |
From the menu bar, choose Window |
The top layer on the list will be the first element in the nozzle sequence. Moving down the list advances through the element progression. |
3 |
Rearrange the layer hierarchy to create the progression you want in the nozzle.
|
4 |
If any item in the Layers panel is a group, click the Layer Commands button |
5 |
Hold down the Shift key, and select each item in the list.
|
6 |
Click the Layer Commands button, and choose Group Layers.
|
All items are now part of the same group. |
7 |
Choose Window |
8 |
In the Nozzle Libraries panel, click the Nozzle Options button |
Corel Painter creates a new, untitled image. This is your nozzle file. |
9 |
From the menu bar, choose File |
10 |
Give the file a descriptive name and save it in RIFF format.
|

Creating a nozzle from layers.
Nozzles of two and three ranks cannot be created from a layer group. You must build these nozzles manually. The indexing system requires the nozzle images to fit in a regular grid. You can create a nozzle file by setting up a grid and placing an image element at the center of each cell.
The cell size is based on the smallest rectangle that will hold the largest image element (including its selection). To make sure that your images fit in the grid, copy your largest image element to a layer. After you have set up the nozzle images in the grid, you can build your nozzle. Refer to Creating Layers for more information.
| To determine the grid cell size and nozzle dimensions |
1 |
In the toolbox, click the Layer Adjuster tool |
Corel Painter displays the pixel width and height of the layer’s content in the Navigator panel. To display the Navigator panel, choose Window |
You might want to use slightly larger values for the grid cell size. |
2 |
Determine the number of elements you want in each rank.
|
3 |
Multiply the number of items in Rank-1 by the cell width.
|
This value is the nozzle’s width. |
4 |
Multiply the number of items in Rank-2 by the cell height.
|
This value is the nozzle’s height. |
| To create the grid |
1 |
From the menu bar, choose File |
You must enter the nozzle’s width and height that you calculated in steps 3 and 4 of To determine the grid cell size and nozzle dimensions. |
2 |
From the menu bar, choose Canvas |
3 |
In the Grid Options dialog box, set the Horizontal Spacing and Vertical Spacing to
the values of the cell width and height, and click OK.
|
You need to enter the cell width and height from step 1 of To determine the grid cell size and nozzle dimensions. |
4 |
Show the grid by choosing Canvas |
The grid should describe the number of elements you want in each rank — Rank 1 horizontally and Rank 2 vertically. |
| To build a 2-Rank nozzle |
1 |
Place one image element in the center of each grid cell.
|
The easiest way to do this is with layers. When you bring image elements into the grid as layers, they bring their layer mask with them. If the image elements are layers in different files, it is easier to open the files one at a time. |
Follow an appropriate progression based on your intentions for controlling this nozzle. |
2 |
From the menu bar, choose Window |
3 |
In the Layers panel, select all layers.
|
4 |
Click the Layer Options button |
5 |
From the menu bar, choose File |
In this finished 2-Rank nozzle, variety is the first rank, and size is the second rank.
To paint with your new nozzle file, you’ll need to load it first. For information
on loading 2-Rank nozzles, see To load a nozzle file.
|
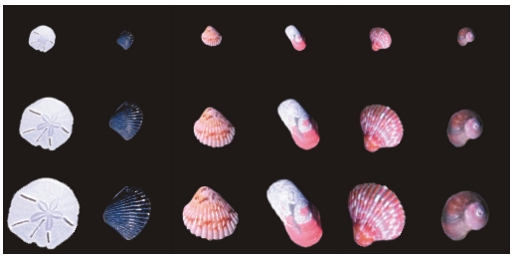
You can create a 3-Rank nozzle using the grid method.

This nozzle file has three items in Rank 1, three items in Rank 2, and three items in Rank 3.
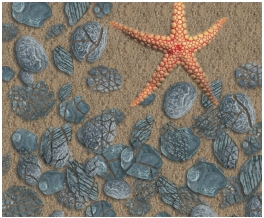
Painting with the 3-Rank nozzle “Broken Shells.”
| To create a 3-Rank nozzle |
1 |
Build or open a 2-Rank file.
|
2 |
Determine the number of elements you want in the third rank.
|
3 |
Choose Window |
4 |
Multiply the number of items in the third rank by the height of the file.
|
The result will be the height of your 3-Rank nozzle file. |
5 |
Choose Select |
6 |
Choose Select |
7 |
Choose Edit |
Now you must extend this file vertically to accommodate the items in the third rank. |
8 |
In the Layers panel, select the canvas.
|
9 |
From the menu bar, choose Canvas |
10 |
To set the canvas to the height of your 3-Rank nozzle, add the correct number of
pixels in the Add Pixels to Bottom box.
|
The value you need is the difference between the height of the 3-Rank nozzle calculated in step 4 and the height of the open 2-Rank nozzle. |
Now you can develop images for each item (set) in the third rank. |
11 |
Choose Edit |
The images should be centered in the grid cells. |
If necessary, modify the images in this layer. |
12 |
Choose the Layer Adjuster tool |
13 |
Click the Layer Options button |
14 |
Choose File |
If you previously defined this file as a nozzle, you must edit the definition to describe the three ranks you created. |
15 |
Choose File |
For example, the nozzle definition “image hose 3 by 3” describes a 2-Rank nozzle with three image elements (items) in Rank 1 and three image elements in Rank 2. Suppose the new nozzle has three image elements in Rank 3. To paint with images from all three ranks, you need to change the nozzle definition to “image hose 3 by 3 by 3”. |
To paint with your new nozzle file, you first need to load it. For information
on loading nozzle files, see To load a nozzle file.
|
Frame after frame of a Corel Painter movie can flow from the Image Hose. The frame size describes the “Item Size.” If you’re creating a movie just to turn it into a Nozzle, set the frame size just large enough to hold your largest image element. You can use the selection in each frame to control the shape of the images.
The Make Nozzle from Movie command automatically creates a 1-Rank nozzle. If you want, you can use this technique to create a 2-Rank nozzle.
| To make a nozzle file from a movie |
1 |
Open the movie you want to turn into a nozzle file.
|
2 |
Choose Window |
3 |
In the Nozzle Libraries panel, click the Nozzle Options button |
An untitled image file appears containing each movie frame. |
4 |
If you didn’t create selections in a frame of the Frame Stack, you can create the
selections now.
|
Remember, each image element must be included in the selection. |
5 |
Save the file in RIFF format.
|
You can now load and use this file as you would any 1-Rank nozzle file. |
| To make a 2-Rank nozzle from a movie |
1 |
Choose File |
The frame size (canvas width and height) should be just large enough to hold your largest image element. |
The total number of frames must equal the number of elements in Rank 1 multiplied by the number of elements in Rank 2. For example, for a 2-rank nozzle with three items in Rank 1 and three items in Rank 2, the movie needs to contain nine frames. |
2 |
Add an image element to the first frame. You can add image elements by using
selections or layers.
|
3 |
In the Layers panel, click the Layer Options button |
4 |
Move to the second frame, and add an image element. Edit the image element if
necessary, and repeat step 3 before moving to the next frame.
|
5 |
Continue adding image elements to the remaining frames. Make sure to apply the
Drop and Select command before moving to a new frame.
|
You need to arrange image elements in sets according to the second rank. In the following example, the second rank progression for the new nozzle is changing color. The movie is organized in three color sets. Frames 1 to 3 form the red set; frames 4 to 6, the green set, and frames 7 to 9, the yellow set. Each set is the first rank progression (changing angle) for the new nozzle and contains images that are the same color but are placed at a different angle. |
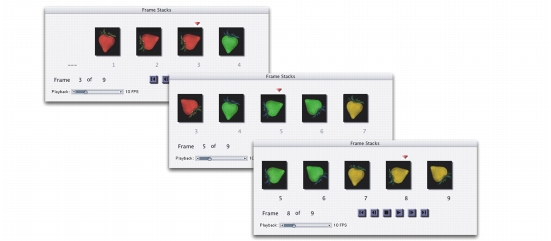
The image elements in this movie are arranged in color sets according to the second rank.
6 |
In the Frame Stacks panel, click the Rewind button |
7 |
Choose Window |
8 |
In the Nozzle Libraries panel, click the Nozzles Options button |
A new file appears. |

The resulting nozzle file from the movie in the previous example.
9 |
From the menu bar, choose File |
The File Information dialog box holds the information Corel Painter uses to index in this file. |
10 |
Edit the statement to describe the nozzle index you created.
|
For example, the statement “image hose 9 items” describes a 1-Rank nozzle with nine image elements. To describe a 2-Rank nozzle with three items in Rank 1 and three items in Rank 2, you need to change the statement to “image hose 3 by 3 items”. |
11 |
Save the file.
|
To paint with the new nozzle file, you need to load it first. For more information, see To load a nozzle file. |
Do not allow empty frames at the end of the movie.
|
To paint with a separate nozzle file that isn’t part of a library, you first need to load it into the Image Hose library.
| To load a nozzle file |
1 |
Choose Window |
2 |
In the Nozzle Libraries panel, click the Nozzles Options button |
3 |
Choose a nozzle from the Open dialog box, and click Open.
|
You can now paint with the nozzle. |
If the Nozzle Definition dialog box appears, you are trying to load a 2- or 3-Rank nozzle and need to complete steps 4 through 6. |
4 |
In the Item Width and Height boxes in the Nozzle Definition dialog box, enter the
values you set in the nozzle file. These values describe the grid cell size.
|
If you are not sure about these values, first open the nozzle file, and choose File |
5 |
In the Index Rank box, enter 2 for a 2-Rank nozzle and 3 for 3-Rank nozzle.
|
6 |
In the Rank columns, enter the number of image elements used in each rank of the
nozzle file.
|
If this is a 2-Rank nozzle file, enter 1 in the Rank 3 column. |
If the values you enter do not describe the file, Corel Painter won’t accept them. In other words, the “number of items” in Rank 1 (horizontal progression) multiplied by the “item width” must equal the width of the nozzle file; the “number of items” in Rank 2 (vertical progression) multiplied by the “item height” must equal the height of the nozzle file. |
Remember, you still need to describe the indexing rule for each rank. |
Corel Painter needs the information you enter in the Nozzle Definition dialog
box to index images correctly.
|
Nozzle libraries let you save and retrieve sets of nozzle files. For information on loading alternate libraries, creating new libraries, and moving items between libraries, refer to Libraries.
| To add a nozzle to the library |
1 |
Choose Window |
2 |
In the Nozzle Libraries panel, click the Nozzles Options button |
3 |
Locate your nozzle file in the dialog box, and click Open.
|
4 |
If necessary, enter the values to define the number of elements, their size, and rank.
|
5 |
Choose Window |
6 |
In the Nozzle Libraries panel, click the Nozzles Options button, and choose Add
Nozzle to Library.
|
7 |
In the Save dialog box, name the nozzle.
|
| To retrieve and edit a nozzle |
1 |
Choose Window |
2 |
In the Nozzle Libraries panel, click the Nozzles Options button |
Corel Painter opens the nozzle file in an image window. |
3 |
Choose Select |
4 |
If necessary, edit the file.
|
Make sure to keep the selections. |
5 |
Choose File |
If you want to protect your original nozzle, save the file under a different filename. |
6 |
Choose Window |
7 |
In the Nozzle Libraries panel, click the Nozzles Options button, and choose Load
Nozzle, and select the nozzle you just saved.
|
8 |
To put the nozzle back in the library, click the Nozzles Options button, and choose
Add Nozzle to Library.
|
|
|
Copyright 2012 Corel Corporation. All rights reserved.