Quick links to procedures on this page:
• |
• |
• |
• |
• |
Historically, an underpainting was used to establish the overall color values for a painting. Similarly, the Underpainting panel lets you adjust the color, tone, and detail of a photo to prepare it for auto-painting. For example, you can darken colors to simulate the colors used in an 18th-century painting, or you can soften colors to simulate the colors found in watercolor paintings.
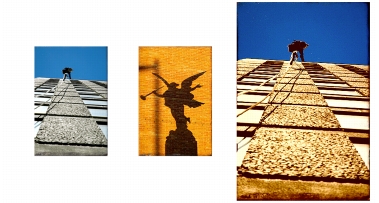
One method you can use to prepare a photo for painting (left) is to choose a source image (center) that contains the colors and tones you want to use. The color and tone of the source image can be applied to your photo to create an underpainting (right).
Depending on the effect you want to achieve, you can choose one of the following methods for creating an underpainting:
• |
Quickly simulate the color and tone used in some popular art styles, such as
watercolor paintings or chalk drawings, by using a Color Scheme preset.
|
• |
Match the color and tone of your underpainting to an existing image, such as a
photo, scanned image, or digital artwork.
|
• |
Quickly lighten, darken, or shift the color or contrast of your photo by using a
Photo Enhance preset.
|
• |
Adjust individual settings in the Photo Enhance area, and save the settings as a
custom preset. You can use the following settings:
|
• |
Brightness — lets you brighten or darken the photo
|
• |
Contrast — lets you increase or decrease the difference in tone between the dark
and light areas of the photo
|
• |
Hue — lets you shift the color balance of the photo. For example, you can
correct a color cast or apply a cast to create a special effect.
|
• |
Saturation — lets you adjust the vividness of colors
|
• |
Value — lets you brighten or darken the photo by using the HSV color space
values
|
• |
Smart Blur — lets you adjust the level of detail in the photo. More detail is
maintained in high-contrast areas than in low-contrast areas.
|
| To create an underpainting |
1 |
Choose File |
2 |
Choose Window |
3 |
In the Underpainting panel, choose a preset from one of the following list boxes:
|
• |
Color Scheme
|
• |
Photo Enhance
|
4 |
In the Photo Enhance area, adjust any of the sliders.
|
A preview of the change is shown in the photo, but the change is not applied until you click the Apply button |
5 |
Click the Apply button |
Before clicking the Apply button |
| To save Photo Enhance settings as a preset |
1 |
In the Underpainting panel, adjust the Photo Enhance sliders to achieve the style
you want.
|
2 |
Click the Add Preset button |
3 |
In the Save Preset dialog box, type a name for your preset.
|
The preset appears in the Photo Enhance list box. |
You can delete a preset by choosing it in the Photo Enhance list box and
clicking the Delete Preset button |
| To create an underpainting by matching the color and tone of another image |
1 |
Open the image that you want to use as a source for color matching.
|
2 |
Open the image that you want to use as an underpainting.
|
This image is now the active document. |
3 |
In the Underpainting panel, choose the filename for the source image from the
Color Scheme list box.
|
The underpainting is automatically updated with the color scheme from the source image. |
If you want to fine-tune the underpainting, you can adjust the Photo Enhance settings. |
4 |
Click the Apply button |
If you want more control over the matching process, you can use the Match
Palette effect. For more information, see Matching Color and Brightness
across Images.
|
You can add an edge effect to simulate the unpainted edge of a canvas or to create a frame effect. You can choose from rectangular, circular, or jagged vignettes.
| To add an edge effect to an underpainting |
1 |
In the Underpainting panel, choose an edge from the Edge Effect list box.
|
2 |
Adjust the Amount slider.
|
3 |
Click the Apply button |
After you create an underpainting, it is recommended that you clone the image. Creating a clone lets you preserve the underpainting before the image is auto-painted.
| To clone an underpainting |
• |
In the Underpainting panel, click the Auto Clone button |
|
|
Copyright 2012 Corel Corporation. All rights reserved.