Quick links to procedures on this page:
• |
• |
• |
• |
• |
• |
• |
Corel Painter has a variety of effects that let you adjust color and tone. Some effects are designed primarily for correcting colors, while others let you adjust colors for special effects. For example, you can match colors across images, invert colors, or posterized colors.
You can also use tools, such as the Dodge tool and the Burn tool, to adjust color and tone in specific areas.
For information about color correction, see Correcting and Adjusting Colors.
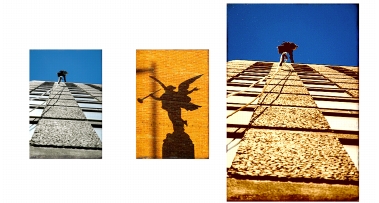
The Match Palette effect lets you apply the color and brightness of a source image to a destination image. For example, you can match the colors in a photo to the colors in a favorite painting. You can then clone and paint your photo in the same style as your favorite painting. You can also use the Match Palette effect to ensure that the color and brightness in a group of photos is consistent.
You can apply the color and brightness from a source image (centre) to your working image (left) to create a new effect (right).
| To match colors across images |
1 |
Open both the source image and the destination image.
|
2 |
Select the destination image.
|
3 |
Choose Effects |
The Match Palette dialog box appears. |
4 |
From the Source list box, select the source image.
|
The filenames for all open images appear in the list box. |
5 |
Adjust any of the following sliders:
|
• |
Color — lets you determine how the colors from the source image blend with
the colors in the destination image. At higher settings, more source color is
applied.
|
• |
Variance (Color) — lets you adjust the range of the source colors. Higher
settings increase the number of shades used from the source image.
|
• |
Brightness — lets you determine how the luminance from the source image
blends with the luminance in the destination image. Higher Brightness settings
pull more highlights and shadows from the source image into the destination
image.
|
• |
Variance (Brightness) — lets you adjust the range of highlights and shadows.
Higher settings increase the contrast between the highlights and shadows.
|
6 |
Move the Amount slider to specify the overall intensity of the other settings.
|
Start at 100%, and decrease the amount until you are satisfied with the results. |
The Negative effect inverts all the colors in your image or in the selected layer.
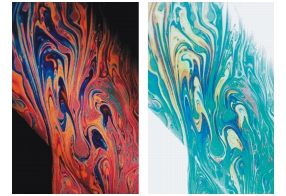
Positive (left) and negative (right) versions of an image.
| To invert colors |
1 |
Select a layer or area of the canvas.
|
If you want to invert the entire image, do not make a selection. |
2 |
Choose Effects |
Posterizing reduces the number of color levels contained in an image.
| To posterize an image |
1 |
Select a layer or area of the canvas.
|
If you want to apply the effect to the entire image, do not make a selection. |
2 |
Choose Effects |
3 |
In the Posterize dialog box, specify a number of levels.
|
The fewer levels you specify, the more dramatic the effect. |
To posterize an image combined with a paper grain, refer to Applying a
Screen.
|
To posterize to two levels and also adjust the brightness, refer to Using the
Equalize Effect to Equalize Images.
|
Corel Painter can posterize your image based on a color set. This effect lets you create an image with only a specified set of colors in it. This is useful for multimedia work, as well as applications such as silkscreening.
This effect can also be used to reduce an image’s colors so that the image appears correctly on the Web. For more information, refer to Working with Posterize Using Color Set.
| To posterize an image by using a color set |
1 |
Select a layer or area of the canvas.
|
If you want to apply the effect to the entire image, do not make a selection. |
2 |
Open or create a color set.
|
For instructions on creating a color set, refer to Creating and Exporting Color Sets. |
3 |
Choose Effects |
The image is reduced to the colors in the current color set. |
The Video Legal Colors effect makes the colors in an image compatible with video. Colors that aren’t possible in video are converted to video legal colors.
Only bright yellows and cyans are not video legal. Corel Painter supports both the National Television System Committee (NTSC) for video systems in the United States, U.S. and Phase Alternation by Line (PAL) for video systems in Europe.
| To apply Video Legal Colors |
1 |
Select a layer or area of the canvas.
|
If you want to apply the effect to the entire image, do not make a selection. |
2 |
Choose Effects |
3 |
In the Video Legal Colors dialog box, choose NTSC or PAL from the System list
box.
|
The Dodge and Burn tools let you adjust the highlights, midtones, and shadows in an image. The Dodge tool lightens the tone; the Burn tool darkens it. You can dodge and burn anywhere in a photo, affecting an area as large or as small as you like.
| To lighten the tone |
1 |
Choose the Dodge tool |
2 |
On the property bar, move the Size slider |
3 |
Move the Opacity slider |
4 |
Move the Jitter slider, or type a value in the Jitter box, to specify the amount of
randomness in the stroke.
|
5 |
Drag the brush in the image to apply the effect.
|
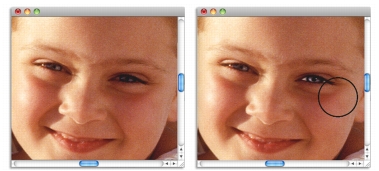
The Dodge tool was used to lighten the girl’s eye.
| To darken the tone |
1 |
Choose the Burn tool |
If the Burn tool is not displayed in the toolbox, hold down the Dodge tool |
2 |
On the property bar, move the Size slider |
3 |
Move the Opacity slider |
4 |
Move the Jitter slider, or type a value in the Jitter box, to specify the amount of
randomness in the stroke.
|
5 |
Drag the brush in the image to apply the effect.
|
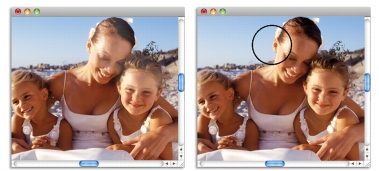
The Burn tool was used to reduce the strong highlights on the faces.
|
|
Copyright 2012 Corel Corporation. All rights reserved.