Quick links to procedures on this page:
• |
• |
• |
• |
• |
• |
• |
• |
• |
• |
• |
• |
• |
• |
• |
• |
• |
• |
• |
Although dynamic plug-ins share many characteristics, each has its own settings. The following sections describe the plug-ins and give instructions for adjusting their settings.
The Brightness and Contrast dynamic plug-in creates a layer that applies brightness and contrast adjustments to the images beneath it.
The Brightness and Contrast dynamic layer affects all images beneath it.
| To create a Brightness and Contrast dynamic layer |
1 |
Do one of the following:
|
• |
In the Layers panel, select the Canvas or another layer.
|
• |
If you want the new dynamic layer to be a specific size, select an area in the
document window.
|
If you select an area, Corel Painter automatically creates a new layer when you apply the dynamic plug-in. |
2 |
In the Layers panel, click the Dynamic Plug-ins button |
3 |
In the Brightness/Contrast dialog box, drag the sliders to adjust the image contrast
and brightness.
|
If you don’t like the results, you can click Cancel or you can click Reset to
restore the default settings.
|
You can also use the Opacity slider |
The Burn dynamic plug-in applies a burn effect to the edges of a selected layer. You can also apply a burn effect to a selected area in the Canvas layer. You can adjust the amount and character of the burn with sliders.
Different burn settings produce different results.
| To burn a layer or selection |
1 |
Do one of the following:
|
• |
In the Layers panel, select a layer.
|
• |
If you want the new dynamic layer to be a specific size, select an area on the
Canvas.
|
If you select an area of the Canvas, Corel Painter automatically creates a new layer when you apply the dynamic plug-in. |
2 |
In the Layers panel, click the Dynamic Plug-ins button |
3 |
In the Burn Options dialog box, set the following sliders and controls to adjust the
burn effect:
|
• |
Burn Margin — specifies the width of the burn effect in relation to the layer’s
size
|
• |
Flame Breadth — specifies the width of the scorched region. The burn color
appears in the scorch.
|
• |
Flame Strength — specifies how much of the layer is consumed by the burn.
Increasing Flame Strength shrinks the layer.
|
• |
Wind Direction — changes the burn amount for different sides of the layer
|
• |
Wind Strength — determines how much change the Wind Direction control
imparts
|
• |
Jaggedness — specifies the amount of irregularity in the burnt edges
|
• |
Use Paper Texture — lets you use the current paper to vary dye concentration
in the scorch region
|
• |
Burn Interior Edges — lets you burn interior edges as well as exterior edges.
Disable this option to protect the interior edges.
|
• |
Preview — lets you Corel Painter display your changes before they are actually
applied to the image
|
• |
Off — prevents Corel Painter from applying the settings to the image. You can
later turn the burn back on by disabling this check box.
|
• |
Burn Color — displays the color used in the scorch area. You can change the
color if you want. Click the Burn Color chip, and use the Color dialog box to
select a color.
|
• |
Save As Default — sets a new default based on the current settings
|
• |
Reset — restores the default settings
|
You can apply a Burn to a specific area of a non-Canvas layer by copying the
area to which you’d like the effect applied to a new layer and applying the
Burn dynamic plug-in to the new layer.
|
You can use the Revert to Original command in the Layers panel menu to
restore a source image to its original condition. Refer to Deleting or Reverting
Dynamic Layers for more information.
|
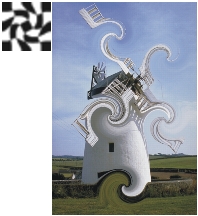
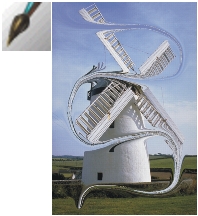
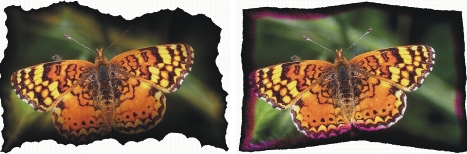
The Tear dynamic plug-in applies a torn-paper effect to the edge of a selected layer or area.
You can tear a little (left) or a lot (right).
| To tear a layer or selection |
1 |
Do one of the following:
|
• |
In the Layers panel, select a layer.
|
• |
If you want the new dynamic layer to be a specific size, select an area in the
document window.
|
If you select an area, Corel Painter automatically creates a new layer when you apply the dynamic plug-in. |
2 |
In the Layers panel, click the Dynamic Plug-ins button |
3 |
In the Tear Options dialog box, set the following sliders and controls to adjust the
tear effect:
|
• |
Margin — specifies the width of the tear effect from the edge of the layer
|
• |
Strength — specifies how much of the layer is torn away
|
• |
Jaggedness — specifies the amount of irregularity in torn edges
|
• |
Tear Interior Edges — lets you tear interior edges as well as exterior edges.
Disable this option to protect interior edges.
|
• |
Preview — lets you Corel Painter display your changes before they are actually
applied to the image
|
• |
Off — prevents Corel Painter from applying the settings to the image. You can
later turn the tear back on by disabling this check box.
|
• |
Tear Color — shows the color used at the edge of the tear. You can change the
color if you want: Click the color chip, and use the Color dialog box to select a
color.
|
• |
Save As Default — sets a new default based on the current settings
|
• |
Reset — restores the default settings
|
![]()
Use a rough paper texture to create a better tear by clicking the
Paper Selector in the toolbox and choosing a paper texture from the list.
|
You can use the Revert to Original command in the Layers panel menu to
restore a source image to its original condition. Refer to Deleting or Reverting
Dynamic Layers for more information.
|
The Bevel World dynamic plug-in applies three-dimensional (3D) bevel effects, or angled edges, to selected layers or areas. Both bevel shape and lighting can be controlled to create unique effects.
A wide variety of bevel profiles is possible.
To create a 3D button with text on it, you first use Bevel World to create the background button. Then, you create text to float over the button by grouping the text and button together and then collapsing the layer group.
The Bevel World dialog box includes the following controls in the Bevel Controls area:
• |
Preview shows a real-time preview based on the options you set.
|
• |
Off prevents Corel Painter from applying the settings to the image. You can later
turn the bevel back on by disabling the check box.
|
• |
Bevel Interior Edges lets you add beveling on the interior edges of the bevel area.
|
• |
Bevel Width specifies the width of the bevel in relation to the layer diameter.
|
• |
Outside Portion controls the portion of the bevel that appears outside the layer.
|
• |
Rim Slope specifies the angle of the rim (innermost portion) of the bevel.
|
• |
Cliff Portion specifies the horizontal distance between the base and the rim.
|
• |
Cliff Height specifies the vertical distance between the base level and rim level.
|
• |
Cliff Slope specifies the angle of the cliff (middle portion) of the bevel.
|
• |
Base Slope specifies the angle of the base (outermost portion) of the bevel.
|
• |
Smoothing controls the roundness of the transitions between base, cliff, and rim as
well as the sharpness of the resulting ridges.
|
• |
Outside Color determines the color of the outside portion of the bevel. This control
applies only when Outside Portion is greater than zero. You can click the Outside
Color chip and use the Color dialog box to set the color.
|
Lighting changes can make a huge difference in the 3D appearance of the bevel. You can change the light’s angle by dragging the circle in the preview sphere.
The Bevel World dialog box includes the following controls in the Light Controls area:
• |
Light Direction and Light Height change the light’s position and angle. With
Light Height at maximum, the light shines straight down on the layer, and the
Light Direction setting has no effect. When Light Height is less than maximum,
the Light Direction slider rotates the light around the center.
|
• |
Brightness controls the light’s intensity.
|
• |
Scatter adjusts the spread of the light’s shine over the surface.
|
• |
Shine controls the prevalence of highlights.
|
• |
Reflection controls how much of the source image is visible in the bevel. If you are
working with a clone, the clone source is mapped onto the surface at a variable
percentage. A discussion of reflection maps can be found in Working with
Reflection Maps.
|
• |
Light Color determines the color for the light. To set a color, click the chip, and use
the Color dialog box.
|
| To bevel a layer or selection |
1 |
Do one of the following:
|
• |
In the Layers panel, select a layer.
|
• |
If you want the new dynamic layer to be a specific size, select an area in the
document window.
|
If you select an area, Corel Painter automatically creates a new layer when you apply the dynamic plug-in. |
2 |
In the Layers panel, click the Dynamic Plug-ins button |
If the Commit dialog box appears, click Commit to commit the dynamic layer to an image layer. |
3 |
In the Bevel World dialog box, specify the settings you want.
|
If you don’t like the results, click Reset to restore the default settings.
|
You can set a new default based on the current settings by clicking Save As
Default.
|
You can use the Revert to Original command in the Layers panel menu to
restore a source image to its original condition. Refer to Deleting or Reverting
Dynamic Layers for more information.
|
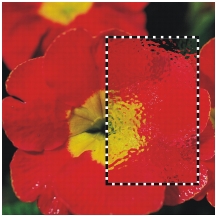
The Equalize dynamic plug-in creates a layer that improves contrast in underlying images. It does this by adjusting black and white points and distributing the brightness levels throughout the entire range of available levels.

The Equalize dynamic layer is applied to a rectangular selection.
The Equalize dynamic plug-in creates a histogram showing the number of pixels for each brightness level value. Equalize allows gamma adjustment, which lightens or darkens an image without changing highlights or shadows.
| To create an Equalize dynamic layer |
1 |
Do one of the following:
|
• |
In the Layers panel, select the Canvas or another layer.
|
• |
If you want the new dynamic layer to be a specific size, select an area in the
document window.
|
If you select an area, Corel Painter automatically creates a new layer when you apply the dynamic plug-in. |
2 |
In the Layers panel, click the Dynamic Plug-ins button |
3 |
In the Equalize dialog box, adjust the contrast by dragging the small black and
white markers under the histogram.
|
Any values in the image located to the right of the white marker become black; any values to the left of the black marker become white. |
4 |
Drag the Brightness slider to adjust only the midtones of an image and leave the
white and black areas untouched.
|
If you don’t like the results, click Reset to restore the default settings.
|
You can also use the Opacity slider in the Layers panel to adjust the effect.
|
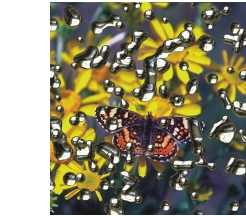
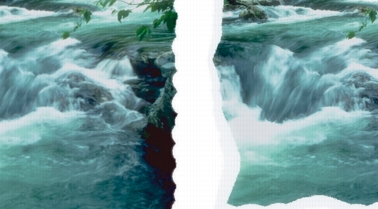
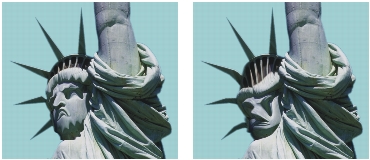
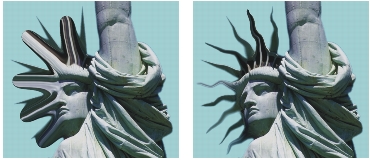
The Glass Distortion dynamic plug-in creates a layer that applies Glass Distortion to the images beneath it. You can move the layer in the document to view the distortion over different images.
The Glass Distortion dynamic layer in action.
| To create a Glass Distortion dynamic layer |
1 |
Do one of the following:
|
• |
In the Layers panel, select the Canvas or another layer.
|
• |
If you want the new dynamic layer to be a specific size, select an area in the
document window.
|
If you select an area, Corel Painter automatically creates a new layer when you apply the dynamic plug-in. |
2 |
In the Layers panel, click the Dynamic Plug-ins button |
3 |
In the Glass Distortion Options dialog box, choose a displacement source from the
Using pop-up menu.
|
• |
Paper uses the selected paper texture. Paper texture is good for creating the
pebbled glass effect. Unless you want frosted glass, you’ll probably want to
increase the scale of the paper.
|
• |
Current Selection uses the currently selected area in the document window.
|
• |
Image Luminance uses the current document’s luminance.
|
• |
Original Luminance uses the clone source’s luminance.
|
Image pixels are displaced, based on the light and dark areas of the source. |
4 |
Set the following sliders and controls to adjust the distortion effect:
|
• |
Inverted — when enabled, lets you work with an inversion of the selected
source
|
• |
Softness — controls the transitions between displaced colors. Increasing
softness creates more intermediate steps and produces a smoother distortion. If
you experience aliasing in a glass distortion, try increasing the softness.
|
• |
Amount — controls the degree of displacement. A higher amount leads to
more distortion.
|
• |
Variance — creates multiple variations in the neighborhood of the
displacement. The result of increasing variance depends on the type of image
and other settings.
|
Preview enables or disables Corel Painter from displaying your changes to the
image.
|
You can set a new default based on the current settings by clicking Save As
Default.
|
![]()
You can also use the Opacity slider in the Layers panel to adjust the effect.
|
You can drag the Glass Distortion layer or selection in the document window
to distort other areas of the image.
|

The Glass Distortion dynamic layer using Paper (left) and Image Luminance (right) displacement sources.
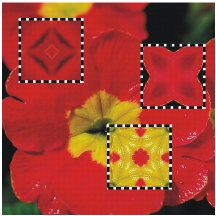
The Kaleidoscope dynamic plug-in creates a square layer that produces kaleidoscopic effects from underlying images. The traditional kaleidoscope is a hollow tube with a set of mirrors and colored chips at one end. You peer into the other end and enjoy the highly symmetrical patterns that the mirrors create from the colored chips. When you add a Kaleidoscope dynamic layer, you first specify its size.
| To create a Kaleidoscope dynamic layer |
1 |
In the Layers panel, click the Dynamic Plug-ins button |
2 |
In the Kaleidoscope dialog box, specify the size of the dynamic layer.
|
Kaleidoscopes must be square, and no smaller than 8 pixels by 8 pixels, and no larger than 500 pixels by 500 pixels. |
3 |
Drag the Kaleidoscope layer to different areas of the image to alter the effect.
|
Try using the arrow keys to see animation of the Kaleidoscope layer.
|
Drag the Kaleidoscope layer to different areas for new effects.
| To create and capture a Kaleidoscope pattern |
1 |
On the canvas, drag the Kaleidoscope dynamic layer until it displays an image you
like.
|
To continue working with the Kaleidoscope layer at a later time, save the image in RIFF format to preserve the image and the Kaleidoscope layer. |
2 |
In the Layers panel, select the Kaleidoscope layer.
|
3 |
Click the Layers panel menu arrow, and choose Drop and Select to commit the
layer.
|
4 |
Choose Window |
5 |
Click the Patterns panel menu arrow, and choose Capture Pattern.
|
For more information on capturing patterns, refer to Patterns. |
When you create a pattern from a Kaleidoscope layer, the selection is dropped
to the canvas and cut out. If you want to preserve the original image and the
Kaleidoscope layer so that you can continue working with the effect, save the
image in RIFF format before you choose Drop and Select. As an alternative,
you can set the number of Undo levels high enough so that you can back out
of the steps to restore the original image.
|
Liquid Lens creates a dynamic layer where you can distort and smear the underlying images. You can create “fun house” mirror effects, melting images, and more. For best results, you should have interesting images beneath the Liquid Lens dynamic layer.
You’ll use the Liquid Lens by choosing a tool, setting sliders to control the effect, and then dragging in the document window to create distortion. You can change slider settings or tools, and then drag again for different results.
Undo features are not available when you work with the Liquid Lens. Use the Liquid Lens Eraser tool in the Liquid Lens dialog box to clear distortion from an area.
You can apply different distortion effects by using the Liquid Lens tools: Circle, Left Twirl, Right Twirl, Bulge, Pinch, or Brush tools.
You can adjust the following settings to customize the distortion effect:
• |
Amount controls the degree of distortion applied. With the slider close to zero, you
create minimal distortion. Negative values create distortion counter to the stroke
direction, so that the image appears broken up.
|
• |
Smooth changes the blending between the distortion stroke and the unaffected
images. Higher values create a smooth, continuous distortion. Lower values create
individual dabs of distortion.
|

Low settings on the Smooth slider make abrupt distortions (left); higher settings let distortions transition smoothly into other areas (right).
• |
Size changes the diameter of the distortion tool and the size of rain, which scatters
distortion droplets in the layer.
|
Examples of how the Size slider affects distortion.
• |
Spacing changes the distance between distortion dabs.
|
Low spacing makes a smooth, continuous stroke (left); high spacing lets the dabs appear individually (right).
• |
Reset restores the default settings.
|
• |
Rain scatters distortion droplets in the layer. Raindrops distort downward, melting
the image.
|
| To create a Liquid Lens dynamic layer |
1 |
In the Layers panel, click the Layer Options button |
2 |
Click the Dynamic Plug-ins button |
3 |
In the Liquid Lens dialog box, choose a Liquid Lens tool.
|
4 |
Use the sliders and controls to adjust the distortion effect.
|
For more information, see Liquid Lens. |
5 |
Drag in the document window to create distortion.
|
If you don’t like the distortions and you want to start again, click Clear. |
You can scatter distortion droplets in the layer by clicking Rain in the Liquid
Lens dialog box. Click anywhere to stop the rain. If Smooth and Size settings
are very high, the rain might continue for a moment after you click.
|
You can move the Liquid Lens layer to different regions of the document to
distort other images.
|
Rain melts the image.
| To erase Liquid Lens distortion |
1 |
In the Liquid Lens dialog box, choose the Eraser tool |
2 |
Set the sliders for Size, Spacing, and Smooth to describe the type of erasing you
want.
|
Higher settings on the Smooth slider create softer transitions from the erasure to the remaining distortion. |
3 |
Drag in the document window.
|
The original underlying image returns. |

Remove distortion by using the Eraser tool.
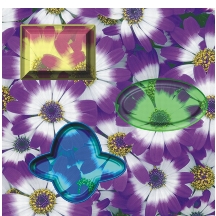
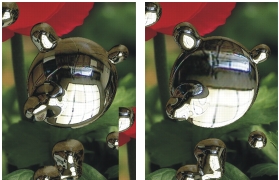
The Liquid Metal dynamic plug-in lets you paint on a layer with liquid and metal. This text uses the term “metal” to refer to the media applied — even if the settings create an effect more like water.
You can apply droplets of water that distort the underlying image through refraction. You can also create globs of shiny metal that flow together and move like mercury. The Refraction slider sets the difference between water and metal, which lets you achieve intermediate effects. Negative metal can be used to create holes in metal.

The Liquid Metal dynamic plug-in creates either liquid metal or translucent, refractive liquid.
A stroke of metal is made up of a series of discrete droplets. You can select one or several droplets and move them or change their properties. Refer to Liquid Metal for information about which slider settings apply to selected droplets.
The “handles” show the droplet’s circle and center point. Showing the handles on the droplets isn’t necessary for selecting them, but it can make your work easier. The droplets applied in the last stroke are automatically selected. Each new stroke deselects the droplets of the previous one.
The Undo feature is not available when working with metal; however, you can remove selected metal, the last metal applied, or all metal on the layer.
Metal is highly reflective. You can customize the look by using a clone source or a pattern as a reflection map. For more information about cloning, refer to Image Cloning and Sampling. For more information about creating and choosing patterns, refer to Patterns.
You can apply metal with the Brush tool, the Circle tool, or the Rain feature. You can adjust the size of your brush or rain droplets. The Brush is the default applicator. You can use the Brush tool to paint with metal. You can use the Circle tool to create circles of metal. The Rain feature lets you scatter metallic droplets on the layer.
You can adjust the following settings to customize the appearance of the liquid metal:
• |
Amount controls the emphasis of the metal effect from the Refraction slider and
applies to all droplets in the layer. The extreme left and extreme right are the
inverse of each other. To create water effects, you can set the Amount to –0.5. This
setting makes the droplets magnify the underlying images.
|
Reflection and Refraction invert when you move the Amount slider to either extreme.
• |
Smooth changes the perimeter range. The perimeter range determines the droplet’s
tendency to “join” its neighbors. The Smooth setting applies to all selected droplets
and to any new droplets that you create.
|
Low settings on the Smooth slider keep droplets distinct (left); higher settings make the droplets flow together (right).
• |
Size changes the diameter of the selected droplets. The Size setting applies to all
selected droplets and to any new droplets you create by using the Brush tool or
Rain. It does not affect the Circle tool.
|
• |
Volume adjusts visibility along the perimeter. The Volume setting applies to all
selected droplets and to any new droplets you create.
|

Decreasing Volume below 100% shrinks the visible portion of the droplet, “drying it up” (left). Increasing Volume beyond 100% extends visibility beyond the droplet circle into the perimeter range (right).
• |
Spacing adjusts the spacing between droplets in strokes created with the Brush
tool.
|

A stroke with low spacing (left): the droplets flow together. A stroke with high spacing (right): each droplet is distinct.
• |
Map specifies the type of metal or reflection map. The type applies to the entire
layer. You can apply metal and change the type later. For information about using
reflection maps and patterns, refer to Liquid Metal.
|
• |
Display Handles shows the droplet’s outline and center point.
|
• |
Refraction controls droplet appearance. The slider represents a scale between
reflection and refraction. The Refraction setting applies to all droplets in the layer.
|
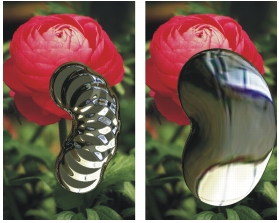
If you want to paint with translucent liquid, you can increase the Refraction slider. As Refraction nears 100%, the metal becomes transparent. The droplets look like a simple liquid — oil or water. |
Low refraction means high reflection (left). High refraction creates translucent, refractive liquid (right).
• |
Surface Tension makes the droplets appear more round and three-dimensional.
|
• |
Reset restores the default settings.
|
| To create a Liquid Metal dynamic layer |
1 |
In the Layers panel, click the Layer Options button |
2 |
Click the Dynamic Plug-ins button |
3 |
In the Liquid Metal dialog box, choose the Circle tool |
4 |
Choose one of the following metal types from the Map pop-up menu:
|
• |
Standard Metal
|
• |
Chrome 1
|
• |
Chrome 2
|
• |
Interior
|
• |
Clone Source
|
5 |
Use the sliders and controls to adjust the appearance of the metal.
|
Refer to Liquid Metal for more information. |
6 |
Drag in the document window to apply the metal.
|
If you want to clear the effect and start again, click Clear. |
You can scatter metal droplets in the layer by clicking Rain in the Liquid
Metal dialog box. Click anywhere to stop the rain.
|
| To create negative metal |
• |
Press Option (Mac OS) or Alt (Windows), and drag with the Circle tool |
You will create holes in your metal. As you drag through positive pools, the negative metal will divide and separate the existing metal. |
| To remove metal |
| To show metal droplet handles |
• |
In the Liquid Metal dialog box, enable the Display Handles check box.
|

When you enable the Display Handles check box (right), you can see the droplet circles and center points.
| To select metal droplets |
1 |
In the Liquid Metal dialog box, choose the Metal Selector tool |
2 |
Perform an action from the following table.
|
When a droplet is selected, the center point handle is displayed as a solid.
|

Drag over the droplets you want to select.
| To move metal droplets |
1 |
In the Liquid Metal dialog box, choose the Metal Selector tool |
2 |
Drag the center of one of the droplets to move the selected group.
|
Notice how the droplets seek to join other droplets they encounter. You can control this tendency by adjusting the Smooth slider. |

You can drag the center of one of the droplets to move the selected group.
| To adjust the size of the Liquid Metal brush |
1 |
In the Liquid Metal dialog box, choose the Metal Selector tool |
2 |
Move the Size slider to the desired value.
|
3 |
Click the Brush tool |
You can also adjust the size of existing metal by selecting the droplets and
moving the Size slider. For information about selecting droplets, see To select
metal droplets.
|
| To adjust the reflection of Liquid Metal |
1 |
Choose a pattern by clicking the Pattern Selector in the toolbox, and clicking a
pattern from the list.
|
2 |
Deselect all layers.
|
3 |
In the Layers panel, click the Dynamic Plug-ins button |
4 |
In the Liquid Metal dialog box, choose Clone Source from the Map pop-up menu.
|
5 |
Adjust any settings.
|
6 |
With the Circle tool |
If you want to clear the effect and start again, click Clear. |
If no clone source has been specified, Corel Painter uses the current pattern as
the reflection map.
|
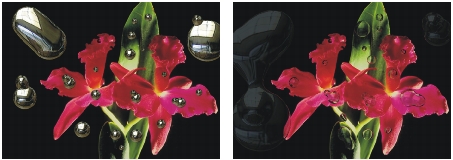
The same piece of metal changes appearance when a pattern is used as the reflection map.
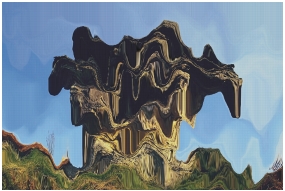
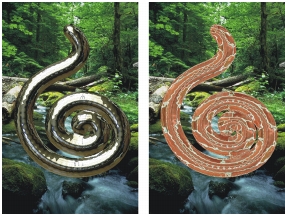
The Posterize dynamic plug-in creates a layer that reduces the number of color levels in the images it floats over.

A Posterize dynamic layer modifies the right half of this image.
| To create a Posterize dynamic layer |
1 |
Do one of the following:
|
• |
In the Layers panel, select the Canvas or another layer.
|
• |
If you want the new dynamic layer to be a specific size, select an area in the
document window.
|
If you select an area, Corel Painter automatically creates a new layer when you apply the dynamic plug-in. |
2 |
In the Layers panel, click the Dynamic Plug-ins button |
3 |
In the Posterize dialog box, specify the number of color levels you want.
|
The maximum number of color levels is 128. The value applies to each color channel — red, green, and blue. |
|
|
Copyright 2012 Corel Corporation. All rights reserved.