
Quick links to procedures on this page:
• |
• |
• |
• |
• |
• |
• |
• |
• |
• |
• |
The Mosaic feature differs from the other Natural-Media tools in Corel Painter. With the mosaics medium, you’re actually working in a different mode. This means that you must have the Make Mosaic dialog box open, and you cannot access any other tools or features — except for the Colors panel.
When in Mosaics mode, you can add, remove, and reshape mosaic tiles. You can choose a color to paint with or use the Clone Color option in the Colors panel. You can also set grout thickness.
The Make Mosaic dialog box provides all the controls needed for working in this medium. When painting with mosaic tiles, you work with one of four tools: Apply Tiles, Remove Tiles, Change Tile Color, or Select Tiles.
Whether you are cloning from an existing image or creating a mosaic design from scratch, you may find the following guidelines helpful:
• |
Use your first few courses of mosaic tiles to delineate the most important contours
of your subject — just as if you were drawing with a pencil. Describe the most
important lines of your scene first. Additional courses of tiles should follow the
initial contours.
|
Tiles applied to the outline of an image.
• |
Use larger tiles in areas of flat color and smaller tiles in regions where you must add
more detail. In flat-color areas, you may want to introduce some color variability
for a more realistic effect. Tiles used in traditional mosaics rarely have uniform
color.
|
• |
If you’re working in a clone, turn on the Tracing Paper feature by enabling the Use
Tracing Paper check box in the Make Mosaics dialog box. This helps you follow the
source images.
|
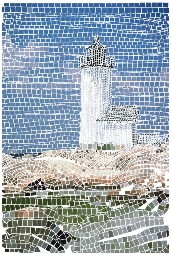
Clone without source images showing (the Use Tracing Paper check box in the Make Mosaic dialog box is disabled).
You can create a mosaic from scratch or based on a clone of another image. For more information about cloning images, see Image Cloning and Sampling. After you create a mosaic, keep the Make Mosaic dialog box open so that you can continue to work on the mosaic. After you apply tiles to a mosaic, you can select or deselect tiles to change their color or apply effects to them.
| To display the Make Mosaic dialog box |
1 |
Do one of the following:
|
• |
Start a new document by choosing File |
• |
Clone an existing document by choosing File |
2 |
Choose Effects |
| To create a mosaic from scratch |
1 |
Start a new document by choosing File |
2 |
Choose Effects |
3 |
In the Make Mosaic dialog box, click the Apply Tiles button |
4 |
Drag in the document window.
|
New tiles flow from your stroke. |
5 |
Keep the Make Mosaic dialog box open so that you can continue to work on the
mosaic.
|
You can also have Corel Painter do the tile work automatically with the
Stroke Selections and Fill Selection commands located in the Make Mosaic
dialog box in the Options list box. For information on how to use the Stroke
Selections and Fill Selection options, see Using Stroke Selections and Fill
Selection Commands.
|
| To create a mosaic based on a cloned image |
1 |
Clone an existing document by choosing File |
2 |
Choose Effects |
3 |
In the Colors panel, click the Clone Color button |
4 |
In the Make Mosaic dialog box, click the Apply Tiles button |
If you don’t want to work with Tracing Paper, disable the Use Tracing Paper check box. |
5 |
Drag in the document window.
|
New tiles flow from your stroke. |
6 |
Keep the Make Mosaic dialog box open so that you can continue to work on the
mosaic.
|
![]()
You can monitor the progress of the clone-based mosaic by viewing the image
with Tracing Paper on, by enabling the Use Tracing Paper check box. This lets
you see a faded out version of the clone source. You can also enable or disable
Tracing Paper by choosing Canvas |
| To select tiles |
| To deselect tiles |
There are several ways to change tile color. You can adjust the value, change the hue, or randomize variability. You can adjust the color for individual tiles or for larger areas across the mosaic.
The tile color is determined by the main color selected in the Colors panel. You might want to add some color variability to build visual interest. When working in a clone document, you can color the tiles based on the clone source.
Normally, each tile is given a single color. If you want more options for coloring tiles, render the tiles to a channel. You can then convert the channel to a selection to paint directly on the tiles, apply effects, or fill them with a pattern, weave, gradient, or image. Refer to Giving Tiles a 3D Look for more information.
| To change the color of selected tiles |
1 |
In the Make Mosaic dialog box, click the Select Tiles button |
2 |
Click or drag across the tiles you want to select.
|
Red borders appear on selected tiles. |
3 |
Choose a color from the Colors panel.
|
4 |
Press one of the following keys to apply the described color change to the selected
tiles:
|
• |
C (Color) Changes the tiles to the current main color.
|
• |
T (Tint) Applies a small amount (10%) of the current main color. Repeat to
accentuate.
|
• |
V (Vary) Adds color variability, based on the variability settings in the Colors
panel. In the Colors and Color Variability panels, choose the color and
variability settings you want to use. Repeat until you are satisfied with the
results.
|
| To change tile color individually |
1 |
In the Make Mosaic dialog box, click the Change Tile Color button |
2 |
Choose one of the following color adjustment modes from the menu:
|
• |
Color — changes the tiles to the current main color
|
• |
Darken — applies a small amount of black
|
• |
Lighten — applies a small amount of white
|
• |
Tint — applies a small amount (10%) of the current main color
|
• |
Vary — adds color variability, based on the variability settings in the Colors
panel. In the Colors and Color Variability panels, choose the color and
variability settings you want to use.
|
3 |
Click individual tiles you want to change or drag across a group of tiles.
|
| To use multicolored tiles |
1 |
Choose Window |
If the Color Variability panel is not expanded, double-click the panel tab. |
2 |
Choose a color variability method from the list box.
|
3 |
Move the sliders or type values in the boxes to adjust the color variability settings.
|
![]()
If the Color Variability panel is not open, you must first close the Make
Mosaic dialog box. Then, display the Color Variability panel, and open the
Make Mosaic dialog box again.
|
| To base colors on a clone source |
• |
After cloning an image, enable the Clone Color button |
For more information about creating mosaics based on cloned images, see To create a mosaic based on a cloned image. |
Any area not covered by tiles is considered grout. The grout color is assigned to the mosaic background when you begin working.
| To change the grout color |
• |
In the Make Mosaic dialog box, click the Grout color chip.
|
Use the Color dialog box to select a grout color. You can change the grout color at any time. However, changing the grout color automatically re-renders the mosaic, which erases any part of the image that is not a tile or grout. |
If you want to remove tiles selectively, use the Remove Tile tool. The Reset Mosaic command removes all tiles from the document; Corel Painter clears the canvas, leaving only the grout color.
| To remove tiles |
If you save a mosaic in the RIFF format, you can open the file later, choose the Make Mosaic command, and continue working.
RIFF is the only file format that will save the resolution-independent mosaic tile objects. Saving in any other format prohibits you from resuming the mosaic process. All file formats will save the rendered image of the mosaic tiles on the canvas. For more information about saving files, see Saving and Backing up Files.
|
|
Copyright 2012 Corel Corporation. All rights reserved.