Quick links to procedures on this page:
• |
• |
• |
• |
• |
The Make Mosaic dialog box includes several powerful features for placing tiles and developing and improving your mosaic. The commands in this section are accessible from the Settings and Options list boxes.
Tile shapes have two categories of control: Dimensions and Randomness. These categories can be controlled by using the Settings list box.
The Dimensions sliders let you control the basic size of the tiles and grout spacing.
The Randomness sliders allow you to control the uniformity of the tile shapes. Increasing randomness makes the shapes more erratic, each different from the last. For example, if the Length dimension is 10 pixels, a Length randomness of 25% creates tiles that are randomly given a length in the range of 7.5 to 12.5 pixels.
| To adjust tile dimensions or randomness |
1 |
In the Make Mosaic dialog box, from the Settings list box, choose one of the
following:
|
• |
Dimensions
|
• |
Randomness
|
2 |
Adjust the sliders.
|
3 |
Drag in the document window to apply tiles with the new dimensions or
randomness settings.
|
When you work with real ceramic tiles, it is physically impossible to merge them. You can put them close to each other, but you can’t make them occupy the same space.
Likewise, the mosaic tiles in Corel Painter respect each other’s space and do not overlap or merge. Corel Painter adjusts the shape of the tiles to fit them together while maintaining the grout lines. So, when you want to re-lay the tiles in an area, you must remove the existing tiles. For more information on removing tiles, refer to Removing Tiles.
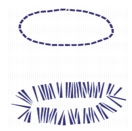
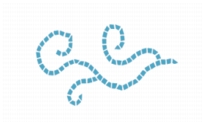
When the Start With Triangle command is enabled, Corel Painter creates a triangle as the first tile in each stroke. This command is particularly useful when you want to fill a “V”-shaped space with tiles.

The Start With Triangle command makes a perfect wedge in the “v.”
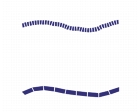
When the Respect Edge Of Image command is enabled, Corel Painter maintains a grout line at the perimeter of the image. Tiles you create at the edge of the image do not violate the grout line.
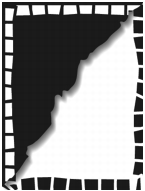
The Respect Edge Of Image command ensures that the tiles you create at the edge will not violate the grout line. In this example, the white tiles respect the edge, while the black tiles do not.
The Render Tiles Into Mask command places the tile shapes in a new channel named Mosaic Mask (in the Channels panel). This feature has several uses. The most common is adding depth to the tiles.
Use the Apply Surface Texture command to create a look of 3D tiles.
With the tiles in a channel, you can load the mosaic pattern as a selection or you can invert the channel to use the grout as a selection. The result can be particularly interesting when you work with a tessellated mosaic.
| To give mosaic tiles a 3D look |
1 |
After creating the mosaic, choose Render Tiles Into Mask from the Options list box
in the Make Mosaic dialog box.
|
2 |
Click Done to exit the Make Mosaic dialog box.
|
3 |
Choose Effects |
4 |
In the Apply Surface Texture dialog box, choose Mosaic Mask from the Using
pop-up menu.
|
5 |
Change the Amount and Softness sliders to achieve the level of relief you want.
|
In most cases, the best results are obtained with the Picture slider set at 100%. For more information on surface texture options, refer to Working with Surface Texture. |
Because Corel Painter uses the tile shapes from the channel, the resulting surface texture gives the tiles a realistic 3D appearance. |
You can use this command to change the resolution of the tiles, after you change the resolution of your document. This command re-creates the mosaic from the grout color and the tile object information. Re-rendering first fills the image with the grout color and then re-renders the mosaic tiles at the resolution of the document. However, after you choose Re-render Mosaic, Corel Painter erases any image that is not a tile or grout.
| To re-render tiles |
1 |
Open an image that is the size you want.
|
2 |
Create a mosaic, and click Done to exit the Make Mosaic dialog box.
|
3 |
Choose Canvas |
In the Resize dialog box, disable the Constrain File Size check box, and set the resolution to a higher value. |
When Corel Painter finishes resizing, you’ll notice that the tiles have blurred. You can correct this problem by re-rendering the mosaic. |
4 |
Choose Effects |
5 |
In the Make Mosaic dialog box, choose Re-Render Mosaic from the Options
pop-up menu.
|
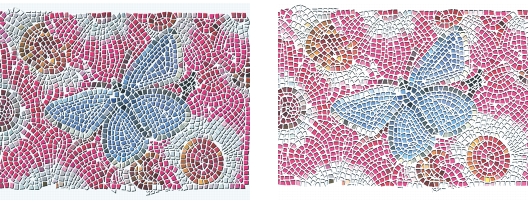
Corel Painter replaces the resized, blurry tiles with tiles rendered at the higher resolution. |
![]()
After you choose Re-render Mosaic, Corel Painter erases any part of the image
that is not a tile or grout.
|
The Stroke Selections and Fill Selection commands let you apply mosaic tiles to selections. These features work only with path-based selections created with the Rectangular Selection, Oval Selection, and Lasso tools. You might need to use the Transform Selection command to convert a channel-based selection to a path-based selection when you work with mosaics. For more information, refer to Creating and Saving Selections.
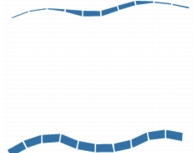
Stroking and filling a selection are appropriate only when you change a parameter between operations — for example, if you change the tile color or dimensions. The Stroke Selection command applies a single row of tiles as an outline along the selection path. To fill an entire selection with tiles, you can make the selection using the Lasso tool. To fill an oval or rectangular selection, you must first use the Stroke Selection command to apply tiles to the selection path, and then use the Fill Selection command to fill the rest of the selection.
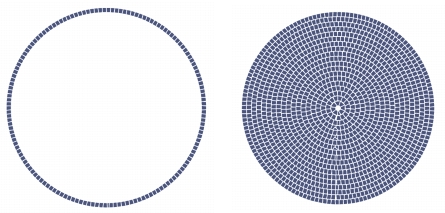
To fill an oval or rectangular selection, you must first use the Stroke Selection command to apply tiles to the selection path (left), and then use the Fill Selection command to fill the rest of the selection (right).
| To create a mosaic in a selection |
1 |
Set up the area you want to tile as an active selection.
|
2 |
Choose Effects |
3 |
In the Make Mosaic dialog box, choose Dimensions or Randomness from the
Settings list box.
|
4 |
Choose the color for the tile and the grout.
|
5 |
Use the Options list box to select the command you want:
|
• |
Stroke Selections — creates one row of tiles along each selection path
|
• |
Fill Selection — applies multiple rows of tiles, working in from the path until
the selected area is filled with tiles
|
The Fill Selection command works with selections made using the Lasso tool |
![]()
In some cases, Corel Painter might not put a tile in every space. You can fill
openings by choosing the Apply Tiles tool |
If you want to change the tiling of an area, you can use the Remove Tiles tool
|
Each mosaic tile you create is stored as a resolution-independent object within the Corel Painter image database. This means that if you resize an image composed of mosaic tiles, your image can be displayed at the same quality as if it had been created at a higher resolution originally.
The image that you see displayed is the set of all mosaic tiles rendered as an image onto the canvas. Mosaics can be re-rendered at any time. After you exit the Make Mosaic dialog box, you can treat this rendered image just like any photograph or painting. You can paint it, apply effects to it, select portions of it, or increase the canvas size. However, after you choose Re-render Mosaic, Corel Painter erases any image that is not a tile or grout.
The first thing the Mosaic feature does is cover the entire canvas with grout. This obliterates images that are on the canvas, but leaves objects that hover above the canvas, such as layers and shapes. These objects are not deleted, but they do cover up the mosaic you’re working on. The Mosaic feature works with the entire canvas. You cannot apply mosaic tiles inside a layer.
If you want to composite a mosaic with another image, you have several options:
• |
Using multiple documents — You can create the mosaic in its own document.
When you’re satisfied with the result, float and copy the mosaic to the document
where you want to composite it. For information on creating floating objects, see
Working with Floating Objects.
|
• |
Using layers — You can float the non-mosaic portion of the image. Create the
mosaic on the canvas. When you’re satisfied with the mosaic, you can drop the
layers.
|
• |
Layering mosaics — If a mosaic already exists in the document when you open the
Make Mosaic dialog box, it is assumed that you want to keep existing tiles, and
Corel Painter does not apply new grout. To avoid this, you can use a layer to create
a mosaic on top of an image.
|
| To layer mosaics |
1 |
Create a mosaic, and then click Done to exit the Make Mosaic dialog box.
|
2 |
Fill, paint, and drop layers to create your background.
|
3 |
When you return to the Make Mosaic dialog box, your background image remains,
and you can place tiles over the top of it.
|
Removing tiles placed on an image reveals the grout, not the image. |
|
|
Copyright 2012 Corel Corporation. All rights reserved.