Quick links to procedures on this page:
• |
• |
• |
• |
• |
• |
• |
You can create movies with Corel Painter, or you can open movies created in common animation formats, such as QuickTime or Video for Windows (AVI).
The first step in creating a new animation is to create a movie file. Corel Painter automatically saves movie files as you proceed from frame to frame.
| To create a movie |
1 |
Choose Movie |
2 |
Type a filename in the Movie Name text box.
|
3 |
In the Canvas Settings area, type values in the Width and Height boxes.
|
The standard digital video frame is 640 by 480 pixels, which is a 4:3 aspect ratio. Many people work at sizes consistent with this aspect ratio. |
4 |
Click the Color chip and choose a paper color from the Color dialog box.
|
5 |
Click the Paper chip and choose a paper texture from the Papers Textures panel.
|
6 |
Type a value in the Resolution box.
|
7 |
In the Movie Settings area, type a value in the Number of Frames box.
|
Remember, you can add and delete frames at any time. |
8 |
In the Layers of Onion Skin area, enable the number of onion skin layers that you
want.
|
The number of onion skin layers determines the number of frames displayed in the Frame Stacks panel. For more information about onion skinning, refer to Understanding Onion Skinning. |
9 |
In the Storage type area, enable one of the following options:
|
• |
8-bit gray (for 256 levels of gray)
|
• |
8-bit color system palette (for 256 colors)
|
• |
15-bit color with 1-bit alpha (for 32,768 colors and a layer for a channel)
|
• |
24-bit color with 8-bit alpha (for 16.7 million colors and a layer for an
anti-aliased channel)
|
When the movie opens, the Frame Stacks panel appears, and the document window displays the first frame of the movie. |
The storage type lets you specify the color depth for saving each frame. This
applies to the saved frame stack, not to your work in the current frame. For
example, choosing 256 colors as the storage type still allows you to work with
a selection and 24-bit tools in the document window for the current frame. As
soon as you change frames, however, the image is saved in the 256-color
format, and the selection is lost. If you want to maintain selections in saved
frames, you’ll need to choose the 15-bit or 24-bit storage type. These storage
types allow you to take advantage of compositing options that require a
selection layer.
|
| To set the preview frame rate |
• |
In the Frame Stacks panel, adjust the Playback slider.
|
The frame rate is displayed to the right of the slider. |
Quite often, you’ll start by opening a movie created in another program — like a captured video segment. You’ll also open an existing movie if you worked on a frame stack earlier and now want to return to it.
For efficiency, don’t bring in more video frames than you’re going to work on. For example, if you have a two-minute video clip and you want to paint on the first 10 seconds, don’t open the entire clip. You’re better off separating the first 10 seconds in your editing application and bringing in just those frames. After finishing that clip in Corel Painter, you can join it to the other part in your editing application.
You can also import a movie that has been saved as a series of numbered files. For more information, refer to Working with Numbered Files.
| To open a Corel Painter frame stack |
1 |
Choose File |
2 |
In the Open (Mac OS) or Select Image (Windows) dialog box, locate the frame
stack, and click Open.
|
When a file is selected, the dialog box shows the frame size, file size, and number of frames. If a preview is available, it shows a thumbnail of the first frame. |
3 |
In the Open Frame Stack dialog box, choose the number of onion skin layers you
want to appear in the Frame Stacks panel.
|
The number you choose also determines the number of thumbnails visible in the Frame Stacks panel. |
4 |
Click OK.
|
The Frame Stacks panel appears and the document window displays the first frame of the movie. |
| To open a QuickTime or AVI movie |
1 |
Choose File |
2 |
In the Open (Mac OS) or Select Image (Windows) dialog box, locate the movie,
and click Open.
|
When a file is selected, the dialog box shows the frame size, file size, and the number of frames. If a preview is available, it shows a thumbnail of the first frame. |
3 |
In the Enter Movie Name dialog box, type a name in the Save As (Mac OS) or File
name (Windows) box, and click Save.
|
The Frame Stacks panel appears, and the document window displays the first frame of the movie. |
When you open a QuickTime or AVI movie, Corel Painter makes a frame
stack copy of the movie. This ensures that the original won’t be changed.
|
Frame stacks are uncompressed, so you need an adequate amount of disk
space to create them. For example, a 1-MB QuickTime or AVI movie can
become a 20-MB frame stack.
|
You can select a frame by clicking its thumbnail in the Frame Stacks panel. You can also easily jump to any frame in a movie.
| To select a frame |
Traditional cartoon animators work on an onion skin paper that allows them to see a sequence of frames through transparent layers. They then draw successive frames, using the previous frames for reference. Seeing the several images superimposed helps increment the action evenly.

Onion skin view (Tracing Paper on). Each frame in the frame stack represents one onion skin layer.
Corel Painter lets you work in two to five layers of onion skin. You specify the number of layers when you open a frame stack. To change the number of onion skin layers, you must close the file and reopen it.
The Frame Stacks panel displays a linear view of the onion skin layers. Each thumbnail represents one onion skin layer, and the thumbnail of the current frame has a red triangle above it.
You can change the current frame by clicking any thumbnail in the Frame Stacks panel. This lets you view a frame in any position of the onion skin sequence. For example, if you want to display the reference frames before the current frame, set the current frame to the far-right position in the panel. If you want to display the frames before and after the current frame, set the current frame to the middle thumbnail in the panel.
| To use the onion skin feature |
• |
Choose Canvas |
In the document window, the current frame appears darkest. Each frame moving away is progressively fainter. |
You can also turn Tracing Paper on and off by pressing Command+T
(Mac OS) or Ctrl+T (Windows) or by clicking the Open Navigator Settings
button |
One of the simplest ways to create animation in Corel Painter is to add an item from the Image Portfolio panel across a series of frames. This is the most basic example of animating with layers. Adding multiple layers allows you to make more complex animations.
You can also group layers and move them simultaneously, but be careful. When you leave a frame, Corel Painter drops the layers in that frame. When a layer is dropped, its contents are merged with the canvas and can no longer be accessed separately. For this reason, you may want to work from the background forward; start by animating what’s farthest from your point of view. For more information, refer to Merging Layers with the Canvas.
You can also rotate a layer. Rotating a layer can degrade its on-screen image quality, but this does not affect its printed quality.
| To create motion with layers |
1 |
Choose Movie |
2 |
Type 1 in the Frames box.
|
3 |
In the Enter Movie Name dialog box, choose a location, enter a name for the file,
and click Save.
|
4 |
In the New Frame Stack dialog box, enable one of the Layers of Onion Skin
options.
|
5 |
Choose Window |
6 |
Double-click an item in the Image Portfolio panel to add it to the document
window.
|
A new layer is created. |
7 |
Position the layer to the far left of the document window.
|
8 |
Click the Step Forward button |
A new frame is added and becomes the current frame. The layer in the previous frame is merged with the canvas. In the new, current frame, the layer is active. |
9 |
On the keyboard, press the arrow keys to move the portfolio image.
|
10 |
Repeat steps 6 and 7 for as many frames as you want to add.
|
11 |
In the last frame, deselect the layer.
|
12 |
Click the Play button |
The portfolio image moves across the screen. |
You can repeat actions to create an animated cycle. Take, for example, a blinking eye. For this type of action, draw the cycle once, and repeat it as many times as needed.
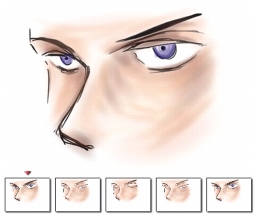
This example shows a blinking eye as an animated cycle. You draw the frames once, and then repeat them.
To create a clean cycle, the beginning and ending images must be the same. For example, in an animation of a blinking eye, the eye would be open at the beginning and the end. This way, when the end of one cycle is “hooked up” to the beginning of the next, the action continues smoothly.
Scrolling a background is another example of a cycled action. Commonly, a subject remains in one place while the background slides by.
|
|
Copyright 2012 Corel Corporation. All rights reserved.