Quick links to procedures on this page:
• |
• |
• |
In complex drawings, lines don’t always meet, which can cause the fill to leak into areas that you don’t want filled — sometimes through the whole image. You can’t always tell if there’s a leak just by looking at your image. If you click a small area and see the prompt, “Now Looking for Extent of Fill,” there’s probably a leak, and Corel Painter is preparing to fill a bigger area than you had in mind. In this case, you can abort the fill.
You can limit leakage to a specific rectangular area. In typical cartoon line work, unbounded areas — for example, hair, tail feathers, and brush bristles — sometimes must be filled. By limiting leakage to a specific area, you can close off these items. You can also close leaks by copying the lines to a selection, saving the selection to a channel, editing the channel, and then reloading it to the selection. For more information about editing channels, refer to Managing and Editing Channels.
| To undo a fill |
• |
To undo a fill, do one of the following:
|
• |
Choose Edit |
• |
Press Command + Z (Mac OS), or Ctrl + Z (Windows).
|
| To limit leakage |
1 |
Choose the Paint Bucket tool |
2 |
On the property bar, click the Fill Cell button |
3 |
Drag to create a rectangle that just covers the area you want to fill.
|
If there is no leak, only the area within the lines is filled. If there is a leak, the fill goes outside the area, but not beyond the constraints of your rectangle. |
| To close a leak |
1 |
Copy the lines to a selection.
|
2 |
Choose Select |
3 |
In the Save Selection dialog box, choose New from the Save To pop-up menu.
|
4 |
Click OK.
|
A new channel is displayed in the Channels panel. |
5 |
In the Channels panel, display and select the channel.
|
6 |
Click the Brush Selector on the Brush Selector bar.
|
7 |
In the Brush Library panel, choose the same brush you used to create the lines.
|
8 |
In the Color panel, set Black as the current main color.
|
9 |
Paint in the channel to close the gaps.
|
10 |
Choose Select |
11 |
In the Load Selection dialog box, choose the modified channel from the Load From
pop-up menu.
|
12 |
Enable the Replace Selection option to replace the original with the edited version.
|
If you want to adjust the mask threshold, double-click the Paint Bucket tool |
The channel does not have to be selected to contain the fill. If you deselect the
channel in the Channels panel, the loaded selection is still in effect.
|
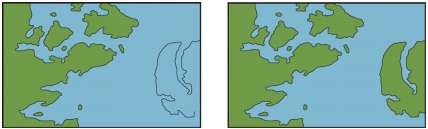
Edit the channel to close leaks. Remember to load the channel back into the selection after editing.
|
|
Copyright 2012 Corel Corporation. All rights reserved.