Quick links to procedures on this page:
• |
• |
• |
• |
• |
• |
• |
• |
• |
• |
• |
• |
The Channels panel lists the RGB color image and each channel you’ve saved. If a layer is selected, and the layer has a layer mask, the Channels panel also lists the layer mask. For information about layer masks, refer to Working with Layer Masks. A channel allows certain types of editing that are not possible in a selection.
Selecting and viewing a channel are distinct operations — you can view a channel without selecting it, and you can select a channel without viewing it. If you want to edit a particular channel, you must select it.
You can view or hide a channel by clicking the eye icon next to the channel’s thumbnail in the Channels panel. When the eye is open, the channel displays in the document window. When the eye is closed, the channel is hidden.
Corel Painter offers two ways to view a channel — as a colored overlay on the image or in grayscale. Colored overlays are red by default, but you can change the color. For more information, refer to To set channel attributes.
You can view the RGB image and more than one channel, but your editing applies only to the one item selected in the Channels panel — either the RGB image or a channel.
| To display the Channels panel |
• |
Choose Window |
If the panel is not expanded, double-click the panel tab. |
| To select a channel |
• |
In the Channels panel, choose a channel from the list.
|
When you want to work on the image again, choose RGB from the list.
|
| To view or hide a channel |
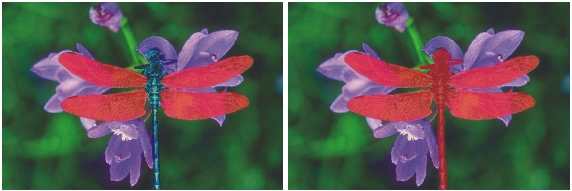
Left: The “wings” channel and the RGB image are displayed. Right: The “wings” and “body” channels are displayed as red overlays on the RGB image. The eye icons for both channels and for RGB are open.

A channel protecting the wings and body is displayed in grayscale. The RGB image is hidden.
Each channel has a set of display attributes that can make it easier to use and help you distinguish it from the other channels. These attributes do not affect the function of the channel; they affect only how the channel displays as you work on it.
Corel Painter names new channels incrementally: Alpha 1, Alpha 2, and so on. Renaming a channel makes it easier to work with, especially if you have several in the document. You can find the channel you want immediately if you’ve given it a descriptive name.
| To set channel attributes |
1 |
In the Channels panel, choose a channel from the list.
|
2 |
Do one of the following:
|
• |
Click the Channel Options button |
• |
Double-click the channel name in the list.
|
3 |
In the Channel Attributes dialog box, drag the Opacity slider to set the channel
display strength.
|
4 |
Click the Color chip, and choose a display color in the Color dialog box.
|
If you want to see the color overlay in grayscale, choose black. |
A channel is easiest to use as an overlay when its color contrasts strongly with the predominant hue of the RGB image. You might want to use a different color for each channel. |
5 |
Click OK.
|
6 |
Enable one of the following options to specify where the color overlay displays:
|
• |
Masked Areas
|
• |
Selected Areas
|
If you want to rename the channel, type a name in the Name box. |
If you want the channel displayed at its full intensity, move the Opacity slider
to 100%. Choose a lower value to display the channel more transparently so
you can follow the underlying RGB image as you edit the channel.
|
If you’ve finished working with a particular channel you can delete it. You can also clear a channel without deleting it, leaving you with a blank channel.
| To delete a channel |
1 |
In the Channels panel, choose a channel from the list.
|
2 |
Do one of the following:
|
• |
Click the Channel Options button |
• |
Click the Delete button |
| To clear a channel |
1 |
In the Channels panel, choose a channel from the list.
|
2 |
Click the Channel Options button |
You can paint in a channel or apply effects to it. Feathering a channel softens the transitions between light and dark areas. In addition, because a channel is a grayscale image, you can make dark pixels light and light pixels dark by inverting it.
You can also fill a channel with a color, pattern, gradient, or weave. You can fill an entire channel or an area of a channel, or you can fill a channel based on existing color. For more information, refer to Working with Color Fills.
When you edit a channel, you are making modifications to the channel, and not the image. Because the alpha channel is a grayscale image, separate from the RGB image, you can use shades of gray only; no colors are available. You can use the resulting channel afterwards to make changes to your image.
If you want to modify a specific area of a channel, you can create a selection. The current selection is available to the RGB image and all channels. For more information, refer to Creating and Saving Selections.
Editing a channel does not affect how the channel displays. For information about setting the color and opacity of the displayed channel overlay, refer to Setting Channel Attributes.
| To paint in a channel |
1 |
In the Channels panel, display and select the channel you want to work with.
|
If you want to paint only on a specific area of the channel, make a selection. |
2 |
Choose the Brush tool |
3 |
Click the Brush Selector on the Brush Selector bar.
|
4 |
In the Brush Library panel, click a brush category, and brush variant.
|
The Pen and Airbrush brush categories make good choices. |
5 |
In the Color panel, choose a color.
|
Only grayscale values are available. Black adds to the channel. White erases from it. |
When you paint in the channel, hue is irrelevant. The channel carries 8 bits of information and you need only set a level in that range. The value scale is between black and white. |
6 |
On the property bar, type a value in the Opacity box, or adjust the pop-up slider.
|
7 |
Type a value in the Size box, or adjust the pop-up slider.
|
8 |
Paint in the document window.
|
| To apply an effect to a channel |
1 |
In the Channels panel, display and select the channel you want to work with.
|
If you want to apply the effect to a specific area of the channel, make a selection. |
2 |
Choose an effect from the Effects menu.
|
To learn more about image effects, see Image Effects. |
| To feather a channel |
1 |
In the Channels panel, display and select the channel you want to work with.
|
2 |
Click the Channel Options button |
3 |
In the Feather dialog box, type a number of pixels.
|

A channel — before and after feathering.
| To invert a channel |
1 |
In the Channels panel, choose a channel from the list.
|
2 |
Click the Invert Channel button |
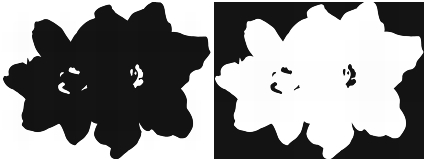
A channel — before and after inversion.
| To fill a channel |
1 |
In the Channels panel, display and select the channel you want to work with.
|
If you want to fill only a specific area of the channel, make a selection. |
2 |
In the toolbox, choose a color, pattern, gradient, or weave from the corresponding
selector.
|
3 |
Choose Edit |
4 |
In the Fill dialog box, enable one of the following options on which to base the fill:
|
• |
Current Color (the current shade of gray)
|
• |
Pattern
|
• |
Gradient
|
• |
Weave
|
5 |
Adjust the Opacity slider.
|
| To fill a channel based on color |
1 |
In the Channels panel, display and select the channel you want to work with.
|
2 |
Choose the Paint Bucket tool |
3 |
On the property bar, click the Fill Image button |
4 |
Choose one of the following from the Fill list box:
|
• |
Current Color — fills with the current color (a shade of gray). For information,
see Working with Color Fills.
|
• |
Gradient — fills with the selected gradient. For information, see Applying
Gradients.
|
• |
Source Image — fills using the current clone source image. If you haven’t
defined a clone source, Corel Painter fills with the current pattern. For
information, see Filling an Area With a Sampled Image.
|
• |
Weave — fills with the selected weave. For information, see Applying Weaves.
|
5 |
Open the Fill selector, and choose a fill from the media library panel.
|
6 |
To specify the range of gray to be filled, type a value in the Tolerance box, or adjust
the pop-up slider.
|
7 |
To specify the fill opacity for pixels outside the Tolerance range, type a value in the
Feather box, or adjust the pop-up slider.
|
If you want to create intermediate fill values on the boundaries, enable the Anti-Alias button |
8 |
Click the area of the channel you want to fill.
|
If the result is not what you want, undo the fill, change the settings, and try again. |
The Paint Bucket tool applies a fill only to a visible channel. Make sure the
channel’s eye icon |
You can return to the default Paint Bucket tool settings by clicking the Reset
Paint Bucket button |
|
|
Copyright 2012 Corel Corporation. All rights reserved.