Quick links to procedures on this page:
• |
• |
• |
• |
• |
• |
• |
• |
• |
Path-based selections support many transformations that pixel-based selections do not. However, you can convert a pixel-based selection to a path-based selection to apply transformations to it. When you convert a pixel-based selection, the protection of the modified selection is reduced to two levels.
To determine whether a selection is pixel- or path-based, you can use the Selection Adjuster tool. If the selection displays handles when the Selection Adjuster tool is active, the selection is path-based. If the selection does not have handles, it is pixel-based. For more information about selection types, see Creating and Saving Selections.
When performing a transformation on a selection, you can choose the reference point for the transformation. The reference point is located at the center of the selection by default. However, you can move the reference point. The transformation is performed around this point.
| To set the reference point for a transformation |
1 |
For a selection made by using the Selection Adjuster tool |
If the Transform tool is not displayed in the toolbox, click and hold the Layer Adjuster tool |
2 |
Point to the center of the selection’s bounding box.
|
3 |
Drag the Reference Point to new location on the canvas.
|
You can place the Reference Point outside the selection. |
You can reset the Reference Point to its default location by clicking the Reset
Reference Point button |
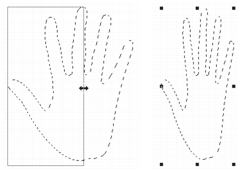
You can move both path-based and pixel-based selections to a new location on the canvas.
| To move a selection |
1 |
For a selection made by using the Selection Adjuster tool |
If the Transform tool is not displayed in the toolbox, click and hold the Layer Adjuster tool |
2 |
On the property bar, click the Move button |
3 |
While staying within the bounding box, click the selection, and then drag it to a
new position on the canvas.
|
4 |
On the property bar, click the Commit Transformation button |
If you prefer, you can apply the transformation by pressing Enter. |
You can move a pixel-based selection with the Transform tool; however, if a
portion of the selection moves off the canvas, it is subtracted from the
selection.
|

To reposition a selection, use the Move tool, and drag the selection to a new position. A rectangular marquee appears while you are dragging the selection.
You can transform a copy of a selection or the contents of an active layer.
| To transform a duplicate |
1 |
Hold down Option (Mac) or Alt (Windows), and choose the Transform tool |
If the Transform tool is not displayed in the toolbox, click and hold the Layer Adjuster tool |
2 |
On the property bar, click a transformation mode.
|
The transformation is applied to copied content. |
You can also transform a duplicate by clicking Command + Shift + Option
+ T (Mac) or CTRL + Shift + Alt + T (Windows).
|
You can scale or rotate path-based selections. Scaling lets you change the dimensions of a selection. You can also scale an object proportionally by preserving its aspect ratio.
| To scale a selection |
1 |
In the toolbox, click the Transform tool |
If the Transform tool is not displayed in the toolbox, click and hold the Layer Adjuster tool |
2 |
On the property bar, click the Scale mode button |
3 |
Perform a task from the following table.
|
Drag a side handle to scale horizontally.
You can also scale a selection by choosing Edit |
| To rotate a selection |
1 |
In the toolbox, click the Transform tool |
If the Transform tool is not displayed in the toolbox, click and hold the Layer Adjuster tool |
2 |
On the property bar, click the Rotate button |
3 |
Move the pointer outside the border of the selection’s bounding box.
|
4 |
Drag a corner handle.
|
If you want to constrain the rotation by 15-degree increments, hold down Shift while dragging. |
5 |
On the property bar, click the Commit Transformation button |
You can also Rotate a selection by choosing Edit |

Rotating a selection.
You can skew and distort path-based selections. Skewing slants the vertical and horizontal dimensions of a selection non-proportionally. Distorting a selection lets you move the sides or corners of a selection in different directions. For example, you can crush or stretch the selection. In addition, you can use perspective distortion to give an object the appearance of depth. Skewing distortion allows you to achieve a 3D look.
| To skew a selection |
1 |
In the toolbox, click the Transform tool |
If the Transform tool is not displayed in the toolbox, click and hold the Layer Adjuster tool |
2 |
On the property bar, click the Skew button |
3 |
Move the pointer outside the border of the selection’s bounding box.
|
4 |
Drag a side handle.
|
If you want to skew only the selected side, hold down Alt (Windows) or Option (Mac) while dragging the side handle. |
5 |
On the property bar, click the Commit Transformation button |

Skewing a selection.
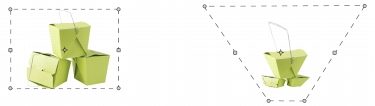
| To distort a selection |
1 |
In the toolbox, click the Transform tool |
If the Transform tool is not displayed in the toolbox, click and hold the Layer Adjuster tool |
2 |
On the property bar, click the Distort button |
3 |
Drag a corner handle.
|
If you want to constrain the distortion to the horizontal or vertical axis, hold down Shift while dragging a corner handle. |
If you want to distort the selection relative to the Reference Point, hold down Alt (Windows) or Option (Mac) while dragging a corner handle. |
4 |
On the property bar, click the Commit Transformation button |
A selection before (left) and after (right) distorting.
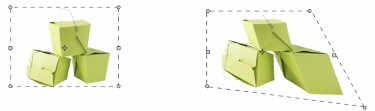
| To distort perspective in a selection |
1 |
In the toolbox, click the Transform tool |
If the Transform tool is not displayed in the toolbox, click and hold the Layer Adjuster tool |
2 |
On the property bar, click the Perspective Distortion button |
3 |
Drag a corner handle.
|
If you want to constrain the distortion to the horizontal or vertical axis, hold down Shift while dragging a corner handle. |
4 |
On the property bar, click the Commit Transformation button |
A selection before (left) and after (right) perspective distorting.
If you are not satisfied with the transformation, you can cancel it and return the selection to its previous state.
| To cancel a transformation |
• |
Click the Cancel Transformation button |
|
|
Copyright 2012 Corel Corporation. All rights reserved.