Quick links to procedures on this page:
• |
• |
• |
An image map is a Web feature that lets you jump to different locations by clicking on specific areas within an image.
There are two types of image maps:
• |
Client-side image maps store image map information right in your HTML
document. URL information appears at the bottom of the browser window when a
cursor is moved over the mapped areas.
|
• |
A server-side image map works differently. Image map information is saved in a
separate file that is stored on a server and accessed by a Common Gateway
Interface (CGI) script. Coordinate information, not URL information, is displayed
at the bottom of the browser window when a cursor is moved over a mapped area.
|
Client-side image maps are faster and more efficient because all the image information is present in the HTML for the page. A server-side image map, in contrast, requires an extra round trip of information between the browser and the Web server. However, client-side image maps are not supported by very old browsers.
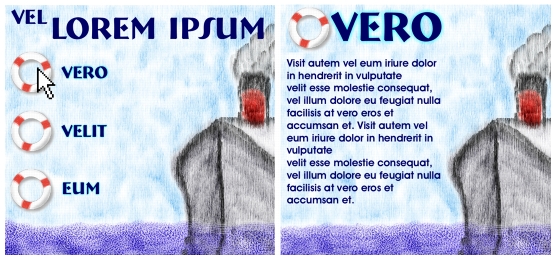
When a hotspot is clicked (left), the browser jumps to the page referenced by that link (right).
A client-side image map is an image that has “hotspots” directly associated with URL information. When a hotspot is clicked, the browser jumps to the page referenced by that link information.
A client-side image map recognizes circular and rectangular “hotspots.” Therefore, Corel Painter treats a circular area as a circle and a rectangle as a rectangle. Oval areas are exported as rectangles.
Image maps are created using layers. The size of the layer determines the clickable area. For information about working with layers, refer to Layers.
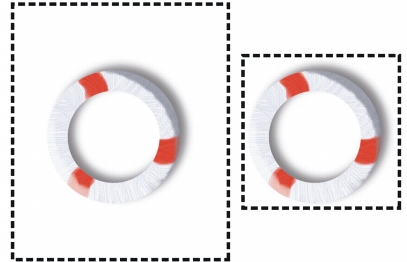
The size of the layer determines the size of the clickable area, or hotspot.
Server-side image mapping handles circles and ovals differently. With server-side mapping, you can export ovals. For more information on server-side image maps, refer to Server-Side Image Mapping.
| To define a client-side image map |
1 |
Select or create a layer or shape in the exact place in your image where you want a
link created.
|
If you can’t see the layer’s marquee, click the Layer Options button |
2 |
Click the Layer Options button |
3 |
In the Layer Attributes dialog box, specify a name for the layer.
|
4 |
Enable the WWW Map Clickable Region check box.
|
5 |
In the URL box, specify a URL to associate with this portion of your image, for
example, http://www.corel.com.
|
6 |
Click OK to return to the image.
|
7 |
Deselect the layer, then define the next area of your image map.
|
If there are two or more overlapping areas in an image map, the topmost one takes priority. |
8 |
Export your image to the GIF or JPEG file format. In the Save As GIF Options or
Save As JPEG Options dialog box, enable the Client Side Map File check box to
indicate that Corel Painter should export an HTML file containing the image map
definition.
|
The RIFF format contains data about your image that is lost when you
convert it to GIF or JPEG. If you want to edit the file later, save a RIFF copy
before you generate a GIF or JPEG version.
|
When a client-side image map is exported, Corel Painter exports both the image and an HTML file. You can then open the HTML file in a text or HTML editor and copy the code into another Web page.
| To define a default URL for an image map |
1 |
To define a default, or base, URL to use when a user clicks outside of defined
hotspot areas in an image map, choose File menu |
The File Information dialog box is displayed. |
2 |
Select WWW Map default URL.
|
3 |
Enter a URL address.
|
4 |
Click OK.
|
If you don’t provide a default URL, clicking outside the defined hotspot areas has no effect.
In Corel Painter, you can define a layer as a clickable region. Corel Painter saves this image map information within a separate text file, which you can upload to your Web server. It can then be accessed by a CGI script.
Because server-side image mapping is becoming obsolete, be sure to read the previous section on client-side image mapping support.
| To create a server-side image map |
1 |
Select or create a layer or shape in the exact place in your image where you want a
link created. For information about working with layers and setting general layer
preferences, refer to Layers.
|
2 |
In the Layers panel, select a layer in the Layer list.
|
3 |
Click the Layer Options button |
4 |
In the Layer Attributes dialog box, specify a name for the layer.
|
5 |
Enable the WWW Map Clickable Region check box.
|
6 |
In the URL box, specify a URL to associate with this portion of your image, for
example, http://www.corel.com.
|
7 |
Click OK to return to the image.
|
8 |
Deselect the layer, then select the next hotspot in your image map. Try to avoid
overlapping hotspot areas within an image map.
|
You can set a default base URL to use if the user clicks outside of your defined hotspot areas. See To define a default URL for an image map. |
9 |
Export your image to the GIF or JPEG file format. In the Save As GIF Options or
Save As JPEG Options dialog box, enable either the NCSA Map File check box or
the CERN Map File check box, depending on which format is recommended by
your Internet Service Provider.
|
When you save the image, Corel Painter creates an additional text file that describes the clickable regions and their associated URLs. |
10 |
Store both files (the image file and its associated image map definition file) on your
Web server, as directed in the documentation for your image mapping CGI script/
program. Both files must be present for the server-side image map to work.
|
The RIFF format contains data about your image that is lost when you
convert it to GIF or JPEG. If you want to edit the file later, save a RIFF copy
before you generate a GIF or JPEG version.
|
|
|
Copyright 2012 Corel Corporation. All rights reserved.