Using the Picture Tube tool
You can use the Picture Tube tool to paint with a collection of objects. For example, you can add butterflies and beetles to a picnic setting or frame a picture with flowers. You can use one of the picture tubes included with Corel PaintShop Pro or create your own.
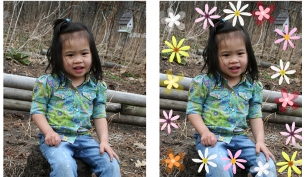
The Picture Tube tool lets you apply various preset images to your photos to create unique effects.
Picture tubes are PspTube files. Each picture tube file is made up of a series of images arranged in rows and columns, called cells. Picture tubes may have any number of cells. As you paint with the Picture Tube tool, Corel PaintShop Pro paints one image from the picture tube after another. Many picture tubes create discrete images (such as zoo animals), and others create the effect of a continuous image (such as grass).
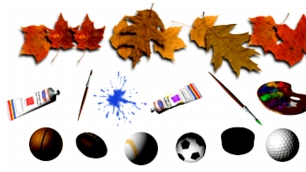
Each picture tube file contains a series of images.
To make picture tube elements easier to edit, it is helpful to paint them on a separate layer.
Where can I get more picture tubes?
You can create your own picture tubes. You can use picture tubes from a previous version of the application. For more information, see To use picture tubes from previous versions of the application.
You can also download free picture tubes from the Web by checking the Corel website (www.corel.com) or by using the keyword phrase “free picture tubes” in an online search engine.
Picture Tube settings
When you click the Settings button ![]() on the Tool Options palette, the Picture Tube Settings dialog box appears. You can use this dialog box to update the current Tool Options palette settings and to modify the look of the current picture tube. However, you can also make the settings permanent by marking the Save as default for this Picture Tube option.
on the Tool Options palette, the Picture Tube Settings dialog box appears. You can use this dialog box to update the current Tool Options palette settings and to modify the look of the current picture tube. However, you can also make the settings permanent by marking the Save as default for this Picture Tube option.
• |
Current Picture Tube name and path — The name and path of the
picture tube appear at the top of this dialog box.
|
• |
Cell arrangement — The Cells across and Cells down fields display
the current cell layout of the tube. The ranges for these values
depend on how the tube was created. The Total cells field shows
the product of multiplying the Cells across value by the Cells down
value.
|
• |
Placement options — Modifying any of these settings updates the
corresponding setting on the Tool Options palette. Note that the
Scale setting is only available for some picture tubes.
|
• |
Save as default for this Picture Tube — Mark this check box if you
want to save any modifications made in the Picture Tube Settings
dialog box. If you do not mark this check box, the changes affect
only the current use of the picture tube.
|
| To paint with a picture tube |
Edit workspace
1 |
On the Tools toolbar, choose the Picture Tube tool |
2 |
On the Tool Options palette, select a picture tube from the Picture
Tube drop-list.
|
Most picture tube previews show the first image rather than all images in the picture tube. To view all images, select the desired picture tube and then paint with it, or open the .PspTube file in Corel PaintShop Pro. |
3 |
If necessary, adjust the following:
|
• |
Scale — determines the percentage (10% to 250%) for reducing
or enlarging each image in the picture tube and scaling the step
|
• |
Step — determines the distance in pixels (1 to 500) between the
centers of each picture tube cell that you paint
|
• |
Placement mode — determines how the images are placed.
Choose Continuous to space the images evenly by step size, or
choose Random to randomly space the images, with intervals
ranging from 1 pixel to the step size.
|
• |
Selection mode — determines how Corel PaintShop Pro selects
images from the cells within the picture tube file. Angular
selects images based on the direction you drag; Incremental
selects images one by one from top left to bottom right;
Pressure selects images based on the pressure you apply on a
pressure-sensitive tablet; Random selects images randomly; and
Velocity selects images based on the speed with which you drag.
|
4 |
In the image window, click to paint with one picture tube image,
or drag to paint with multiple picture tube images.
|
You can make further changes to the behavior of the current
picture tube by clicking the Settings button |
| To create a picture tube |
Edit workspace
1 |
Choose View |
2 |
Click the Grid tab.
|
3 |
In the Current image settings group box, type or set the
Horizontal grids and Vertical grids, and click OK.
|
Values for the grid positions are the values in pixels for the width and height of the cells. Images must be no larger than this cell size. |
4 |
Choose File |
The New Image dialog box appears. |
5 |
Set the following options:
|
• |
Image Dimensions — sets a width and height (in pixels) that are
multiples of the horizontal and vertical grid spacing. The width
and height of the image determine the total number of cells in
the image. For example, if the grid spacing is 100 pixels, you can
create an image that is 400 pixels wide by 300 pixels high. These
dimensions would produce 12 cells (four across and three
down).
|
• |
Image Characteristics — Choose Raster Background as the layer
type, 8 bits/channel or 16 bits/channel as the Color depth, and
mark the Transparent check box.
|
6 |
Click OK.
|
If the grid is not visible, choose View |
7 |
Create one image in each grid square. These squares are the
picture tube cells.
|
To change the size of cells, change the grid size, and then use the Canvas Size command. |
8 |
Choose File |
The Export Picture Tube dialog box appears. |
9 |
Set the following options:
|
• |
Cell arrangement — Enter the number of cells across and down.
Set these fields to match your arrangement of images in step 7.
The Total cells field should match the number of images you
placed in the tube file.
|
• |
Placement options — Choose the default options for this picture
tube. You can change these options when you apply the picture
tube.
|
• |
Tube name — Enter the filename of the tube. The extension
.PspTube is automatically added to the filename.
|
10 |
Click OK.
|
You can make further changes to the behavior of the current
picture tube by clicking the Settings button |
If you want to use one image as a paint brush, export the image
as a picture tube. Use a cell arrangement of one cell across by
one cell down. The image must contain one raster layer that is
not the background. To promote the background to a layer,
choose Layers |
| To use picture tubes from previous versions of the application |
Edit workspace
1 |
Choose the Picture Tube tool |
2 |
On the Tool Options palette, click the Presets drop-list, and click
the File Locations button |
3 |
In the File Locations dialog box, choose Picture Tubes from the File
types list.
|
4 |
Click the Add button.
|
The Browse for Folder dialog box appears. |
5 |
Choose the folder where the previous versions of the picture tubes
are stored, and click OK.
|
The folder path is added to the Picture Tube folders list. |
6 |
Click OK.
|