Adjustment filters
Corel PHOTO-PAINT provides you with many filters to adjust the color and tone of images. Most of these filters are advanced tools that give you great control over the image correction process or let you change colors for specific effects.
The Adjustments docker lets you apply adjustment filters non-destructively as you view your changes in context. For more information, see Adjustments docker. In addition, you can apply adjustment filters non-destructively from the Effects docker. The Adjust menu also lets you access adjustment filters, but they can be applied only as destructive adjustments that permanently alter the image.
Many of these filters are also preset lens types. For more information about using lenses, see Lenses.
Auto-adjust
The Auto-adjust filter equalizes the shadows, midtones, and highlights in an image by automatically redistributing the significant pixel values throughout the tonal range. This adjustment is performed on each color channel of the image, resulting in changes to the color and tone of the image.
Original image (left); the image with Auto-adjust applied (right)
You can apply this adjustment non-destructively from the Histogram section of the Adjustments docker.
Contrast Enhancement
The Contrast Enhancement filter lets you adjust the tone, color, and contrast of an image while preserving shadow and highlight detail that is lost when you adjust the brightness, contrast, and intensity of an image. An interactive histogram lets you shift or compress brightness values to printable limits. The histogram can also be adjusted by sampling values from the image.
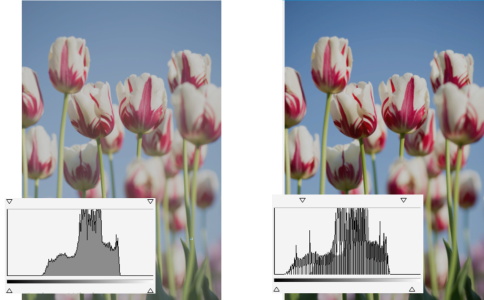
Original image (left); the image with Contrast Enhancement applied and expanded tonal range (right)
To adjust image tone interactively by using a histogram
The histogram displays adjusted values as a black outline and original values as gray shading.
Local Equalization
The Local Equalization filter lets you enhance the contrast near image edges and reveals details in both light and dark regions. The filter uses neighboring pixels to create a stylized effect.
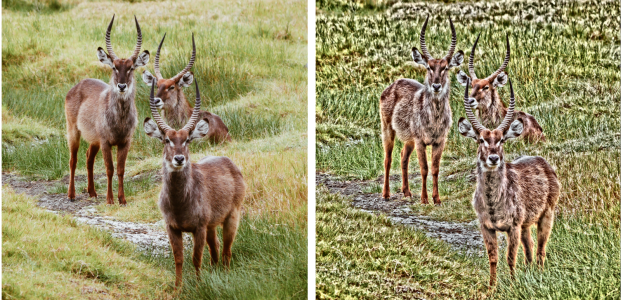
Original image (left); the image with Local Equalization applied (right)
You can apply this adjustment non-destructively from the Effects docker and destructively from the Adjust menu.
Histogram Equalization
The Histogram Equalization filter lets you view the tonal range of an image and redistribute the balance of shadows, midtones, and highlights in the composite channel or in individual color channels according to a preset histogram model.
You can apply this adjustment non-destructively from the Effects docker and destructively from the Adjust menu.
Sample/Target Balance
The Sample/Target Balance filter lets you shift the tonal range of an image by sampling specific image areas. You can take samples from shadow, midtone, and highlight areas, and set target tonal values by choosing colors from a color model. For example, if you want to increase the tonal range, you can sample a shadow area to set the target color to black, and then sample a highlighted area to set the target color to white. You can also shift the tonal range for a specific color channel. The tonal range is displayed as a histogram.
You can apply this adjustment non-destructively from the Effects docker and destructively from the Adjust menu.
Auto Balance Tone
The Auto Balance Tone filter equalizes shadows, midtones, and highlights in an image by automatically redistributing the pixel values throughout the tonal range.
You can apply this adjustment non-destructively from the Effects docker and destructively from the Adjust menu.
Tone Curve
The Tone Curve filter lets you perform color and tonal corrections by adjusting either individual color channels or the composite channel (all channels combined). Individual pixel values are plotted along a tone curve that appears in a graph and represents the balance between shadows (bottom of graph), midtones (middle of graph), and highlights (top of graph). The x-axis of the graph represents the tonal values of the original image or the input values; the y-axis of the graph represents the adjusted tonal values or the output values.
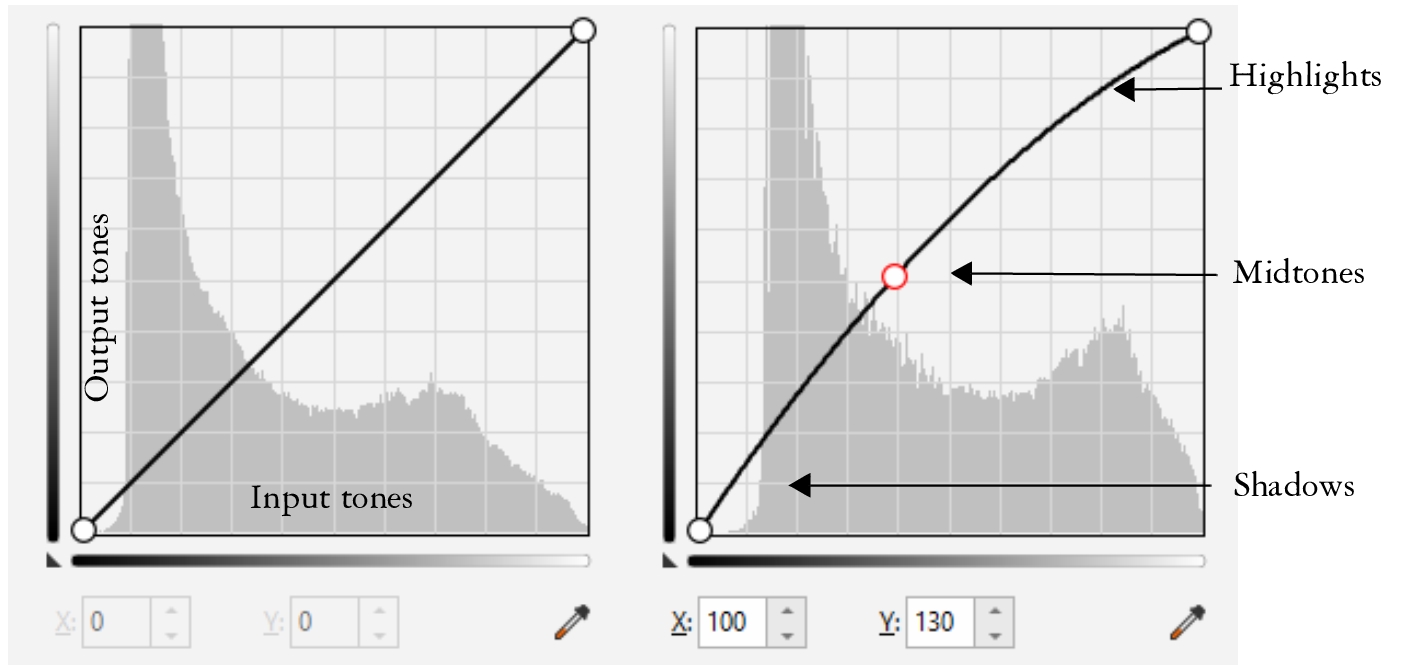
The tone curve shows the balance between the shadows, midtones, and highlights of an image. (left) The tone curve of an image before tonal adjustments. (right) This example shows a small adjustment to the tonal range, in which pixel values of 100 are replaced with pixel values of 130 to lighten the midtone areas.
You can fix problem areas by adding nodes to the tone curve and dragging the curve. If you want to adjust specific areas in an image, you can use the Color eyedropper (Sample tone from image) tool and select the areas in the image window. You can then drag the nodes that appear on the tone curve to achieve the effect you want.
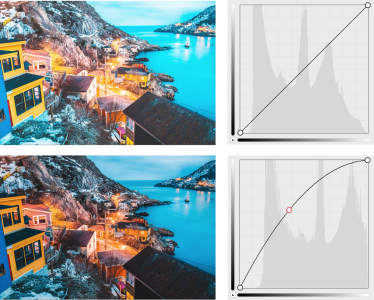
Original image (top); the image with adjusted tonal range (bottom)
The histogram lets you view the adjusted tonal range and evaluate the results. For more information about histograms, see Histograms.
To fine-tune your adjustments, you can choose a curve style from the Style list box. For example, you can redraw the curve by using freehand lines or straight line segments.
In addition, you can equalize the tonal range of an image by clicking the Auto-balance tone button. To specify the outlying pixels (clipped pixels) at each end of the tonal range, you can click the Black and White limits button ![]() and type values in the White limit and Black limit boxes.
and type values in the White limit and Black limit boxes.
You can apply this adjustment non-destructively from the Adjustments docker or the Effects docker, and destructively from the Adjust menu.
When accessing the Tone Curve filter from the Adjust menu or the Effects docker, you can adjust the color and tone of an image by applying a preset from the Presets area. You can also save tone settings as presets to use with other images.
Light
The Light adjustment lets you adjust the brightness and contrast across the entire image as well as brighten or darken specific areas of the images such as its highlights, shadows, and midrange tones.

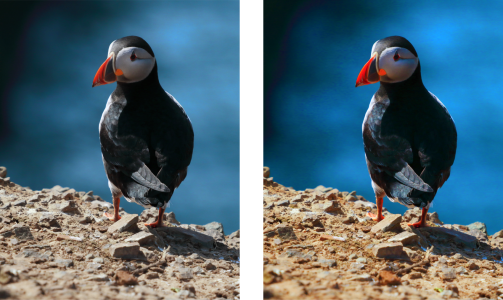
Adjusting the brightness and contrast of an image can reveal more image detail.
Brightness/Contrast/Intensity
The Brightness/Contrast/Intensity filter lets you change the brightness, contrast, and intensity of an image. You can shift pixel values up or down the tonal range. Adjusting the brightness lightens or darkens all colors equally. Contrast and intensity usually work together because increasing the contrast can wash out detail in shadows and highlights; however, increasing the intensity can restore this detail.
You can apply this adjustment non-destructively from the Effects docker and destructively from the Adjust menu.
Gamma
The Gamma filter lets you reveal detail in a low-contrast image without significantly affecting the shadows or highlights. With this filter, the tonal correction of the image is based on the perception of tones relative to the surrounding area. For example, if you place a circle filled with 10 percent gray on a black background, and an identical gray circle on a white background, the circle surrounded by black appears lighter than the circle surrounded by white, even though the brightness values are identical. The Gamma filter affects all image values, but it is curve-based; consequently, changes are weighted toward the midtones.
You can apply this adjustment non-destructively from the Adjustments docker or the Effects docker, and destructively from the Adjust menu.
White Balance
The White Balance adjustment can help you achieve accurate colors in your photos by correcting color casts in your image. Color casts are typically caused by the lighting conditions when a photo is taken, and they can be influenced by the processor in your camera or scanner.
You can also apply this adjustment non-destructively from the Effects docker and destructively from the Adjust menu.
Desaturate
The Desaturate filter creates a grayscale image without changing the color mode. For example, you can apply the Desaturate filter to a color photo to create a black-and-white photo effect. It automatically reduces the saturation of each color to zero, removes the hue component, and converts each color to its grayscale equivalent.
You can apply this adjustment non-destructively from the Effects docker and destructively from the Adjust menu.
Grayscale
The Grayscale filter lets you produce a black and white image without changing the color mode. It also allows you to adjust individual colors for conversion, which modifies the intensity of the gray tones in the image when it’s converted. In addition, you can tint the image by modifying the hue and saturation. For example, you can add a tint to an image to produce a Sepia effect.

A photo before (left) and after (right) applying the Grayscale filter.
You can apply this adjustment non-destructively from the Effects docker and destructively from the Adjust menu.
Hue/Saturation/Lightness
The Hue/Saturation/Lightness filter lets you change the hue, saturation, and lightness values of an image or channel. Hue represents color; saturation represents color depth or richness; and lightness represents the overall percentage of white in an image.
You can apply this adjustment non-destructively from the Adjustments docker or the Effects docker, and destructively from the Adjust menu.
Vibrance
The Vibrance filter allows you to increase the saturation in an RGB image without causing clipping or "blowing out" the image. Clipping occurs when an area of an image is too bright and the color details in the area are lost, which can occur when you increase the saturation in an image indiscriminately. The Vibrance filter adjusts saturation proportionally by increasing the saturation of the less-saturated colors more than that of the saturated colors. This filter is useful for adjusting the saturation of images that include a person in front of a detailed background. For example, it allows you to boost the saturation of the background details without adversely affecting the skin tone of the person in the image.
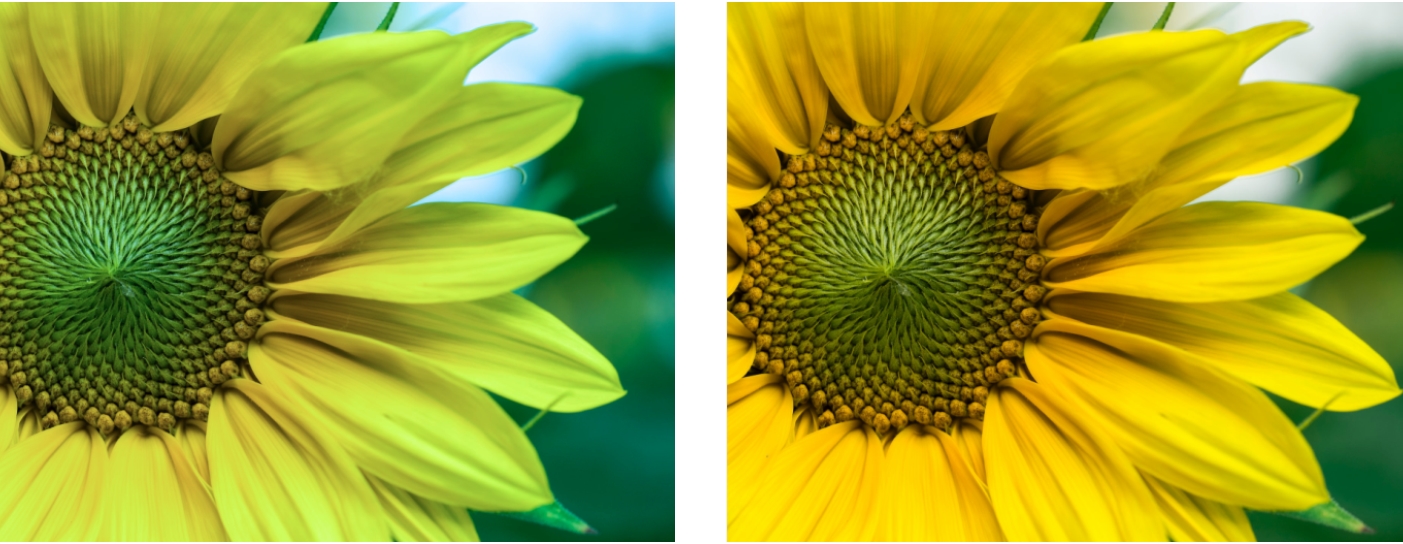
A photo before (left) and after (right) applying the Vibrance filter.
You can apply this adjustment non-destructively from the Adjustments docker or the Effects docker, and destructively from the Adjust menu.
Selective Color
The Selective Color filter lets you change a color by changing the percentage of the component process colors (CMYK values) in a color spectrum (reds, yellows, greens, cyans, blues, and magentas). This filter also lets you add process color to the grayscale tonal component of an image. Selective color modifications increase and decrease the percentage of cyan, magenta, yellow, and black pixels that make up each primary color in the color spectrum. For example, decreasing the percentage of magenta in the reds spectrum results in a color shift toward yellow. Conversely, increasing the percentage of magenta in the reds spectrum causes a color shift toward magenta and an overall increase in red. The extent of color modification depends on the adjustment percentage method you choose.
You can apply this adjustment non-destructively from the Adjustments docker or the Effects docker, and destructively from the Adjust menu.
Channel Mixer
You can mix color channels to balance the colors of an image. For example, if an image has too much red, you can adjust the red channel in an RGB image to improve image quality. For more information about mixing channels, see Color channels.
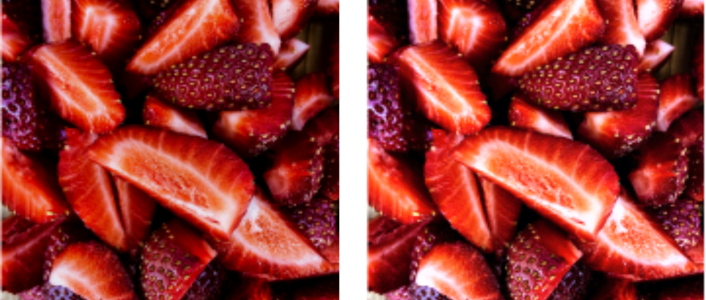
Replace Colors
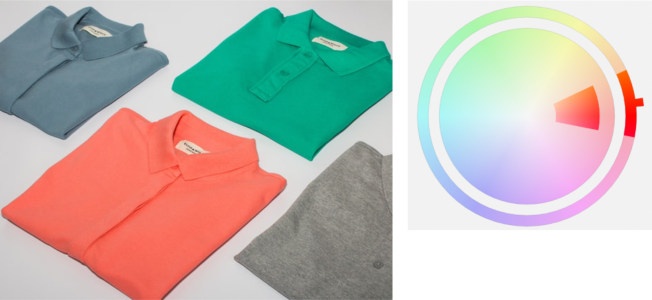
The Replace Colors filter lets you replace colors in an image, editable area, or object. When you select the color you want to replace, the application also automatically selects a range of similar colors to be replaced. You can select the original and replacement colors from the image or from a color picker.
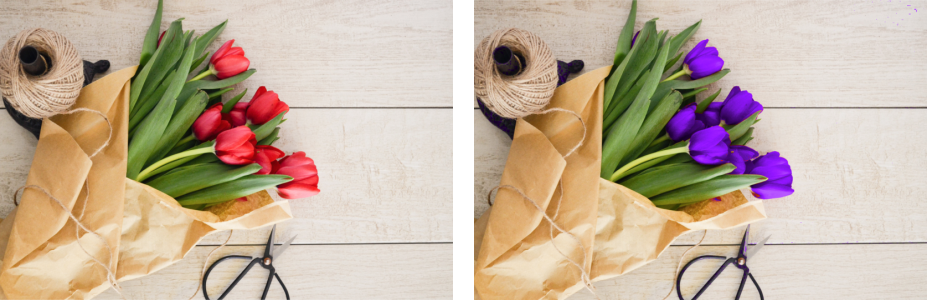
The Replace Colors adjustment has been applied to replace all reds with purple.
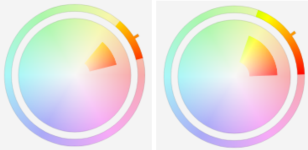
To add or remove colors from the selection, you can adjust the hue and saturation range. You can also select and replace a single color in the image. To prevent abrupt color changes, you can smooth the transition between selected and unselected pixels. You can also set the hue, saturation, and lightness for the new color.
An orange color was selected from the image.
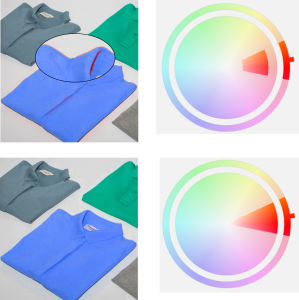
The orange in the shirt is replaced with blue, but some orange and red colors still remain (top). The saturation range is adjusted to select and replace those colors (bottom).
Some versions of Corel PHOTO-PAINT let you use only an earlier version of this adjustment, which is known as Replace Colors (Legacy).
The Replace Colors (Legacy) adjustment also lets you edit Replace Colors adjustments applied non-destructively to images that are saved to the previous version of Corel PHOTO-PAINT.
You can also replace colors non-destructively from the Effects docker and destructively from the Adjust menu.
Color Balance
The Color Balance filter lets you adjust the color balance of an image by shifting the colors between complementary pairs of the primary RGB color values and secondary CMY color values. This method is useful for correcting color casts. For example, if you want to tone down the red in a photo, you can shift the color values from red to cyan. You can also change the hue values to change the colors used in an image.
You can apply this adjustment non-destructively from the Effects docker and destructively from the Adjust menu.
Color Hue
The Color Hue filter lets you change the hue of an image by clicking sample thumbnails. For example, you can remove a yellow cast from an image by clicking a thumbnail that adds blue. The intensity of the effect increases by a specified amount each time you click the thumbnail. The thumbnails also let you preview the color hue adjustment.
You can apply this adjustment non-destructively from the Effects docker and destructively from the Adjust menu.
Color Tone
The Color Tone filter lets you change the brightness, saturation, and contrast of colors by clicking sample thumbnails. The intensity of the effect increases by a specified amount each time you click the thumbnail. The thumbnails also let you preview the color tone adjustment.
You can apply this adjustment non-destructively from the Effects docker and destructively from the Adjust menu.