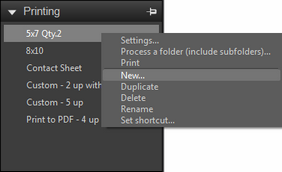
You can create new printing batches, duplicate a print batch, and delete a printing batch. You can also rename a print batch. Sometimes it is easier to duplicate an existing batch, and make modifications to this new copy, instead of making a new batch from scratch.
You can also assign a shortcut key to a printing batch. For example, P can be assigned to the 5x7 Qty. 2 batch, so at any time, you can simply press P to add the currently selected images to the 5x7 Qty. 2 printing batch in order to print the images quickly.

To create a new print batch
| 2. | Right-click a blank area of the Printing section, and choose New from the context menu. |
| 3. | In the Print Settings dialog box, choose the settings that you want to use for the batch. |
After you create the batch, it appears in the Printing section list and the Send selected files to print context menu. You can rename the batch in the Printing section list.
To duplicate a print batch
| 2. | In the Printing section, right-click a batch name and choose Duplicate from the context menu. |
To delete a print batch
| 2. | In the Printing section, right-click a batch name and choose Delete from the context menu. |
To rename a print batch
| 2. | Right-click a name in the Printing section, and choose Rename from the context menu. |
| 3. | Type a new name for the print batch. |
Tip: You can also double-click (slowly) a batch name in the Printing section, type a new name, and press Enter when finished.
To assign a shortcut key to a batch
| 2. | Right-click a batch name in the Printing section, and choose Set shortcut from the context menu. |
| 3. | Press the key or key combination that you want to use for a shortcut. The shortcut appears in the Set shortcut dialog box. |
© 2013 Corel Corporation


