Quick links to procedures on this page:
You can fill objects with vector or bitmap pattern fills, as well as two-color fills. A vector pattern fill is a more complex vector graphic composed of lines and fills. A vector fill can have color or transparent background. A bitmap pattern fill is a bitmap image whose complexity is determined by its size, image resolution, and bit depth. For information about two-color fills, see Applying two-color pattern fills.
CorelDRAW provides a collection of vector and bitmap patterns that you can access. You can browse the available pattern fills, search by keyword, mark fills as favorites, and sort fills. You can also download additional fill packs. For more information, see Finding and viewing fills and transparencies.
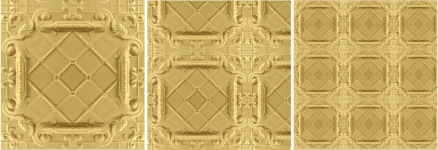
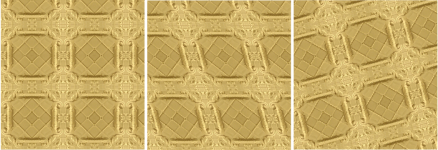
Examples of vector pattern fills
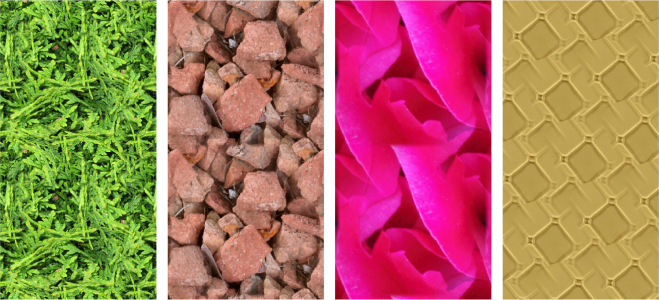
Examples of bitmap pattern fills
Modifying pattern fills
You can modify pattern fills to suit your needs. For example, you can change the size of the pattern fill, or move the center of the pattern left or right and up or down. CorelDRAW also lets you offset tiles in a fill.
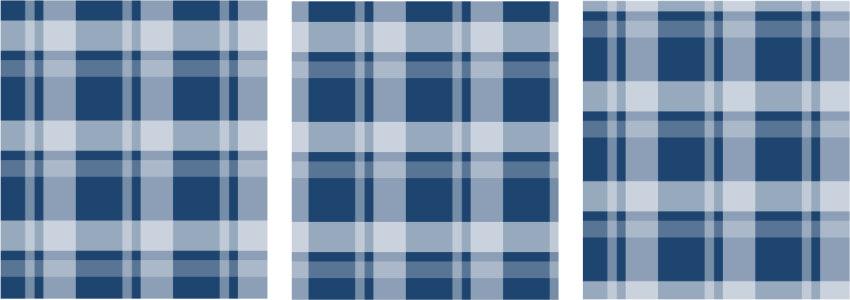
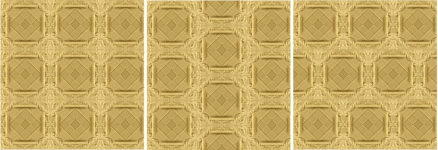
From left to right: Original vector pattern fill. The center of the pattern tile is moved to the right (middle). The center of the tile is moved down (right).
You can mirror the fill so that alternating tiles are reflections of each other. If you want a pattern fill to change according to actions you perform on the filled object, you can set the fill to transform with the object. For example, if you enlarge the object, the pattern becomes larger while the number of tiles remains the same.
The brightness and the contrast of bitmap patterns can be adjusted. You can also create a radial or linear seamless blend between the bitmap pattern tiles, and you can smooth the color transition between tiles by matching their edges. You can also adjust pattern parameters such as the brightness, luminance, and color contrast of the pattern.
Creating pattern fills
You can also create your own patterns. Vector and bitmap patterns are made up of smaller units called tiles. Depending on the size of the object, the pattern fill may consist of one or more tiles. The pattern is created by repeating the tile to fill up the object. You can create a new pattern by selecting an area of the workspace to use as a tile, or by using an imported image as a tile source.
After you create a new pattern, you can save it for future use. For more information, see Saving fills and transparencies.
| 2 . |
Click Object  Object properties. Object properties. |
| 3 . |
In the Object properties docker, click one of the following buttons: |
| 4 . |
Open the Fill picker, and double-click a pattern thumbnail. |

For information about how to find fills in the Fill picker, see To find, filter, and sort fills and transparencies.

You can also apply a fill by clicking a fill thumbnail in the Fill picker. This action applies the fill without closing the Fill picker.
You can also apply a vector or a bitmap pattern fill by clicking the Interactive fill tool  in the toolbox, clicking the Vector pattern fill or Bitmap pattern fill button on the property bar, and choosing a fill from the Fill picker.
| 2 . |
Click Object Object properties. |
| 3 . |
In the Fill area of the Object properties docker, click one of the following buttons: |
| 6 . |
Click the Accept button  displayed below the selection, and click OK in the dialog box that appears. displayed below the selection, and click OK in the dialog box that appears. |
Vector patterns can have transparent or color background.
You can also click the New source from workspace button  and select an area of the document to use as a tile source. In this case, the current settings in the Transformations area of the Object properties docker will apply to the new pattern.
| 2 . |
Click Object Object properties. |
| 3 . |
In the Fill area of the Object properties docker, click one of the following buttons: |
| 5 . |
In the Import dialog box, locate the image that you want to use, and double-click the filename. |
| 2 . |
Click Object Object properties. |
| 3 . |
In the Fill area of the Object properties docker, click one of the following buttons: |
You can also click the Interactive fill tool in the toolbox and use the controls on the property bar.
You can also skew or rotate tiles by clicking the Interactive fill tool in the toolbox, selecting an object, and dragging the skewing or rotation handles to change the appearance of the pattern.
| 2 . |
Click Object Object properties. |
| 3 . |
In the Fill area of the Object properties docker, click the Bitmap pattern fill  button. button. |
|
|
|
|
|
In the Seamless area, click the Radial blend button  , or click the Linear blend button  and move the slider.
|
|
|
Enable the Edge match check box, and move the slider.
|
|
|
Enable the Brightness check box, and move the slider.
|
|
|
Enable the Luminance check box, and move the slider.
|
|
|
Enable the Color check box, and move the slider.
|

Not all suite components documented in this Help are available in our Trial, Academic, and OEM versions. Unavailable components may include Corel applications, product features, third-party utilities, and extra content files.
Copyright 2018 Corel Corporation. All rights reserved.