Quick links to procedures on this page:
• |
• |
• |
• |
Image slicing lets you load a large image on a Web page one piece at a time by cutting it into several smaller files. The resulting files, or slices, can be for viewing only or can be clickable.
Slices can only be rectangular. If you want to create clickable areas in other shapes, you can use an image map instead. For more information about image maps, see Creating image maps.
To slice an image, you must first create a slice grid by placing horizontal and vertical slice lines on the image. You can create the slice grid automatically based on the placement of objects in an image, or create equal slices based on the number of columns and rows you specify. You can also import or export slice grids.
The slice grid creates an overlay in the image window. You can still access other features while you work on a sliced image. You also can hide the slice grid and overlay.
Once you have sliced an image, you can specify a filename. Individual slices can also be exported to different file formats and optimized separately. The default settings are applied to any slices that are not given specific properties. Slices that are not named are automatically given names based on their row and column location in the slice grid. For example, in a sliced image named “banner”, the slice in the first row and the first column is called “banner_r1c1”.
An image slice can also be a rollover. For more information about creating and editing rollovers, see Creating and editing rollovers.
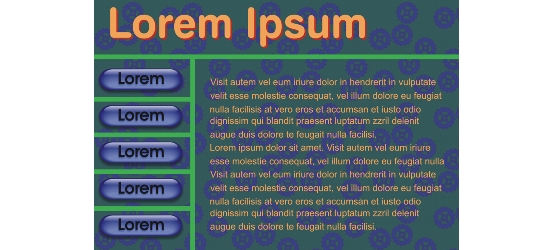
This sliced image features rollover buttons and slices with text that have been optimized separately. The green lines indicate the slice grid.
Once slice lines have been added, they can be moved or erased. To remove part of a slice line, you can select and merge adjacent slices. You can also remove the entire slice grid all at once. When you erase a slice line, you create one slice out of multiple slices. As a result, you lose the settings applied to the separate slices; the new, larger slice assumes the default settings.
When you finish slicing an image, you must export it. During export, Corel PHOTO-PAINT creates a folder containing the image slices.
If you already exported a sliced image, and opened it again to modify it, you can choose to export only the image slices.
You can optimize a sliced image from the Image slicing docker or when you export the image. You cannot specify settings for individual slices at this stage. You can also choose to optimize the whole image and drop all slices and their settings. For more information about optimizing images for the Web, see Exporting images for the Web.
| To slice an image |
1 |
Click the Image slicing tool |
2 |
On the property bar, click any of the following buttons to create a slice grid:
|
• |
Vertical slice button |
• |
Horizontal slice button |
• |
Auto-slice button |
• |
Equal slice button |
3 |
Click the Select slice button |
If you want to move a slice line, drag it to a new position on the image. |
4 |
Click an image slice.
|
5 |
In the Image slicing docker, enter the following information for the selected slice
or slices:
|
• |
Name — specifies a filename for the slice. If you do not type a filename, a
default name will be inserted based on the original image filename, and the
column and row placement of a slice.
|
6 |
In the Format area, choose a file format for the slice from the list box.
|
If you do not choose a file format, the image slice is automatically saved to the default file format. |
If you want to select multiple slices, hold down Shift, and click the slices.
|
To switch between the Horizontal slice and Vertical slice buttons, press
Shift.
|
| To display or hide the slice overlay and grid |
• |
Click View |
You cannot choose to display or hide the slice grid when the Image slicing tool
|
| To erase an image slice line |
1 |
Click the Image slicing tool |
2 |
Click the Erase line button |
3 |
Click a line to erase it.
|
If you want to erase all slices, click the Erase line button |
When a slice line is erased, the new combined slice reverts to the default
settings. Any settings that were applied to the individual slices are lost.
|
| To export a sliced image |
1 |
From the Export for Web dialog box, choose preset settings from the Preset list
box in the upper-right corner of the dialog box.
|
2 |
In the HTML and slices area, choose the Image and HTML option from the
Export list box.
|
3 |
Enable the Include slices check box.
|
4 |
Click Save as.
|
5 |
Choose the drive and folder where you want to store the files.
|
6 |
Type a filename in the File name box.
|
7 |
Click Save.
|
If the Slices option is not enabled, the slices and all settings assigned in the
Image slicing docker will not be applied to the exported image. If you choose
not to apply the slices and settings, you can choose a file format to apply to the
whole image from the Save as type list box.
|
If you have not used a Web-compatible filename, it is automatically corrected
during export. If you have inadvertently duplicated a filename, this is also
automatically corrected.
|
If you want to export only the image slices, enable the Image only option.
|
|
|
Copyright 2010 Corel Corporation. All rights reserved.