Quick links to procedures on this page:
• |
• |
You can create interesting landscapes by using fractal patterns. You can also convert a fractal pattern into a paper texture and save it to the Paper library. For more information, see Paper Texture and Grain.
When you create fractal patterns, the following controls allow you to fine-tune your creation:
• |
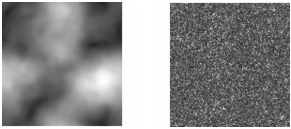
Power controls the intricacy of the pattern’s definition, as if you were “zooming” in
and out on a textured surface with a microscope.
|

The Power slider determines the degree of detail. The image on the left is set to -200% and the image on the right is set to 0%.
• |
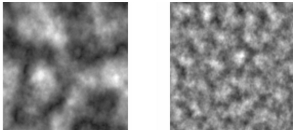
Feature Size defines the number of prominent features within the tile.
|

The Feature Size slider determines the number of repetitions per tile. The image on the left is set to 90% and the image on the right is set to 20%.
• |
Softness adjusts the edge softness of the pattern.
|
• |
Angle changes the direction from which you view the fractal.
|
• |
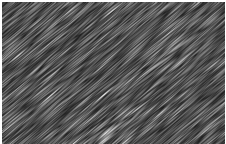
Thinness emphasizes the direction suggested by the lines of the fractal pattern.
Thinner lines produce a more linear look.
|
• |
Size determines the size of the tile you are creating. If your computer has a lot of
memory, you can make a large file with a high resolution. If you do not have a lot of
available memory on your computer, some of the size options may not be available.
|

Low Thinness settings display the fractal as streaks. Use the Angle slider to change the direction of streaking.
Corel Painter uses four channels to store graphic information: Red, Green, Blue, and Alpha. When creating fractal patterns, you can place information other than color values in these channels, which allows you to visualize this information in different ways.
| To create fractal patterns |
1 |
Choose Window |
2 |
In the Patterns panel, click the Pattern Options button |
3 |
The Make Fractal Pattern dialog box appears.
|
4 |
Perform a task from the following table.
|
5 |
In the Size area, enable the option that corresponds to the size of the tile that you
want to create.
|
6 |
From the Channel list box, choose one of the following options:
|
• |
Height as Luminance — displays pseudo-height information as luminance.
White areas are represented as peaks, and dark areas become depressions.
Images generated with this option can be used with the Apply Surface Texture
effect.
|
• |
Gradient Bearing — uses the Red channel to display the bearing of the down
angle of a height field
|
• |
Surface Normal — uses the Green and Blue channels to represent the X and Y
components of the surface normal (angle perpendicular to the surface at a given
point) of the height field (Green=X, Blue=Y)
|
Creating the new pattern may take some time. When the pattern file is ready, it appears in a new document window. |
7 |
In the Patterns panel, click the Pattern Options button, and choose Capture
Pattern.
|
8 |
In the Capture Pattern dialog box, type a name in the Name box.
|
The Gradient Bearing and Surface Normal options for viewing a fractal
texture are offered for purely aesthetic reasons. One way to take advantage of
them is to create color variations of the texture with the Adjust Colors feature.
|
![]()
To colorize a fractal pattern, you can replace the greyscale tones with colors
from a gradient fill by using the Express in Image feature. For information,
see To replace image colors with gradient colors.
|
| To convert a fractal pattern into a paper texture |
1 |
Choose Window |
2 |
In the Patterns panel, click the Pattern selector, and click a pattern in the Painter
Patterns library panel.
|
3 |
Click the Pattern Options button |
The fractal pattern is displayed in a new image window. |
4 |
Choose Effects |
For more information, see Equalizing Images. |
5 |
Choose Select |
6 |
Choose Window |
7 |
In the Papers panel, click the Pattern Options button, and choose Capture Paper.
|
8 |
In the Save Paper dialog box, set the crossfade to 0.00.
|
9 |
Type a name in the Name box.
|
|
|
Copyright 2012 Corel Corporation. All rights reserved.