Quick links to procedures on this page:
• |
• |
The GIF file format is widely used on the Web. Corel Painter lets you create Web-ready transparent and animated GIFs. To keep file sizes small and download times fast, you can easily reduce the number of colors in a GIF file without compromising its usability.
If designed correctly, GIFs with transparent areas are very effective when displayed over background colors or tiles.

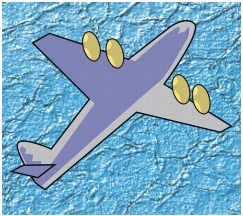
A GIF with a transparent background (the airplane) is displayed over a blue background image.
In Corel Painter, the method of defining transparency during GIF export is to define the transparent areas based on the content of the selected layers. The edges of the floating elements on the layers help define the transparent areas. For more information about layers, refer to Layers.
When saving to the GIF file format, you can reduce the number of colors, which translates into smaller files. For more information about reducing the number of colors, refer to Reducing the Number of Colors.
For information about other options available for saving GIF files, refer to Saving GIF Files.
| To create a transparent GIF from a layer or group of layers |
1 |
From the Layers panel, select a layer or group of layers.
|
To output transparency in a GIF, you need an active selection. |
2 |
Choose Select |
3 |
Choose File |
4 |
Choose GIF from the Save as type list box.
|
5 |
Specify a location and filename, and click Save.
|
6 |
In the Save As GIF Options dialog box, enable the Output Transparency check box
to make the selected area the only part of the canvas displayed on your Web page.
|
7 |
Enable one of the following options:
|
• |
Background is WWW Gray — sets the transparent color to 75% gray
|
• |
Background is BG Color — sets the transparent color using the additional
color specified in the Colors panel. Note that this setting does not refer to the
HTML page’s background color.
|
8 |
In the Preview window, verify that the selected area is correctly masked and that
the transparent area is correctly positioned. Transparent areas are designated with a
grid.
|
If necessary, drag in the Preview window to view all parts of the image. |
9 |
Choose one of the following imaging methods:
|
• |
Quantize to Nearest Color option — causes Corel Painter to look at each pixel
and pick the nearest color. This is useful when the image you are saving has
broad areas of a single color.
|
• |
Dither Colors option — causes Corel Painter to apply a stippled effect to the
colors chosen to generate a more accurate, less banded result. Unfortunately,
Dither Colors can reduce the effectiveness of GIF file compression.
|
The RIFF format contains image data that is lost when saving to GIF or
JPEG. To edit the file later, save a RIFF copy before saving to the GIF or
JPEG file format.
|
Corel Painter can open a QuickTime movie, which can be painted on, then saved as an animated GIF. Additionally, you can create a new movie or animation from scratch in Corel Painter and save it as an animated GIF, QuickTime, or Audio/Video Interleaved (AVI) movie.
For information about creating movies, refer to Creating a Movie. For information about creating and exporting animated GIFs, refer to Creating and Exporting Animations for the World Wide Web.
Web designers are always seeking a careful balance when creating graphics for the Web. Artwork and images must be as rich and vibrant as possible while remaining small and easily downloadable.
One way of keeping an image’s file size small is to reduce the number of colors used to create that graphic element. Reducing the number of colors used reduces file size and, therefore, download time.
A Web artist may end up saving multiple versions (varying in the number of colors used) of the same graphic element. These versions must then be placed on a page, loaded to the page, and viewed to determine if the quantity of colors used is acceptable. This whole process can be time-consuming and confusing.
In Corel Painter, you can make this decision during the process of saving the image to GIF format, by using the Preview window on the Save As GIF Options dialog box.
| To visually reduce the number of colors |
1 |
Choose File menu |
2 |
Choose the GIF file format, and click Save.
|
3 |
Click OK to dismiss the layer warning, if displayed.
|
4 |
In the Save As GIF Options dialog box, in the Number of Colors area, enable the
256 Colors option.
|
5 |
Enable the 128 Colors option.
|
In the Preview window, the image appears in 128 colors. |
6 |
Continue reducing the number of colors in the graphic until you find the minimum
number of colors necessary for adequate display on your Web page.
|
7 |
Enable the Quantize to Nearest Color option if you want Corel Painter to look at
each pixel and pick the nearest color. Enable Dither Colors if you want
Corel Painter to apply a pattern to the colors chosen to generate a more accurate,
less banded result.
|
You can now either save the graphic element to place on the Web page or return to Corel Painter to work on the design and color balance. |
The RIFF format contains data about your image that is lost when you
convert it to GIF. If you want to edit the file later, save a RIFF copy before
you generate a GIF version.
|
|
|
Copyright 2012 Corel Corporation. All rights reserved.